nagios运用飞信实现短信报警监控服务器
此平台是基于apache2.2.1+php5.3.0+nagios3.1.2+fetion2009等软件的组合搭建而出,这些软件的版本是现阶段最新的。本人经过一段时间的搭建与测试,各个功能都能够成功实现,现源于开源软件,本人却不敢独享,现把搭建与配置过程介绍如下:
一、服务器端的设置
1、下载需求软件:
nagios主程序:
http://prdownloads.sourceforge.net/sourceforge/nagios/nagios-3.1.2.tar.gz
nagios插件程序:
http://prdownloads.sourceforge.net/sourceforge/nagiosplug/nagios-plugins-1.4.13.tar.gz
apache程序:
http://apache.freelamp.com/httpd/httpd-2.2.11.tar.gz
php程序:
http://cn.php.net/distributions/php-5.3.0.tar.gz
libACE程序:
http://www.it-adv.net/fetion/downng/library_linux.tar.gz
fetion机器人程序:
http://www.it-adv.net/fetion/downng/fetion20090406003-linux.tar.gz
2、软件的安装
(1) apache的安装
[root@localhost httpd-2.2.11]# ./configure --prefix=/usr/local/apache --enable-so
[root@localhost httpd-2.2.11]# make && make install容
[root@localhost httpd-2.2.11]# make && make install容
(2) php的安装
[root@localhost php-5.2.10]# ./configure --prefix=/usr/local/php \
> --with-apxs2=/usr/local/apache/bin/apxs
[root@localhost php-5.2.10]# make && make install
[root@localhost php-5.2.10]# cp php.ini-dist /usr/local/lib/php.ini
[root@localhost php-5.2.10]# vi /usr/local/apache/conf/httpd.conf请
> --with-apxs2=/usr/local/apache/bin/apxs
[root@localhost php-5.2.10]# make && make install
[root@localhost php-5.2.10]# cp php.ini-dist /usr/local/lib/php.ini
[root@localhost php-5.2.10]# vi /usr/local/apache/conf/httpd.conf请
为了配置文件的工整,在配置文件的相关地方加入如下配置:
LoadModule php5_module modules/libphp5.so (如果有,不用加)
AddType application/x-httpd-php .php .html
找到DirectoryIndex index.html
改为: DirectoryIndex index.php index.html
在最后加入nagios的访问目录:
ScriptAlias /nagios/cgi-bin /usr/local/nagios/sbin
<Directory "/usr/local/nagios/sbin">
AuthType Basic
Options ExecCGI
AllowOverride None
Order allow,deny
Allow from all
</Directory>
Alias /nagios /usr/local/nagios/share
<Directory "/usr/local/nagios/share">
AuthType Basic
Options None
AllowOverride None
Order allow,deny
Allow from all
</Directory> 请输入内容
(3) nagios的安装
为了支持Nagios安装完后status map,trend等完全显示,需要gd库的支持,首先看一下gd与gd-devel有没有安装
 [root@localhost php-5.2.10]# rpm -qa|grep gd
gdb-6.5-37.el5
libgdiplus-1.2.5-1.el5.centos
gd-2.0.33-9.4.el5_1.1
gdbm-1.8.0-26.2.1
sysklogd-1.4.1-44.el5
libgdiplus-devel-1.2.5-1.el5.centos
gd-devel-2.0.33-9.4.el5_1.1
[root@localhost php-5.2.10]# rpm -qa|grep gd
gdb-6.5-37.el5
libgdiplus-1.2.5-1.el5.centos
gd-2.0.33-9.4.el5_1.1
gdbm-1.8.0-26.2.1
sysklogd-1.4.1-44.el5
libgdiplus-devel-1.2.5-1.el5.centos
gd-devel-2.0.33-9.4.el5_1.1
如果没有,请拿出光盘安装上,或者用yum -y install gd*安装也可
[root@localhost nagios-3.1.2]# useradd nagios
[root@localhost nagios-3.1.2]# ./configure --prefix=/usr/local/nagios \
> --with -gd-lib=/usr/lib --with-gd-inc=/usr/include --with-nagios-user=nagios \
> --with-nagios-group=nagios
[root@localhost nagios-3.1.2]# make all
[root@localhost nagios-3.1.2]# make install
[root@localhost nagios-3.1.2]# make install-init
[root@localhost nagios-3.1.2]# make install-commandmode
[root@localhost nagios-3.1.2]# make install-config
(4) nagios-plugin的安装
[root@localhost nagios-plugins-1.4.13]# ./configure --prefix=/usr/local/nagios
[root@localhost nagios-plugins-1.4.13]# make && make install
(5) 飞信机器人的安装
在安装飞信之前需要在/usr/lib目录下加上libACE库文件,以便使飞信能够正常使用
[root@localhost src]# tar zxvf library_linux.tar.gz
[root@localhost src]# mv libACE* libcrypto.so.0.9.8 libssl.so.0.9.8 /usr/lib
好了,现在来正式安装飞信
[root@localhost src]# tar zxvf fetion20090406003-linux.tar.gz
[root@localhost src]# mv install /usr/local/fetion
[root@localhost src]# chmod -R 755 /usr/local/fetion
[root@localhost src]# chown -R nagios:nagios /usr/local/fetion
测试飞信能否成功发送短信(发送对象需是自己飞信好友):
[root@localhost src]# /usr/local/fetion/fetion --mobile=137*** --pwd=*** \
> --to=136*** --msg-utf8="test"
如果136***能成功收到137***的短信就是正常的哟,如果不能成功看日志。
3、nagios的配置
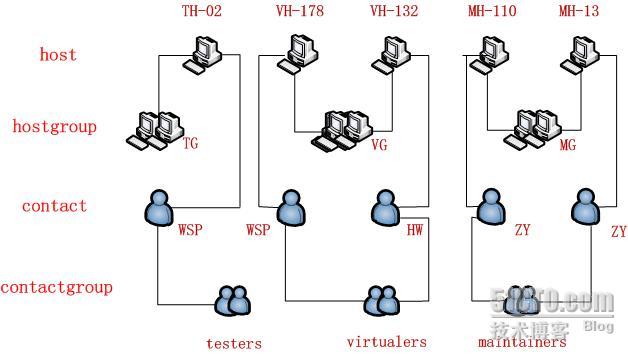
首先讲一下,我建有host(主机),hostgroup(主机组),contact(联系人),contactgroup(联系人组),分别讲一下它们的相关情况:
host包含:TH-02,VH-178,VH-132,MH-110,MH-13
hostgroup包含:TG(别名:testgroup) , VG(别名:virtualgroup),MG(别名:maintaingroup);TG包括主机:TH-02,VG包括主机:VH-132,VH-178,MG包括主机:MH-110,MH-13
contact包含:WSP,HW,ZY
contactgroup包含:testers,virtualers,maintainers;testers包含用户:WSP,virtualers包含用户:WSP和HW,maintainers包含用户:ZY
为了直观起见,请看下图,
好了,有了大致模块以后,现在我们正式开始配置nagios吧
(1) host的编辑与添加
为了灵活使用,我们直接进入/usr/local/nagios/etc/objects目录下面,
[root@localhost src]# cd /usr/local/nagios/etc/objects/
[root@localhost objects]# vi hosts.cfg
##########################################################################
### Define whole host for all the machines
# Define testgroup host for the testers machine
define host{
host_name TH-02
alias testhost02
max_check_attempts 5
contact_groups testers
address 60.191.*.*
}
# Define virtualgroup host for the virtualers machine
define host{
host_name VH-178
alias Virutalhost178
max_check_attempts 5
contact_groups virtualers
address *.*.*.178
}
define host{
host_name VH-132
alias Virtualhost132
max_check_attempts 5
contact_groups virtualers
address *.*.*.132
}
# Define maintaingroup host for the maintainers machine
define host{
host_name MH-110
alias maintainhost110
max_check_attempts 5
contact_groups maintainers
address *.*.*.110
}
define host{
host_name MH-13
alias maintainhost13
max_check_attempts 5
contact_groups maintainers
address *.*.*.13
}
##############################################################################
### Define all hostgroup for the whole machine
# Define testgroup
define hostgroup{
hostgroup_name TG
alias testgroup
members TH-02
}
# Define virtualgroup
define hostgroup{
hostgroup_name VG
alias virtualgroup
members VH-178,VH-132
}
# Define maintaingroup
define hostgroup{
hostgroup_name MG
alias maintaingroup
members MH-110,MH-13
}
#############################################################################
### SERVICE DEFINITIONS
# Define a service to "ping" the whole machine
define service{
host_name TH-02,VH-178,VH-132,MH-110
service_description PING
is_volatile 0
check_period 24x7
max_check_attempts 1
normal_check_interval 1
retry_check_interval 1
notification_options w,u,c,r
notification_interval 1
notification_period 24x7
check_command check_ping!100.0,20%!500.0,60%
}
# Define a service to "HTTP" the whole machine
define service{
host_name H-02,VH-178,VH-132,MH-13,MH-110
service_description HTTP
is_volatile 0
check_period 24x7
max_check_attempts 1
normal_check_interval 1
retry_check_interval 1
notification_options w,u,c,r
notification_interval 1
notification_period 24x7
check_command check_http
notifications_enabled 0
}
is_volatile 0
check_period 24x7
max_check_attempts 1
normal_check_interval 1
retry_check_interval 1
notification_options w,u,c,r
notification_interval 1
notification_period 24x7
check_command check_http
notifications_enabled 0
}
service 可以根据自己的需要加的,我这里只对HTTP与PING来作阐述的。
(2) contacts.cfg的编辑
###############################################################################
# CONTACTS.CFG - SAMPLE CONTACT/CONTACTGROUP DEFINITIONS
#
# Last Modified: 05-31-2007
#
# NOTES: This config file provides you with some example contact and contact
# group definitions that you can reference in host and service
# definitions.
#
# You don't need to keep these definitions in a separate file from your
# other object definitions. This has been done just to make things
# easier to understand.
#
###############################################################################
###############################################################################
###############################################################################
#
# CONTACTS
#
###############################################################################
###############################################################################
### Define contact information for all the contacter
# Define contact information for WSP
define contact{
contact_name WSP
use generic-contact
alias WY-wsp
service_notification_commands notify-service-by-email,service-notify-by-fei
host_notification_commands notify-host-by-email,host-notify-by-fei
email [email protected]
pager 150***
}
# Define contact information for HW
define contact{
contact_name HW
use generic-contact
alias WY-hw
service_notification_commands notify-service-by-email,service-notify-by-fei
host_notification_commands notify-host-by-email,host-notify-by-fei
email [email protected]
pager 135***
}
# Define contact information for ZY
define contact{
contact_name ZY
use generic-contact
alias WY-zy
service_notification_commands notify-service-by-email,service-notify-by-fei
host_notification_commands notify-host-by-email,host-notify-by-fei
email [email protected]
pager 150***
}
###############################################################################
###############################################################################
#
# CONTACT GROUPS
#
###############################################################################
###############################################################################
### Define contact group for all ther whole contacter
# Define testers contact group
define contactgroup{
contactgroup_name testers
alias testhost contacters
members WSP
}
# Define virtualers contact group
define contactgroup{
contactgroup_name virtualers
alias virtualhost contacters
members WSP,HW
}
# Define maintainers contact group
define contactgroup{
contactgroup_name maintainers
alias maintainhost contacters
members ZY
}
(3) commands.cfg的编辑
为了支持飞信发短信的功能需要在此文件中添加飞信命令,以促使信息的发送,代码如下:
# 'notify-host-by-fei' command definition
define command {
command_name host-notify-by-fei ;
command_line /usr/local/fetion/fetion --mobile=137*** --pwd=*** --to=$CONTACTPAGER$ --msg-utf8="Host $HOSTSTATE$ alert for $HOSTNAME$! on '$LONGDATETIME$'" $CONTACTPAGER$
}
# 'notify-service-by-fei' command definition
define command {
command_name service-notify-by-fei
command_line /usr/local/fetion/fetion --mobile=137*** --pwd=*** --to=$CONTACTPAGER$ --msg-utf8="$HOSTADDRESS$ $HOSTALIAS$/$SERVICEDESC$ is $SERVICESTATE$ on $LONGDATETIME$" $CONTACTPAGER$
}
(4) 编辑nagios.cfg
为了不监控本机,现把localhost注释掉,找到此行,并且加以注释:
# cfg_file=/usr/local/nagios/etc/objects/localhost.cfg
为了使刚才编辑的文件生效,需加入一行:
cfg_file=/usr/local/nagios/etc/objects/hosts.cfg
(5) 编辑cgi.cfg
为了保证权限能正常访问nagios的web页面,需把这些行的值改掉:
authorized_for_system_information=*
authorized_for_configuration_information=*
authorized_for_system_commands=nagios
authorized_for_all_services=*
authorized_for_all_hosts=*
authorized_for_all_service_commands=*
authorized_for_all_host_commands=*
*号在此表示所有用户,也可以改成相关用户,不过必须逐一添加。
服务器端的配置基本上大致如此了。
4、启动nagios与apache服务
(1) nagios自启动
[root@localhost objects]# service nagios restart
Running configuration check...done.
Stopping nagios: done.
Starting nagios: done.
[root@localhost objects]# chkconfig nagios on
[root@localhost objects]# chkconfig --list|grep nagios
nagios 0:关闭 1:关闭 2:启用 3:启用 4:启用 5:启用 6:关闭
(2) apache的启动
[root@localhost ~]# export PATH=$PATH:/usr/local/apache/bin
[root@localhost ~]# apachectl -k start
httpd (pid 3108) already running
注:为了让apache可以自启动,可以加入到/etc/rc.local之中。
5、测试与浏览
在启动nagios服务之前,我们可以先测试一下是否配置有没有错误,或者你启动的时候出现错误也可以用下述命令进行测试
[root@localhost ~]# /usr/local/nagios/bin/nagios -v /usr/local/nagios/etc/nagios.cfg
Nagios 3.1.2
Copyright (c) 2009 Nagios Core Development Team and Community Contributors
Copyright (c) 1999-2009 Ethan Galstad
Last Modified: 06-23-2009
License: GPL
Website: http://www.nagios.org
Reading configuration data...
Read main config file okay...
Processing object config file '/usr/local/nagios/etc/objects/commands.cfg'...
Processing object config file '/usr/local/nagios/etc/objects/contacts.cfg'...
Processing object config file '/usr/local/nagios/etc/objects/timeperiods.cfg'...
Processing object config file '/usr/local/nagios/etc/objects/templates.cfg'...
Processing object config file '/usr/local/nagios/etc/objects/hosts.cfg'...
Read object config files okay...
Running pre-flight check on configuration data...
Checking services...
Checked 9 services.
Checking hosts...
Checked 5 hosts.
Checking host groups...
Checked 3 host groups.
Checking service groups...
Checked 0 service groups.
Checking contacts...
Checked 3 contacts.
Checking contact groups...
Checked 3 contact groups.
Checking service escalations...
Checked 0 service escalations.
Checking service dependencies...
Checked 0 service dependencies.
Checking host escalations...
Checked 0 host escalations.
Checking host dependencies...
Checked 0 host dependencies.
Checking commands...
Checked 26 commands.
Checking time periods...
Checked 5 time periods.
Checking for circular paths between hosts...
Checking for circular host and service dependencies...
Checking global event handlers...
Checking obsessive compulsive processor commands...
Checking misc settings...
Total Warnings: 0
Total Errors: 0
呵呵,没有错误,可能您在配置之前或多或少会出现问题的,根据相关错误提示,逐一排查,相信您定会成功的。
现在我们打开nagios的web页面,输入: http://***.com/nagios样例
先看map页面,大致页面如下
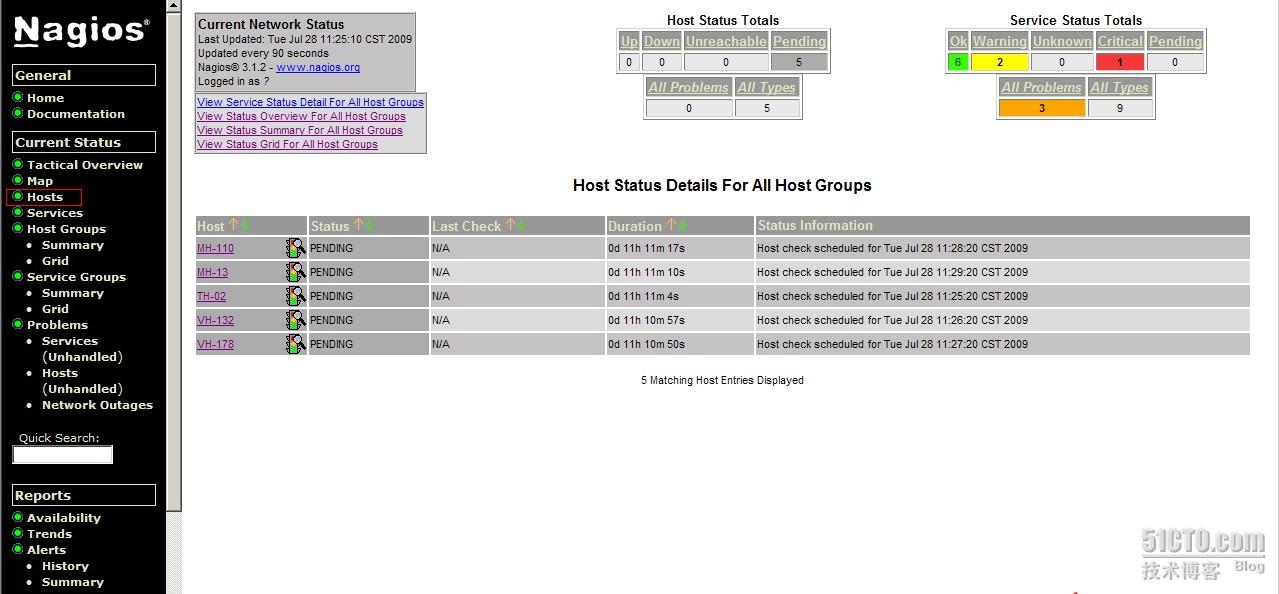
再看hosts相关链接页面:

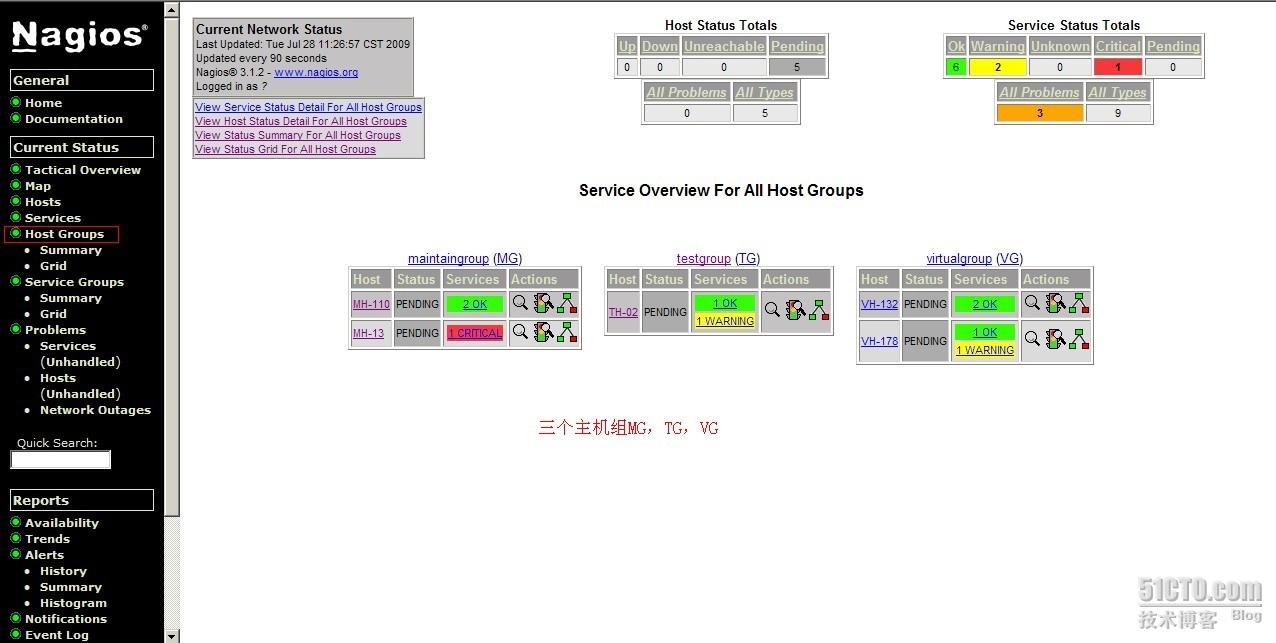
最后,我们再看一下hostgroups页面:
二、客户端的配置:
1、需求软件的下载:
nagios插件程序:
http://prdownloads.sourceforge.net/sourceforge/nagiosplug/nagios-plugins-1.4.13.tar.gz
nrpe软件:
http://prdownloads.sourceforge.net/sourceforge/nagios/nrpe-2.12.tar.gz
2、软件的安装
(1) nagios插件的安装:
首先在安装前建立nagios用户,命令如下:
[root@yibaner src]# useradd nagios -s /sbin/nologin -M
[root@yibaner src]# tar zxvf nagios-plugins-1.4.13.tar.gz
[root@yibaner src]# cd nagios-plugins-1.4.13
[root@yibaner nagios-plugins-1.4.13]# ./configure --prefix=/usr/local/nagios
[root@yibaner nagios-plugins-1.4.13]# make && make install
[root@yibaner nagios-plugins-1.4.13]# chown -R nagios.nagios /usr/local/nagios/
(2) nrpe的程序的安装:
[root@yibaner src]# tar zxvf nrpe-2.12.tar.gz
[root@yibaner nrpe-2.12]# cd nrpe-2.12
[root@yibaner nrpe-2.12]# ./configure
[root@yibaner nrpe-2.12]# make all
[root@yibaner nrpe-2.12]# make install-plugin
[root@yibaner nrpe-2.12]# make install-daemon
[root@yibaner nrpe-2.12]# make install-daemon-config
(3) 修改nrpe.cfg配置文件:
[root@yibaner nrpe-2.12]# vi /usr/local/nagios/etc/nrpe.cfg
将server_address的值修改为本机的IP地址:
server_address=*.*.*.110
将allowed_hosts的值修改为远程监控服务器的IP地址:
allowed_hosts=*.*.*.27
(4) 运行nrpe服务:
[root@yibaner nrpe-2.12]# /usr/local/nagios/bin/nrpe -c /usr/local/nagios/etc/nrpe.cfg -d
(5) 查看nrpe运行情况:
[root@yibaner nrpe-2.12]# netstat -nap | grep nrpe
tcp 0 0 *.*.*.110:5666 0.0.0.0:* LISTEN 3538/nrpe
从上述情况来看,nrpe成功运行,并且占用了5666端口
(6) 设置nrpe自启动:
[root@yibaner nrpe-2.12]#vi /etc/rc.local
在其中加中此行:
/usr/local/nagios/bin/nrpe -c /usr/local/nagios/etc/nrpe.cfg -d
(7) 在监控服务器端测试被监控服务器是否正常运行
[root@localhost src]# telnet *.*.*.110 5666
测试如果一切正常,整个配置过程全部告一段落,只需到监控服务器中设置对被监控服务器的所需服务的监控即可。
这样一来,整个nagios的配置全部告一段落了,把被监控服务器的某个服务暂时停用一下,马上就会收到飞信的短消息了,一切表明,配置成功了。