CentOS Postfix 安装构架全解
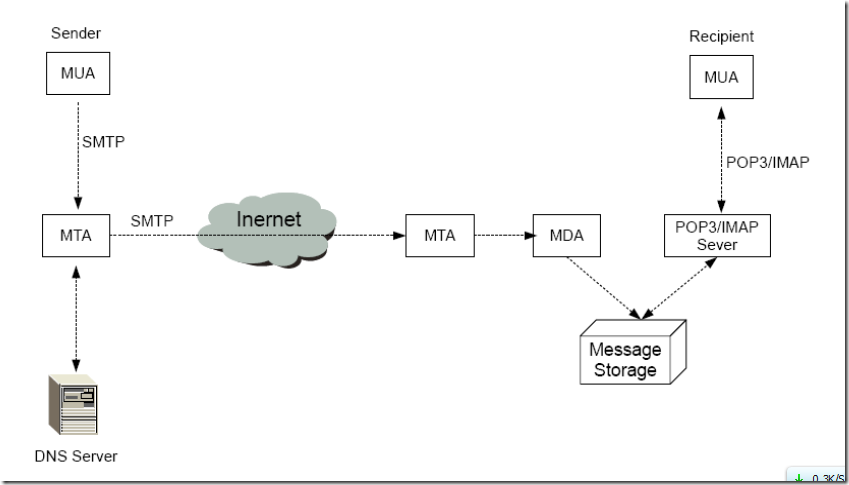
邮件代理
1. MUA ( Mail User Agent )
提供用户写信、读信、寄信、收信的软件。寄信的时候通过SMTP协议将邮件交给MTA ,收信的时候
使用POP3或IMAP协议访问服务器上的用户邮箱。
比较常见的MUA软件有 ThunderBird ,FoxMail ,Eudora ,mutt , Evolution的C/S结构的,也
有像SquirrelMail ,openwebmail,RoundCube ,sqwebmail 等B/S结构的MUA程序。
2. MTA ( Mail Transfer Agent )
提供接收、传递邮件的服务器软件。决定邮件传递的路径,进行必要的改写地址改写。如果是自己
所管辖的域的邮件,就收下邮件,交给MDA进行最后的投递。
比较著名的MTA 有sendmail ,postfix ,qmail ,extm ,Courier(其中包括mta,mda等)等,
还有一些非开源的。
3. MDA ( Mail Delivery Agent )
MDA是被MTA调用,负责将邮件投递到用户的邮箱。MDA也可以过滤邮件内容,或是按照用户的规则,
将邮件分类到适当的邮箱;甚至可以将邮件转回给MTA,以寄到另一个邮箱中。
在类Unix的系统中,procmail和maildrop是比较著名的MDA程序,在dovecot软件中也有MDA的功
能。

postfix与其他组件之间的关系
![clipboard[1] clipboard[1]](http://img1.51cto.com/attachment/201207/26/2721425_1343286747zlmy.png)
1.了解基本概念和原理后,进行安装操作。先确定自己安装的系统
![clipboard[2] clipboard[2]](http://img1.51cto.com/attachment/201207/26/2721425_1343286747CPpm.png)
2.配置主机名
编辑/etc/hosts
127.0.0.1 localhost.localdomain localhost
192.168.1.210 pretty.girl.face
编辑/etc/sysconfig/network 文件,修改HOSTNAME的值
HOSTNAME=pretty.girl.face
更新系统
yum update -y
reboot
3.安装基本软件包
1)安装编译软件
yum install -y gcc gcc-c++ rpm-build autoconf automake
2)安装apache,php,mysql
yum install -y mysql mysql-server mysql-devel
yum install -y httpd mod_ssl php php-mysql php-mbstring php-imap php-pear-DB
启动httpd
/etc/init.d/httpd start
启动mysqld
/etc/init.d/mysqld start
3 ).验证apache,php,mysql是否正确安装
echo "<?php
phpinfo();
?>" > /var/www/html/test.php
访问,http://192.168.1.210/test.php,检查是否支持mysql,imap功能。
4.安装mail工具
yum -y install mutt
5.卸载sendmail
yum -y remove sendmail
6.安装postfix
yum -y install postfix
7.编辑/etc/postfix/main.cf
1)设置主机名
myhostname = pretty.girl.face
2)发信时所显示的“发信源主机”项目
myorigin = $myhostname
3)设置postfix的监听端口
inet_interfaces = all
4)设置能够“收信的主机名称”(目的地地址)
mydestination = $myhostname,localhost. $mydomain,localhost, $mydomain
5)指定信任网段类型
mynetworks_style= host
6)指定信任的客户端
mynetworks = 192.168.1.0/24, 127.0.0.0/8
7)指定允许中转邮件的域名
relay_domains = $mydestination
8) 设置邮件的别名
alias_maps = hash:/etc/aliases
4.启动postfix服务,并设置为开机启动
chkconfig postfix on
/etc/init.d/postfix restart
netstat -tlnup | grep 25
![clipboard[3] clipboard[3]](http://img1.51cto.com/attachment/201207/26/2721425_1343286748eHs1.png)
5.安装dovecot,cyrus-sasl并进行设置
yum -y install dovecot cyrus-sasl
vim /etc/dovecot.conf
protocols = pop3
listen = *
测试一下好了
![clipboard[4] clipboard[4]](http://img1.51cto.com/attachment/201207/26/2721425_13432867481b38.png)
查收一下
![clipboard[5] clipboard[5]](http://img1.51cto.com/attachment/201207/26/2721425_1343286752jpmv.png)
6.设置postfix支持smtp认证
1)运行saslauthd -v
![clipboard[6] clipboard[6]](http://img1.51cto.com/attachment/201207/26/2721425_13432867525fcA.png)
可以显示saslauthd支持的认证机制
2)编辑/etc/sysconfig/saslauthd文件,确认为
MECH=shadow
3)启动saslauthd
service saslauthd start
/usr/sbin/testsaslauthd -u user -p 'password'可以尝试测试saslauthd认证是否生效
![]()
4)设置postfix支持smtp认证
在main.cf文件中更改如下:
smtpd_sasl_auth_enable = yes
smtpd_sasl_local_domain = ''
smtpd_recipient_restrictions = permit_mynetworks,permit_sasl_authenticated,reject_unauth_destination
broken_sasl_auth_clients=yes
smtpd_client_restrictions = permit_sasl_authenticated
smtpd_sasl_security_options = noanonymous
5)测试SMTP认证是否成功
由于刚才配置的postfix的SMTP用户身份认证采用的不是明文方式,所以要首先计算出自己的用户名和密码才行。通过perl命令就可以算出来
![]()
![clipboard[9] clipboard[9]](http://img1.51cto.com/attachment/201207/26/2721425_1343286753nyPi.png)
期间遇到,
telnet: Unable to connect to remote host: Connection refused
查询可能是xinted服务没有启动。
service xinted start
至此,说明配置postfix服务器SMTP用户认证成功。
尝试设置客户端
![clipboard[10] clipboard[10]](http://img1.51cto.com/attachment/201207/26/2721425_1343286754HRLj.png)
尝试发送邮件
![clipboard[11] clipboard[11]](http://img1.51cto.com/attachment/201207/26/2721425_1343286755IQdN.png)
说明服务器运行正常。
postfix服务只是一个MTA(邮件传输代理),它只提供SMTP服务,也就是只提供转发和本地分发的功能。要实现一台服务器既作为邮件发送服务,又可以保存邮件,还必须安装POP3或IMAP服务。那么这台主机也就称作为邮件服务器。2个软件可以同时提供POP3和IMAP服务:Dovecot和cyrus-imapd。
6)以web方式收发电子邮件-SquirreMail安装与配置
http://www.squirrelmail.org下载地址
squirrelmail-webmail-1.4.22.tar.gz(软件)
all_locales-1.4.18-20090526.tar.gz(语言包)
![clipboard[12] clipboard[12]](http://img1.51cto.com/attachment/201207/26/2721425_1343286755aNxu.png)
tar zxvf squirrelmail-webmail-1.4.22.tar.gz -C /var/www/html/
cd /var/www/html
mv squirrelmail-webmail-1.4.22/ webmail
cd webmail/
创建及调整数据目录
![clipboard[13] clipboard[13]](http://img1.51cto.com/attachment/201207/26/2721425_1343286765trSW.png)
建立config.php配置文件
cp config/config_default.php config/config.php
vi config/config.php
$squirrelmail_default_language = 'zh_CN';
$default_charset = 'zh_CN.UTF-8';
$domain = 'pretty.girl.face';
$smtpServerAddress = '192.168.1.210'; //设置发信服务器地址及端口
$smtpPort = 25;
$imap_server_type = 'dovecot'; //设置收信人服务器地址及端口
$imapPort = 143;
$data_dir = '/var/www/html/webmail/data/'; //设置数据保存路径
$attachment_dir = '/var/www/html/webmail/user/';
在web中尝试
![clipboard[14] clipboard[14]](http://img1.51cto.com/attachment/201207/26/2721425_1343286766bs6H.png)
![clipboard[15] clipboard[15]](http://img1.51cto.com/attachment/201207/26/2721425_1343286767s7sh.png)
注:确保Web服务器有权限读取和写在PHP的配置指令session.save_path的指定目录(vim /etc/php.ini)
![clipboard[16] clipboard[16]](http://img1.51cto.com/attachment/201207/26/2721425_1343286767qsgV.png)
简单的webmail收发就设置完成了。