linux kickstart无人值守安装实现多版本的引导
网络安装 客户端的网卡需要支持PXE 无人值守 无人值守是通过Kickstart来实现的kickstart是安装过程中的一个"应答文件"
安装系统= 引导部分 + 安装部分(安装源)
安装系统的方式
1.本地安装 光盘、U盘、iso 缺点 操作性差效率低不便于部署大规模服务器
2.网络安装 PXE和kickstart PXE能够实现网络引导安装配合kickstart可实现全自动无人值守安装
引导系统的方式 1. 本地引导 2. 网络引导
用到的软件
dhcp-------tftp-----------syslinux------nfs/ftp/http----------kickstart + ISO镜像文件
| | | | | | |
分配IP 传输文件 网络引导程序 指定安装源 实现自动安装 安装文件rpm包
| | |
pxelinux.0\vmlinuz\initrd rpm包所在的路径 安装的应答文件
安装系统主要分为两步 1.引导――光盘网络引导 2.安装源――本地光盘也可以通过网络
前提环境
1、客户端可以是裸机客户端和服务器必须处于同一网络环境必须能相互沟通――>确保能够正常通信(通过域名的方式安装OS确保DNS能够正常解析)
2、客户端的网卡必须拥有 PXE ROM preboot execution Enviroment芯片――网络预启动
3、BIOS 开启网络启动功能。
原理和过程===================================
1、 客户端启动BIOS如果支持网络引导启动顺序在先PXE ROM 调入内存执行。
发送UDP广播包――――>dhcp服务器能回应――――>给客户端指定IP地址同时指定tftp地址指定下载文件名
2、 客户端通过dhcp服务器分配的tftp服务器tftp=trivial file transfer protocol 细小文件传输协议
从tftp服务器传输(pxelinux.0)文件到本地
3、读取pxelinux.0根据内容请求tftp服务器传送配置文件 pxelinux.cfg/deault的vmlinuz和initrd文件
4、再读取配置文件 pxelinux.cfg 拿到启动资源――>获得ks.cfg文件
vmlinuz initrd.img boot.msg ks.cfg 获取NFS安装源的地址和路径
5、从ks.cfg文件中获得安装源所在的路径可以使用ftp、http、nfs获得安装源所在的路径通常建议使用nfs其传输效率是最高的
1. [root@oracle80 ~]# yum -y install dhcp dhclient
[root@oracle80 ~]# service dhcpd start 开启
[root@oracle80 ~]# service dhcpd restart 重启
配置dhcp服务器
[root@oracle80 ~]# vim /etc/dhcpd.conf
ddns-update-style interim;
ignore client-updates;
next-server 192.168.2.200;
filename"pxelinux.0";
subnet 192.168.2.0 netmask 255.255.255.0 {
# --- default gateway
option routers 192.168.2.1;
option subnet-mask 255.255.255.0;
option nis-domain "domain.org";
option domain-name "example.com";
option domain-name-servers 192.168.2.1;
option time-offset -18000; # Eastern Standard Time
# option ntp-servers 192.168.2.1;
# option netbios-name-servers 192.168.2.1;
# --- Selects point-to-point node (default is hybrid). Don't change this unless
# -- you understand Netbios very well
# option netbios-node-type 2;
range dynamic-bootp 192.168.2.150 192.168.2.180;
default-lease-time 21600;
max-lease-time 43200;
# we want the nameserver to appear at a fixed address
host ns {
allow bootp;
allow booting;
hardware ethernet 12:34:56:78:AB:CD;
fixed-address 207.175.42.254;
}
}
2.安装vsftpd服务
[root@oracle80 ~]# yum install vsftpd
====服务管理====
[root@oracle80 ~]# service vsftpd start开启
[root@oracle80 ~]# service vsftpd stop关闭
[root@oracle80 ~]# service vsftpdrestart
用法:/etc/init.d/vsftpd {start|stop|restart|condrestart|status}
vsftpd服务的主配置文件是/etc/vsftpd/vsftpd.conf
[root@oracle80 ~]# vim /etc/vsftpd/vsftpd.conf
anonymous_enable=YES 允许匿名用户登录(ftp和anonymous)默认匿名用是ftp、anonymous
local_enable=YES 允许本地用户(在/etc/passwd文件中的用户)
write_enable=YES 允许本地用户写,即上传文件的权限
local_umask=022 本地上传文件的权限的umask(目录为755,文件为644)
dirmessage_enable=YES 切换目录显示提示信息,在目录下有.message的文件只能通过ftp工具才能看到!
xferlog_enable=YES 开启日志审计功能,对应的日志文件在/var/log/xferlog.log,记录用户上传下载等信息
connect_from_port_20=YES 数据连接端口,启动主动模式
xferlog_std_format=YES 启用标准日志格式,是否启用Wu-ftp格式的日志记录
listen=YES 选择启动服务的类型,YES为独立启动服务,NO为xinetd服务
pam_service_name=vsftpdPAM 认证模块的配置文件,在/etc/pam.d/下有个vsftpd的文件
userlist_enable=YES 开启禁止登陆vsftpd服务列表,为YES时,在/etc/vsftpd/ftpuser不能登录,userlist_enable=NO时则相反
tcp_wrappers=YES 支持TCP_Wraper功能,对应的配置文件是/etc/hosts.allow和/etc/hosts.deny两个
====配置文件帮助参考man 5 vsftpd.conf====
3. 安装和配置tftp-server并拷贝启动所需的文件
[root@oracle80 ~]# yum install tftp-server
[root@oracle80 ~]# chkconfig tftp on 启动tftp服务器
[root@oracle80~]# chkconfig tftp --list
tftp 启用
tftp服务器的配置
[root@oracle80 ~]# vim /etc/xinetd.d/tftp
service tftp
{
socket_type = dgram
protocol = udp
wait = yes
user = root
server = /usr/sbin/in.tftpd
server_args = -s /tftpboot
disable = yes 将yes修改为no表示开启tftp服务器如果是yes则表示关闭
per_source = 11
cps = 100 2
flags = IPv4
[root@oracle80 tftpboot]# cp /usr/lib/syslinux/pxelinux.0 /tftpboot/ 拷贝网络启动文件
[root@oracle80 ~]# mkdir /tftpboot/pxelinux.cfg
[root@oracle80~]# cp /mnt/cdrom/isolinux/* /tftpboot/
[root@oracle80 tftpboot]# mv isolinux.cfg pxelinux.cfg/default
[root@oracle80 tftpboot]# cat pxelinux.cfg/default
default linux5 默认启动的标签名label名
超时后自动启动的标签名或者直接按下回车启动的标签名
timeout 600 等待超时时间时间到后默认启动default中定义的标签
display boot.msg 显示boot.msg文件中的提示信息
boot.msg存放在 /tftpboot目录下可以自定义
prompt 1 启动的时候是否等待选择。
label linux5 自定义标签每个label对应一个启动项。
本label命名为linux lable命名不能重复等待调用
kernel vmlinuz5 定义该label要启动的内核文件名称
append initrd=initrd5.img 定义该lable要启动的镜像文件的名称
4. 配置网络安装部分实现网络安装 首先创建两个目录来存放镜像文件
[root@oracle80 pub]# mkdir rhel5
[root@oracle80 pub]# mkdir centos
[root@oracle80 iso]# mount -o loop rhel-server-5.8-x86_64-dvd.iso /var/ftp/pub/rhel5/
[root@oracle80 iso]# mount -o loop CentOS-5.5-x86_64-bin-DVD-1.iso /var/ftp/pub/centos/
[root@oracle80 iso]# df
/var/ftp/iso/CentOS-5.5-x86_64-bin-DVD-1.iso
4290746 4290746 0 100% /var/ftp/pub/centos
/var/ftp/iso/rhel-server-5.8-x86_64-dvd.iso
4028944 4028944 0 100% /var/ftp/pub/rhel5
这是刚才挂载的镜像文件
创建两个目录用来存放引导文件的
[root@oracle80 tftpboot]# mkdir /rhel5
[root@oracle80 tftpboot]# mkdir /centos
[root@oracle80 tftpboot]# cd /var/ftp/pub/rhel5/
[root@oracle80 rhel5]# cd isolinux/
[root@oracle80 isolinux]# cp vmlinuz initrd.img /tftpboot/rhel5/ 拷贝vmlinuz 和 initrd 两个文件过来做引导
[root@oracle80 isolinux]# cd /var/ftp/pub/centos/
[root@oracle80 centos]# cd isolinux/
[root@oracle80 isolinux]# cp vmlinuz initrd.img /tftpboot/centos/ 与上面一样也是拷贝两个文件过来
[root@oracle80 ]# vim /tftpboot/pxelinux.cfg/default
default linux
prompt 1
timeout 100
display boot.msg
F1 boot.msg
F2 options.msg
F3 general.msg
F4 param.msg
F5 rescue.msg
label linux
kernel vmlinuz
append initrd=initrd.img
label rhel5 自己自定义的
kernel rhel5/vmlinuz
append initrd=rhel5/initrd.img 安装rhel的标签
label centos
kernel centos/vmlinuz
append initrd=centos/initrd.img 安装centos的标签
5. 编辑boot.msg文件告知客户端显示的内容
[root@oracle80 ~]# cat /tftpboot/boot.msg
splash.lss
- To install or upgrade in graphical mode, press the 01<ENTER>07 key.
- To install or upgrade in text mode, type: 01linux text <ENTER>07.
- To install rhel5,press the 01 rhel5<ENTER>07 key.
- To install centos,press the 01 centos<ENTER>07 key.
- Use the function keys listed below for more information.
0f[F1-Main] [F2-Options] [F3-General] [F4-Kernel] [F5-Rescue]07
6.[root@oracle80 ~]# yum -y install portmap nfs-utils
[root@oracle80 ~]# service portmap start 注意要确保portmap服务优先于nfs服务启动否者nfs服务启动失败
[root@oracle80 ~]# service nfs start
[root@oracle80 ~]# service nfs restart
7.配置ftp采用匿名 并配置nfs服务共享以上的目
[root@oracle80 iso]# vim /etc/exports
/var/ftp/pub/rhel5 *(ro)
/var/ftp/pub/centos *(ro)
8.然后客户端来测试下使用nfs直接指定绝对路径采用ftp和http则需要相对路径
nfs server 192.168.2.200 对应的目录/var/ftp/pub/rhel5
ftp server: 192.168.2.200 对应的目录/pub/rhel5
其他的类比如centos则
nfs server 192.168.2.200 对应的目录/var/ftp/pub/centos
ftp server: 192.168.2.200 对应的目录/pub/centos
下面实现网络安装的过程中无人值守
获得kickstart的脚本的方法==================================
==== 1:安装kickstart 确保有图形界面------------------------
yum install -y system-config-kickstart
2. 运行 system-config-kickstart 启动Kickstart
进行相关的设置基本和安装系统一致
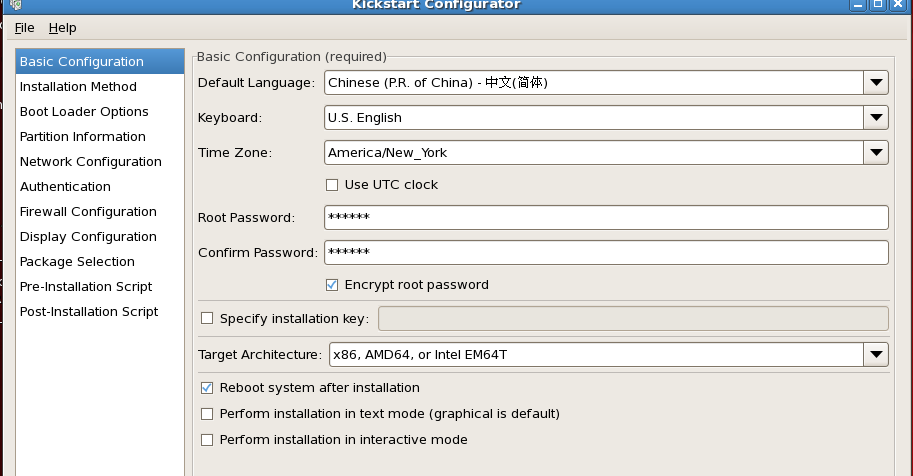
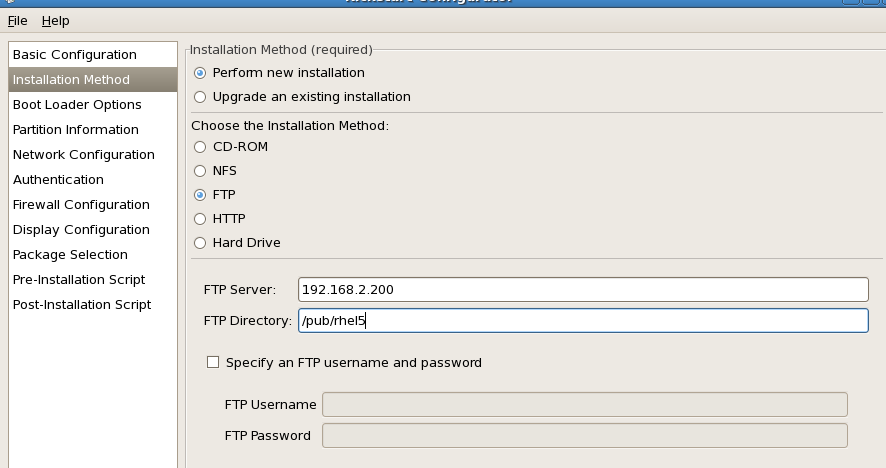
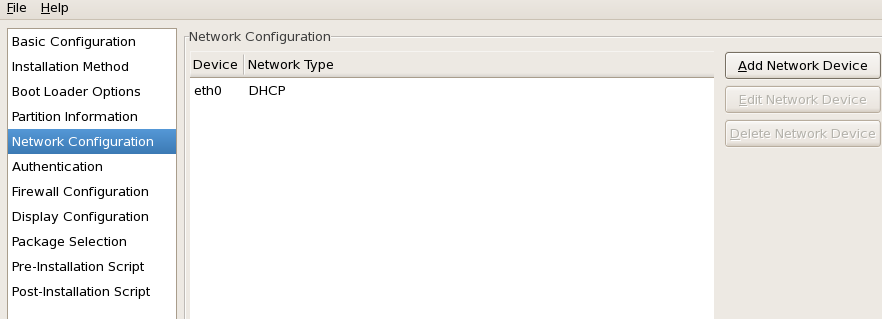


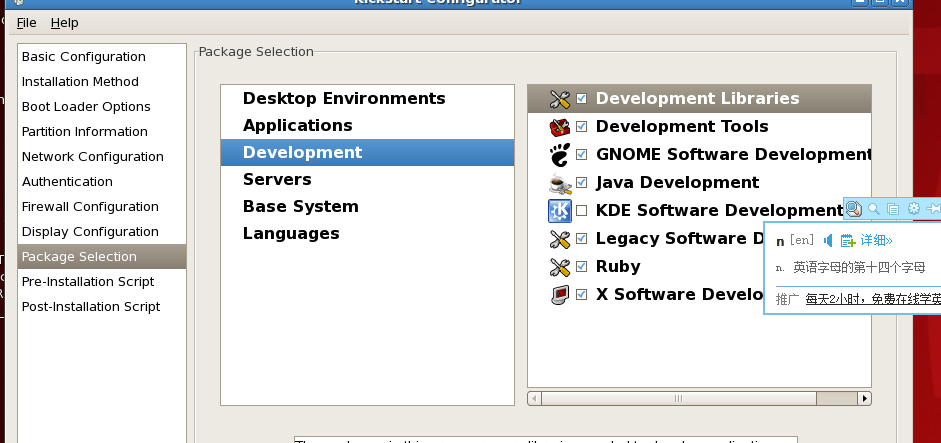
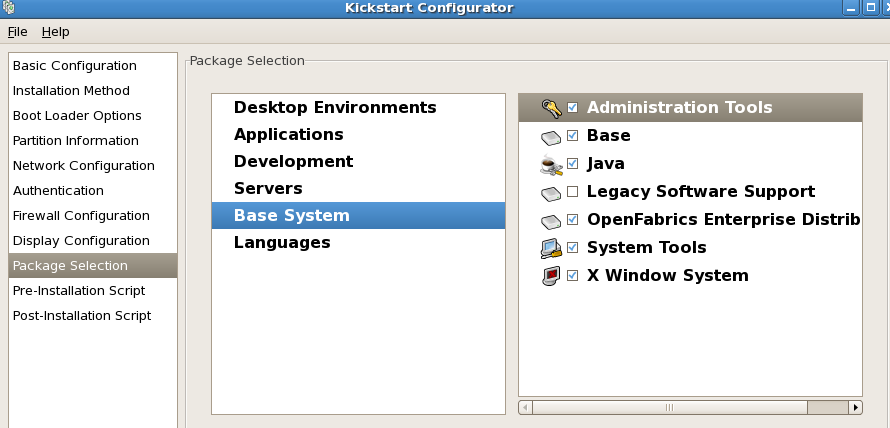

让客户端能够下载得到 ks.cfg
把ks.cfg 移动到/var/ftp/pub底下
mv ks.cfg /var/ftp/pub
客户端下载ks.cfg文件的方式类似于安装源可以通过nfs、ftp、http的方式指定使用nfs直接指定绝对路径采用ftp和http则需要相对路径
[root@oracle80 ~]# cat /etc/exports
/var/ftp/pub/rhel5 *(ro) 这个是存放镜像
/var/ftp/pub *(ro) 这个是存放ks.cfg文件
/var/ftp/pub/centos *(ro) 这个是存放镜像
指定客户端读取ks.cfg
编辑启动配置文件 /tftpboot/pxelinux.cfg/default
在对应的label中 () append中指定kc.cfg所在位置。
[root@oracle80 ~]# vim /tftpboot/pxelinux.cfg/default
default rhel5
prompt 1
timeout 600
display boot.msg
F1 boot.msg
F2 options.msg
F3 general.msg
F4 param.msg
F5 rescue.msg
label rhel5
kernel vmlinuz
append initrd=initrd.img ks=ks=ftp://192.168.2.200/pub/ks.cfg 追加版本rhel5的ks文件
label centos
kernel centos/vmlinuz
append initrd=centos/initrd.img ks=ftp://192.168.2.200/pub/ks-centos 追加版本centos的ks文件
如果是NFS安装的话 路径是这样写的
label rhel5
kernel rhel5/vmlinuz
append initrd=rhel5/initrd.img ks=nfs:192.168.2.200:/var/ftp/pub/ks.cfg
label centos
kernel centos/vmlinuz
append initrd=centos/initrd.img ks=nfs:192.168.2.200:/var/ftp/pub/ks.cfg
注意事项
[root@oracle80 ~]# cd /var/ftp/pub/
[root@oracle80 pub]# vim ks.cfg
查看第6,10行内容没有请手动添加
key --skip 跳过安装序列号,需要手动修改添加
clearpart --all --initlabel 初始化所有分区(裸机安装最好添加此行)
ks.cfg脚本内容:
#platform=x86, AMD64, 或 Intel EM64T
# System authorization information auth --useshadow --enablemd5
# System bootloader configuration bootloader --location=mbr
key --skip 没有这行的话一定要添加
# Clear the Master Boot Record zerombr
# Partition clearing information
clearpart --all --initlabel 没有这行的话一定要添加
客户端测试


