VMware Workstation 为CentOS虚拟机不重启添加SCSI硬盘
大纲
1、通过VMware Workstation为虚拟机添加硬盘
2、强制Linux扫描SCSI设备
It is possible to add or remove a SCSI device explicitly, or to rescan an entire SCSI bus without rebooting a running Linux VM guest.
All instructions are tested on RHEL, Fedora, CentOS and Ubuntu Linux guest / hosts operating systems.
一般情况下,我们可以通过VMware给虚拟机添加硬盘,但是需要重启虚拟机才可以识别新增的磁盘。我们能不能在线新增磁盘,而不重新启动呢? 答案是肯定的。
1、通过VMware Workstation为虚拟机添加硬盘
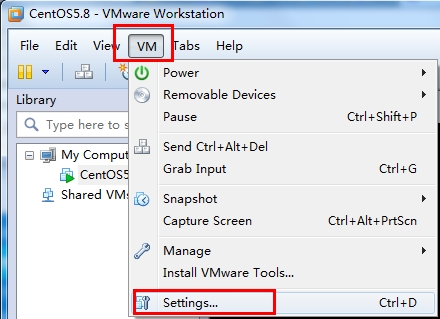
1、在线为CentOS添加磁盘,点击VM > Settings
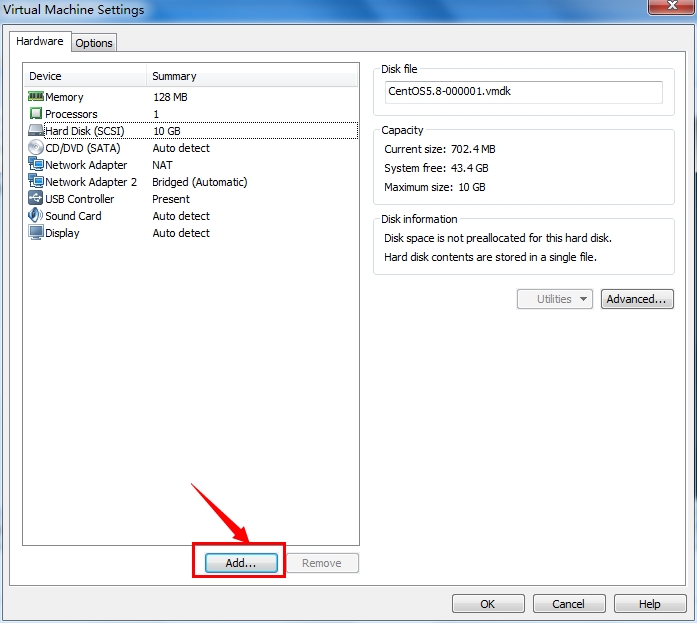
在弹出的Virtual Machine Settings窗口中,选择下方的 "Add" 按钮。
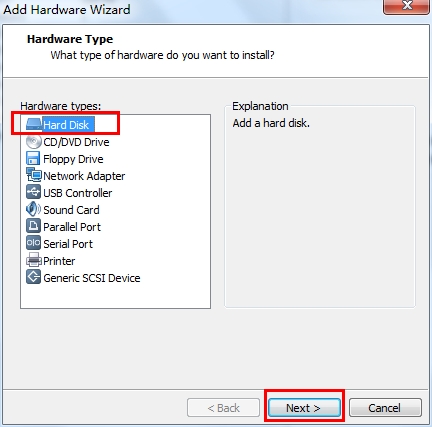
然后进入"Add Hardware Wizard"添加硬件向导,选择 "Hard Disk", 然后 "Next"
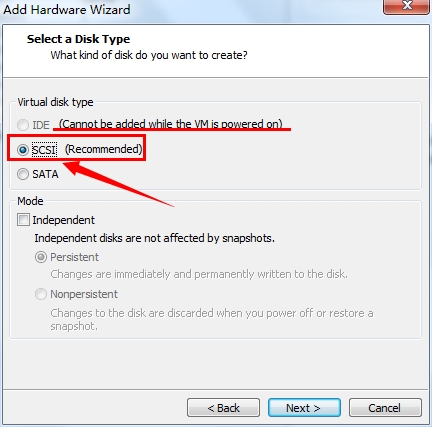
接下来选择“Disk Type”,我们选择 SCSI(Small Computer System Interface),即小型计算机系统接口 , 不能选择IDE,VMware也非常友好的提示"Cannot be added while the VM is powerd on"。为什么呢? 因为IDE接口的硬盘是不支持热插拔的设备,所以我们必须选择SCSI或者SATA类型的接口,支持热插拔的类型才行。
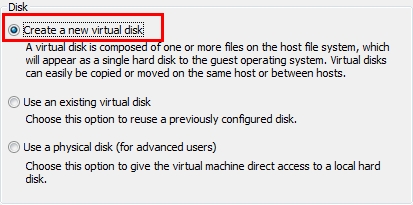
下一步,我们直接选择"Create a new virtual disk",创建一个新的虚拟磁盘,如果你想添加已经存在的虚拟磁盘,请选择第2项,这里不建议选择第3项"Use a physical disk"
选择磁盘大小,根据自己的需要合理指定大小即可。
Allocate all disk space now. 选择它,那么会立刻在我们物理磁盘上申请并分配我们指定的大小空间,可以提高虚拟机的性能,但是会占用更多的空间。相反,如果不勾选它,默认情况下,消耗的空间根据实际虚拟机中占用的磁盘空间大小动态分配。
Store virtual disk as a single file. 把虚拟磁盘存储为单个文件,如果宿主机文件系统是NTFS,那么建议选择它。
Split virtual disk into multiple files. 把虚拟磁盘切割为多块存储在多个文件中,这样可以更容易移动到其他计算机上,但是可能降低性能。其实我认为最主要的原因是某些文件系统,如FAT的单个文件最大限制为4G,所以切分为多个文件进行存储,可以避免单个文件过大而无法存储的问题。
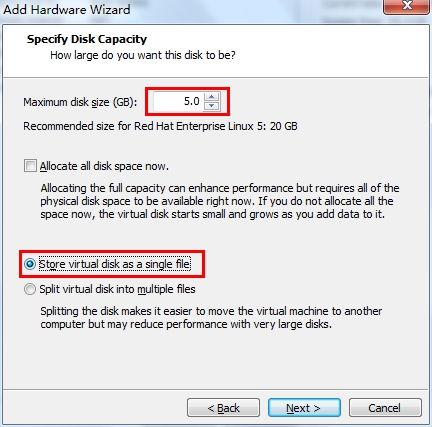
然后点击"Finish", 即添加成功。
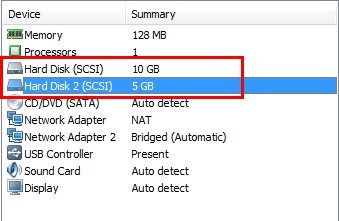
看,我们现在有两块磁盘了哦。
2、强制Linux扫描SCSI设备
通常,磁盘添加完成后,需要重启一下计算机,内核会自动检测到这个新的设备。我们可以使用
# ls /dev/sd*
来查看,一般是以/dev/sd[a-z]命名的设备文件。
但是,在生产环境中,是不允许我们随意重启服务器的,我们会尽可能的选择不重启系统的方式来解决,现在我们就来探讨一种不重启而让内核检测到SCSI磁盘的方法。
Replace host# with actual value such as host0. You can find scsi_host value using the following command:
# ls /sys/class/scsi_host
Output: host0
Now type the following to send a rescan request:
# echo "- - -" > /sys/class/scsi_host/host0/scan
# fdisk -l
# tail -f /var/log/message
1、以root用户执行下面的命令,强制内核再次检测PCI设备:
[root@localhost ~]# ls /dev/sd*
/dev/sda  /dev/sda1  /dev/sda2  /dev/sda3

[root@localhost ~]# echo '- - -' > /sys/class/scsi_host/host0/scan

[root@localhost ~]# ls /dev/sd*
/dev/sda  /dev/sda1  /dev/sda2  /dev/sda3  /dev/sdb

[root@localhost ~]# fdisk -l
[root@localhost ~]# tail -f /var/log/message
最关键的是这一行命令:

注意:三个"- - -"号之间有空格。
执行完这条命令后,再执行 ls /dev/sd* 命令,就能发现新添加的磁盘 /dev/sdb,查看系统日志/var/log/messages,发现对SCSI设备进行了一次重新扫描。

可以看到有如图的相关信息。
OK,至此我们已经顺利新增了一块磁盘,那么接下来可以进行fdisk分区,mkfs格式化等操作了。
下面有更详尽的描述:
http://hi.baidu.com/doughtymild/item/ad2096fd80ff9ecf521c2609
Step # 2: Rescan the SCSI Bus to Add a SCSI Device Without rebooting the VMA rescan can be issued by typing the following command:
# echo "- - -" > /sys/class/scsi_host/host#/scan
# fdisk -l
# tail -f /var/log/message
Sample outputs:
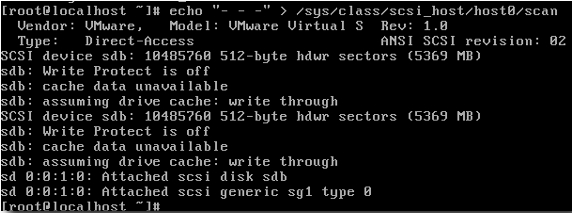
Replace host# with actual value such as host0. You can find scsi_host value using the following command:
# ls /sys/class/scsi_host
Output: host0                # host0
Now type the following to send a rescan request:
# echo "- - -" > /sys/class/scsi_host/host0/scan        # host0
# fdisk -l
# tail -f /var/log/message
Sample Outputs:
Jul 18 16:29:39 localhost kernel: Vendor: VMware, Model: VMware Virtual S Rev: 1.0 Jul 18 16:29:39 localhost kernel: Type: Direct-Access ANSI SCSI revision: 02 Jul 18 16:29:39 localhost kernel: target0:0:1: Beginning Domain Validation Jul 18 16:29:39 localhost kernel: target0:0:1: Domain Validation skipping write tests Jul 18 16:29:39 localhost kernel: target0:0:1: Ending Domain Validation Jul 18 16:29:39 localhost kernel: target0:0:1: FAST-40 WIDE SCSI 80.0 MB/s ST (25 ns, offset 127) Jul 18 16:29:39 localhost kernel: SCSI device sdb: 2097152 512-byte hdwr sectors (1074 MB) Jul 18 16:29:39 localhost kernel: sdb: Write Protect is off Jul 18 16:29:39 localhost kernel: sdb: cache data unavailable Jul 18 16:29:39 localhost kernel: sdb: assuming drive cache: write through Jul 18 16:29:39 localhost kernel: SCSI device sdb: 2097152 512-byte hdwr sectors (1074 MB) Jul 18 16:29:39 localhost kernel: sdb: Write Protect is off Jul 18 16:29:39 localhost kernel: sdb: cache data unavailable Jul 18 16:29:39 localhost kernel: sdb: assuming drive cache: write through Jul 18 16:29:39 localhost kernel: sdb: unknown partition table Jul 18 16:29:39 localhost kernel: sd 0:0:1:0: Attached scsi disk sdb Jul 18 16:29:39 localhost kernel: sd 0:0:1:0: Attached scsi generic sg1 type 0 Jul 18 16:29:39 localhost kernel: Vendor: VMware, Model: VMware Virtual S Rev: 1.0 Jul 18 16:29:39 localhost kernel: Type: Direct-Access ANSI SCSI revision: 02 Jul 18 16:29:39 localhost kernel: target0:0:2: Beginning Domain Validation Jul 18 16:29:39 localhost kernel: target0:0:2: Domain Validation skipping write tests Jul 18 16:29:39 localhost kernel: target0:0:2: Ending Domain Validation Jul 18 16:29:39 localhost kernel: target0:0:2: FAST-40 WIDE SCSI 80.0 MB/s ST (25 ns, offset 127) Jul 18 16:29:39 localhost kernel: SCSI device sdc: 2097152 512-byte hdwr sectors (1074 MB) Jul 18 16:29:39 localhost kernel: sdc: Write Protect is off Jul 18 16:29:39 localhost kernel: sdc: cache data unavailable Jul 18 16:29:39 localhost kernel: sdc: assuming drive cache: write through Jul 18 16:29:39 localhost kernel: SCSI device sdc: 2097152 512-byte hdwr sectors (1074 MB) Jul 18 16:29:39 localhost kernel: sdc: Write Protect is off Jul 18 16:29:39 localhost kernel: sdc: cache data unavailable Jul 18 16:29:39 localhost kernel: sdc: assuming drive cache: write through Jul 18 16:29:39 localhost kernel: sdc: unknown partition table Jul 18 16:29:39 localhost kernel: sd 0:0:2:0: Attached scsi disk sdc Jul 18 16:29:39 localhost kernel: sd 0:0:2:0: Attached scsi generic sg2 type 0
How Do I Delete a Single Device Called /dev/sdc?
In addition to re-scanning the entire bus, a specific device can be added or existing device deleted using the following command:
### echo 1 > /sys/block/devName/device/delete    # devName
# echo 1 > /sys/block/sdc/device/delete        # sdc
How Do I Add a Single Device Called /dev/sdc?
To add a single device explicitly, use the following syntax:
# echo "scsi add-single-device <H> <B> <T> <L>" > /proc/scsi/scsi
Where,
<H> : Host
<B> : Bus (Channel)
<T> : Target (Id)
<L> : LUN numbers
For e.g. add /dev/sdc with host # 0, bus # 0, target # 2, and LUN # 0, enter:
# echo "scsi add-single-device 0 0 2 0">/proc/scsi/scsi
# fdisk -l
# cat /proc/scsi/scsi
Sample Outputs:
Attached devices: Host: scsi0 Channel: 00 Id: 00 Lun: 00 Vendor: VMware, Model: VMware Virtual S Rev: 1.0 Type: Direct-Access ANSI SCSI revision: 02 Host: scsi0 Channel: 00 Id: 01 Lun: 00 Vendor: VMware, Model: VMware Virtual S Rev: 1.0 Type: Direct-Access ANSI SCSI revision: 02 Host: scsi0 Channel: 00 Id: 02 Lun: 00 Vendor: VMware, Model: VMware Virtual S Rev: 1.0 Type: Direct-Access ANSI SCSI revision: 02Step #3: Format a New Disk
Now, you can create partition using fdisk and format it using mkfs.ext3command:
# fdisk /dev/sdc
# mkfs.ext3 /dev/sdc3
Step #4: Create a Mount Point And Update /etc/fstab
# mkdir /disk3
Open /etc/fstab file, enter:
# vi /etc/fstab
Append as follows:
/dev/sdc3 /disk3 ext3 defaults 1 2
Save and close the file.
Optional Task: Label the partition
You can label the partition using e2label. For example, if you want to label the new partition /backupDisk, enter
# e2label /dev/sdc1 /backupDisk
Conclusion
The VMware guest now has an additional virtualized storage device. The procedure works for all physical block devices, this includes CD-ROM, DVD and floppy devices. Next, time I will write about adding an additional virtualized storage device using XEN software.