Linux系统启动流程详解
大纲
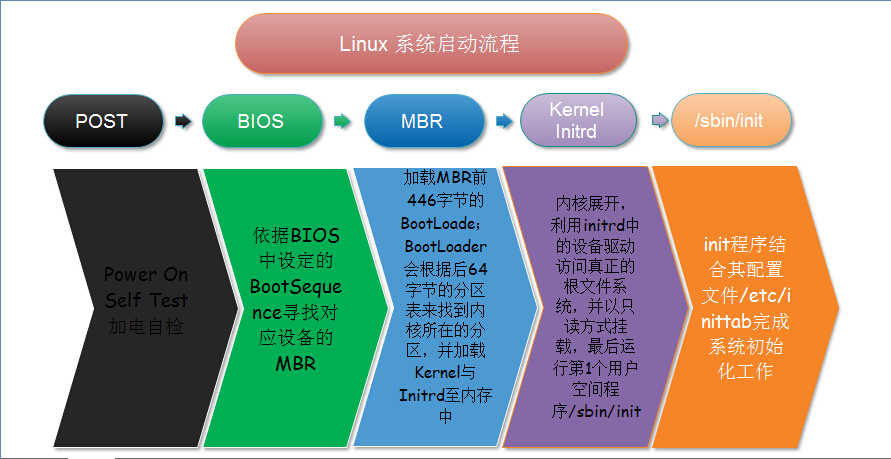
一、Linux系统启动流程图
二、Linux系统启动流程详解之一:POST
三、Linux系统启动流程详解之二:BIOS(Boot Sequence)
四、Linux系统启动流程详解之三:MBR(BootLoader)
五、Linux系统启动流程详解之四:kernel和initrd
六、Linux系统启动流程详解之五:/sbin/init
一、Linux系统启动流程图
俗话说一图胜前言,点击图片可查看大图,系统启动具体过程请看下面详细阐述

二、Linux系统启动流程详解之一:POST
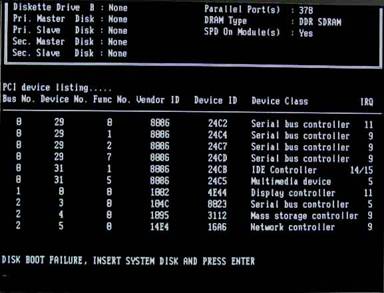
加电自检又称为开机自我检测(英文Power-On Self-Test,常用简称POST),是计算机BIOS的一个功能,在开机后会运行,针对计算机硬件如CPU、主板、存储器等进行检测,结果会显示在固件可以控制的输出界面,像屏幕、LED、打印机等等设备上。如果设备健康状态监测出了问题,就会有各种含义的蜂鸣声。

测试流程:
开机系统重置REST启动CPU。
CPU指向BIOS自我测试的地址FFFFOH并打开CPU运行第一个指令。
CPU内部寄存器的测试。
CMOS 146818 SRAM检查。
ROM BIOS检查码测试。
8254计时/计数器测试。
8237 DMA控制器测试。
74612页寄存器测试。
REFRESH刷新电路测试。
8042键盘控制器测试。
DRAM 64KB基本存储器测试。
CPU保护模式的测试。
8259中断控制器的测试。
CMOS 146818电力及检查码检查。
DRAM IMB以上存储器检查。
显卡测试。
NMI强制中断测试。
8254计时/计数器声音电路测试。
8254计时/计数器计时测试。
CPU保护模式SHUT DOWN测试。
CPU回至实模式(REAL MODE)。
键盘鼠标测试。
8042键盘控制器测试。
8259中断控制器IRQ0至IRQ18创建。
磁盘驱动器及界面测试。
设置并行打印机及串列RS232的界面。
检查CMOS IC时间、日期。
检查完成
如果没有显示器,我们可以通过POST CARD来完全上面的测试工作。
三、Linux系统启动流程详解之二:BIOS(Boot Sequence)
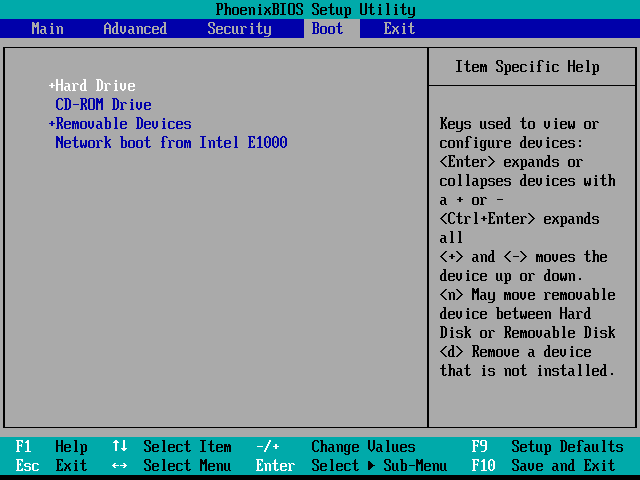
当硬件自检完成之后,BIOS就会依据定义在Boot Sequence中自上而下的寻找MBR,如果第一个设备找不到MBR,则会找第二个,以此类推,如果第一个设备有MBR,但是损坏了,它不会去找第二个设备的MBR。所以只有当找不到MBR时,才会去另一个设备。当找到某个设备的MBR时,再将计算机的控制权转交给MBR中位于前446字节的BootLoader。

补充:BIOS与CMOS的关系
CMOS是计算机上另一个重要的存储器。之所以提到它,是因为BIOS程序的设置结果就保存在CMOS中。而且,在BIOS程序引导计算机启动后,计算机需要载入CMOS中的用户信息和常规设置后才能正常使用。
四、Linux系统启动流程详解之三:MBR(BootLoader)
1、Linux上常见BootLoader
BootLoader分MBR前446字节存放的就是BootLoader;其本质是用于引导操作系统的代码段X86的工作站和服务器上一般使用LILO和GRUB( GRand Unified Bootloader)。LILO曾经是Linux发行版主流的BootLoader,不过,它不能引导1024柱面以后的分区,所以现在几乎所有的发行版都已经使用了GRUB,GRUB比LILO有更友好的显示接口,使用配置也更加灵活方便。
2、grub启动阶段
stage1:存储于MBR中前446字节,用于实现引导stage2
stage1.5:存储于/boot/grub目录中,用于识别内核所在分区的文件系统类型
stage2:存储于/boot/grub目录中,结合grub.conf配置文件实现引导操作系统
3、grub的配置文件
[root@CentOS5 grub]# cat /boot/grub/grub.conf
# grub.conf generated by anaconda
#
# Note that you do not have to rerun grub after making changes to this file
# NOTICE:  You have a /boot partition.  This means that
#          all kernel and initrd paths are relative to /boot/, eg.
#          root (hd0,0)
#          kernel /vmlinuz-version ro root=/dev/VolGroup00/LogVol00
#          initrd /initrd-version.img
#boot=/dev/sda
default=0                                # 设定默认启动的title的编号,从0开始
timeout=5                                # 等待用户选择的超时时长,单位是秒
splashimage=(hd0,0)/grub/splash.xpm.gz                    # grub的背景图片定义
hiddenmenu                                # 隐藏菜单,需要按键才会显示菜单
passwd --md5 $1$iR1wX$Q5NDrU92ypjCLAUHHHg260     # 密码设置在此处时,则需要先输入密码才能编辑grub菜单,按p提示输入grub密码
title CentOS (2.6.18-308.el5)       # 内核标题,或操作系统名称,字符串,可自由修改
	root (hd0,0)        # 内核文件所在的设备;对grub而言,所有类型硬盘一律hd,格式为(hd#,N);hd#, #表示第几个磁盘;最后的N表示对应磁盘的分区;
	kernel /vmlinuz-2.6.18-308.el5 ro root=/dev/VolGroup00/LogVol00    # 内核文件路径,及传递给内核的参数
	initrd /initrd-2.6.18-308.el5.img                  # ramdisk文件路径
	passwd --md5 $1$4G2wX$Jb7Nvqdubza6oXH3C/BlL.            #密码设置在此处时,则需要先输入密码,才能启动内核

如需更改grub背景图片,则用gimp制作一个640X480大小的xpm格式图片,再gzip压缩放于/boot/grub/目录下即可


当前boot分区是一个独立的分区,在kernel这一行定义时,是直接在根下,而不是/boot下
因为各分区在物理上是并行的。虽然boot目录是在根下,但boot目录下的文件则是在另一个独立分区上。
所以在grub看来,要想访问kernel文件,即把这个单独分区当做根,那么文件即是直接在根下,而不是在/boot下
4、安装grub
(1)、grub命令行方式
[root@CentOS5 ~]# mount
/dev/mapper/VolGroup00-LogVol00 on / type ext3 (rw)
proc on /proc type proc (rw)
sysfs on /sys type sysfs (rw)
devpts on /dev/pts type devpts (rw,gid=5,mode=620)
/dev/sda1 on /boot type ext3 (rw)                        # 可以看到boot为独立分区
tmpfs on /dev/shm type tmpfs (rw)
none on /proc/sys/fs/binfmt_misc type binfmt_misc (rw)
sunrpc on /var/lib/nfs/rpc_pipefs type rpc_pipefs (rw)
[root@CentOS5 ~]# fdisk -l
Disk /dev/sda: 21.4 GB, 21474836480 bytes
255 heads, 63 sectors/track, 2610 cylinders
Units = cylinders of 16065 * 512 = 8225280 bytes
   Device Boot      Start         End      Blocks   Id  System
/dev/sda1   *           1          13      104391   83  Linux
/dev/sda2              14        2610    20860402+  8e  Linux LVM
[root@CentOS5 ~]# dd if=/dev/zero of=/dev/sda bs=200 count=1        # 模拟bootloader损坏
1+0 records in
1+0 records out
200 bytes (200 B) copied, 0.000158 seconds, 1.3 MB/s
[root@CentOS5 ~]# sync                                                # 同步至磁盘
[root@CentOS5 ~]# grub                                              # 进入grub命令行界面
Probing devices to guess BIOS drives. This may take a long time.
    GNU GRUB  version 0.97  (640K lower / 3072K upper memory)
 [ Minimal BASH-like line editing is supported.  For the first word, TAB
   lists possible command completions.  Anywhere else TAB lists the possible
   completions of a device/filename.]
grub> root (hd0,0)                                    # 指定内核所在磁盘及分区,自己指定
root (hd0,0)
 Filesystem type is ext2fs, partition type 0x83
grub> setup (hd0)                                    # 安装grub,指定磁盘
setup (hd0)
 Checking if "/boot/grub/stage1" exists... no
 Checking if "/grub/stage1" exists... yes
 Checking if "/grub/stage2" exists... yes
 Checking if "/grub/e2fs_stage1_5" exists... yes
 Running "embed /grub/e2fs_stage1_5 (hd0)"...  15 sectors are embedded.
succeeded
 Running "install /grub/stage1 (hd0) (hd0)1+15 p (hd0,0)/grub/stage2 /grub/grub.conf"... succeeded
Done.
grub> quit
quit
(2)、grub-install命令方式:grub安装在当前磁盘上
 grub-install --root-directory=/path/to/boot's_parent_dir  /PATH/TO/DEVICE
 此时需要注意--root-directory指向的是boot的父目录
 grub在安装时,会自动在根下找boot目录,然后在boot目录里创建stage1.5和stage2等各种文件

[root@CentOS5 ~]# dd if=/dev/zero of=/dev/sda bs=200 count=1    # 模拟损坏bootloader
1+0 records in
1+0 records out
200 bytes (200 B) copied, 0.000229 seconds, 873 kB/s
[root@CentOS5 ~]# sync                                            # 同步至磁盘
[root@CentOS5 ~]# grub-install --root-directory=/  /dev/sda         # 安装grub
Installation finished. No error reported.
This is the contents of the device map //boot/grub/device.map.
Check if this is correct or not. If any of the lines is incorrect,
fix it and re-run the script `grub-install'.

# this device map was generated by anaconda
(hd0)     /dev/sda
(3)、grub-install命令方式:grub安装在另一块磁盘上
[root@soysauce ~]# fdisk -l /dev/sda

Disk /dev/sda: 21.5 GB, 21474836480 bytes
255 heads, 63 sectors/track, 2610 cylinders
Units = cylinders of 16065 * 512 = 8225280 bytes
Sector size (logical/physical): 512 bytes / 512 bytes
I/O size (minimum/optimal): 512 bytes / 512 bytes
Disk identifier: 0x00000000
[root@soysauce ~]# fdisk /dev/sda                # 新建一个20M的分区,存放grub配置文件及启动文件
Device contains neither a valid DOS partition table, nor Sun, SGI or OSF disklabel
Building a new DOS disklabel with disk identifier 0x7dd89809.
Changes will remain in memory only, until you decide to write them.
After that, of course, the previous content won't be recoverable.

Warning: invalid flag 0x0000 of partition table 4 will be corrected by w(rite)

WARNING: DOS-compatible mode is deprecated. It's strongly recommended to
         switch off the mode (command 'c') and change display units to
         sectors (command 'u').

Command (m for help): n
Command action
   e   extended
   p   primary partition (1-4)
p
Partition number (1-4): 1
First cylinder (1-2610, default 1):
Using default value 1
Last cylinder, +cylinders or +size{K,M,G} (1-2610, default 2610): +20M

Command (m for help): p

Disk /dev/sda: 21.5 GB, 21474836480 bytes
255 heads, 63 sectors/track, 2610 cylinders
Units = cylinders of 16065 * 512 = 8225280 bytes
Sector size (logical/physical): 512 bytes / 512 bytes
I/O size (minimum/optimal): 512 bytes / 512 bytes
Disk identifier: 0x7dd89809

   Device Boot      Start         End      Blocks   Id  System
/dev/sda1               1           4       32098+  83  Linux

Command (m for help): w
The partition table has been altered!

Calling ioctl() to re-read partition table.
Syncing disks.
[root@soysauce ~]# cat /proc/partitions             # 此时刚才创建的sda1已经被内核识别
major minor  #blocks  name

   8        0   20971520 sda
   8        1      32098 sda1
   8       16   20971520 sdb
   8       17     512000 sdb1
   8       18   20458496 sdb2
 253        0   18423808 dm-0
 253        1    2031616 dm-1
[root@soysauce ~]# mke2fs -j /dev/sda1                        # 创建ext3文件系统
mke2fs 1.41.12 (17-May-2010)
Filesystem label=
OS type: Linux
Block size=1024 (log=0)
Fragment size=1024 (log=0)
Stride=0 blocks, Stripe width=0 blocks
8032 inodes, 32096 blocks
1604 blocks (5.00%) reserved for the super user
First data block=1
Maximum filesystem blocks=33030144
4 block groups
8192 blocks per group, 8192 fragments per group
2008 inodes per group
Superblock backups stored on blocks:
	8193, 24577

Writing inode tables: done
Creating journal (1024 blocks): done
Writing superblocks and filesystem accounting information: done

This filesystem will be automatically checked every 39 mounts or
180 days, whichever comes first.  Use tune2fs -c or -i to override.
[root@soysauce ~]# mkdir /mnt/boot                # 以mnt为根,在其目录下创建一个boot目录
[root@soysauce ~]# mount /dev/sda1 /mnt/boot/        # 挂载sda1分区至boot目录下
[root@soysauce ~]# ls /mnt/boot/
lost+found                                            # 分区已挂载成功
[root@soysauce ~]# grub-install --root-directory=/mnt/ /dev/sda        # 安装grub
Probing devices to guess BIOS drives. This may take a long time.
Installation finished. No error reported.
This is the contents of the device map /mnt//boot/grub/device.map.
Check if this is correct or not. If any of the lines is incorrect,
fix it and re-run the script `grub-install'.

(fd0)	/dev/fd0
(hd0)	/dev/sda
(hd1)	/dev/sdb
[root@soysauce ~]# sync                                   # 同步内存数据至磁盘
[root@soysauce ~]# vim /mnt/boot/grub/grub.conf             # 编辑grub配置文件
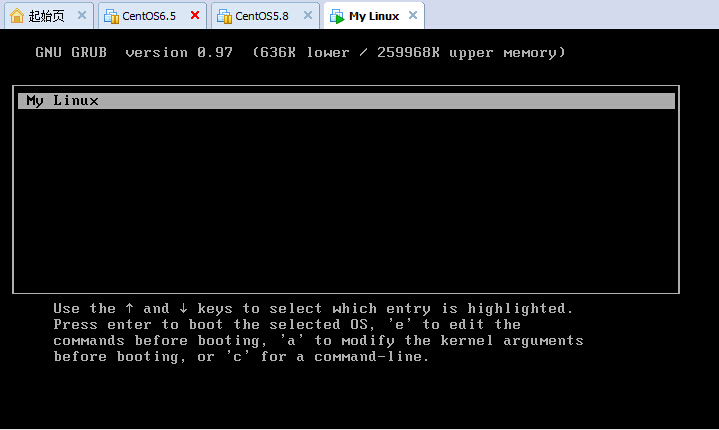
[root@soysauce ~]# cat /mnt/boot/grub/grub.conf
default=0
timeout=5
title My Linux
	root (hd0,0)
	kernel /vmlinuz
	initrd /initrd
[root@soysauce ~]# sync                                  # 同步内存数据至磁盘
[root@soysauce ~]# umount /mnt/boot/                     # 卸载此磁盘,挂载至其他计算机上

五、Linux系统启动流程详解之四:kernel和initrd
当Grub通过分区表找到了Kernel和Initrd之后,将它们加载到内存中,然后展开内核,内核通过initrd里面的设备驱动以及根文件系统所在分区的文件系统类型驱动或模块访问真正的根文件系统,并以只读方式挂载。所以说,initrd最核心的功能便是提供存储设备和文件系统相关的驱动或模块。
1、内核设计分类
单内核:又称宏内核,内核代码是高度集成的,如Linux和FreeBSD内核
微内核:由非常简单的硬件抽象层和一组比较关键的原语或系统调用组成,如Windows
2、内核模块管理
(1)、列出当前内核所加载的模块
[root@CentOS5 linux]# lsmod | head             # 因为篇幅原因,故只选取前10行
Module                  Size  Used by
autofs4                62281  3
hidp                   83521  2
rfcomm                104681  0
l2cap                  89537  10 hidp,rfcomm
lockd                 101425  0
sunrpc                203145  2 lockd
ip_conntrack_netbios_ns    36033  0
ipt_REJECT             38849  1
xt_state               35265  2
(2)、装载内核模块
insmod /PATH/TO/MODULE_FILE                # 要指定内核模块路径

modprobe MOD_NAME                  # 只需指定内核名即可,会自动去/lib/modules/`uname -r`中去找

[root@CentOS5 ~]# lsmod | grep "floppy"        # 此时floppy模块并没有被加载
[root@CentOS5 ~]# insmod /lib/modules/2.6.18-308.el5/kernel/drivers/block/floppy.ko    # 装载模块,要指定模块路径
[root@CentOS5 ~]# lsmod | grep "floppy"
floppy                 95465  0
[root@CentOS5 ~]# modprobe -r floppy            # 此时卸载此内核模块
[root@CentOS5 ~]# lsmod | grep "floppy"
[root@CentOS5 ~]# modprobe floppy                # 再次装载此内核模块
[root@CentOS5 ~]# lsmod | grep "floppy"
floppy                 95465  0
(3)、卸载内核模块
modprobe -r MOD_NAME

rmmod MOD_NAME

[root@CentOS5 ~]# lsmod | grep "floppy"
floppy                 95465  0
[root@CentOS5 ~]# modprobe -r floppy             # 此时卸载此内核模块
[root@CentOS5 ~]# lsmod | grep "floppy"            # 可以看到已被卸载
[root@CentOS5 ~]# modprobe floppy                # 再次装载此内核模块
[root@CentOS5 ~]# lsmod | grep "floppy"
floppy                 95465  0
[root@CentOS5 ~]# rmmod floppy                    # 再次卸载此内核模块
[root@CentOS5 ~]# lsmod | grep "floppy"
(4)、查看内核模块信息
modinfo MOD_NAME

[root@CentOS5 ~]# modinfo pcnet32                    # 查看网卡模块的信息
filename:       /lib/modules/2.6.18-308.el5/kernel/drivers/net/pcnet32.ko
license:        GPL
description:    Driver for PCnet32 and PCnetPCI based ethercards
author:         Thomas Bogendoerfer
srcversion:     F81443556AAE169CBF80F55
alias:          pci:v00001023d00002000sv*sd*bc02sc00i*
alias:          pci:v00001022d00002000sv*sd*bc*sc*i*
alias:          pci:v00001022d00002001sv*sd*bc*sc*i*
depends:        mii
vermagic:       2.6.18-308.el5 SMP mod_unload gcc-4.1
parm:           debug:pcnet32 debug level (int)
parm:           max_interrupt_work:pcnet32 maximum events handled per interrupt (int)
parm:           rx_copybreak:pcnet32 copy breakpoint for copy-only-tiny-frames (int)
parm:           tx_start_pt:pcnet32 transmit start point (0-3) (int)
parm:           pcnet32vlb:pcnet32 Vesa local bus (VLB) support (0/1) (int)
parm:           options:pcnet32 initial option setting(s) (0-15) (array of int)
parm:           full_duplex:pcnet32 full duplex setting(s) (1) (array of int)
parm:           homepna:pcnet32 mode for 79C978 cards (1 for HomePNA, 0 for Ethernet, default Ethernet (array of int)
module_sig:	883f3504f44473a48d0a1fbae482c4c11217bc09d15ad29e9d477db22e50ac643b16b395d056747309e3f86ddb4f4e1c48ceed068c324c8516b2f7ba3a9
(5)、查看模块之间的相依性
depmod /PATH/TO/MODULES_DIR

depmod读取在/lib/modules/version 目录下的所有模块,并检查每个模块导出的symbol和需要的symbol\
然后创建一个依赖关系列表\
默认地,该列表写入到/lib/moudules /version目录下的modules.dep文件中

[root@CentOS5 ~]# lsmod | grep "floppy"
floppy                 95465  0
[root@CentOS5 ~]# modprobe -r floppy
FATAL: Module floppy not found.            # 提示错误,但floppy内核模块确实已经加载了
[root@CentOS5 ~]# depmod                     # 重新检查
[root@CentOS5 ~]# lsmod | grep "floppy"
floppy                 95465  0
3、内核参数设定方法
(1)、立即生效,但无法永久有效
echo VALUE > /proc/sys/TO/SOMEFILE

sysctl -w kernel.hostname=VALUE

[root@CentOS5 sys]# pwd
/proc/sys
[root@CentOS5 sys]# cat kernel/hostname                 # hostname保存了主机名
CentOS5.8
[root@CentOS5 sys]# echo "soysauce" > kernel/hostname         # 改变hostname值
[root@CentOS5 sys]# cat kernel/hostname
soysauce                                                # 可以看到立即生效
[root@CentOS5 sys]# hostname
soysauce                                               # 与hostname命令结果一致
(2)、永久有效,但无法立即生效
修改/etc/sysctl.conf配置文件,路径分隔以.代替/

[root@CentOS5 sys]# cat net/ipv4/ip_forward
0
[root@CentOS5 sys]# sed -ri  "s@(net.ipv4.ip_forward =) [0-9]@\1 1@g" /etc/sysctl.conf    # 修改其值为1
[root@CentOS5 sys]# cat net/ipv4/ip_forward
0                                    # 修改的配置文件,并不会立即生效
[root@CentOS5 sys]# sysctl -p                # 通知内核重新加载系统内核参数
net.ipv4.ip_forward = 1
net.ipv4.conf.default.rp_filter = 1
net.ipv4.conf.default.accept_source_route = 0
kernel.sysrq = 0
kernel.core_uses_pid = 1
net.ipv4.tcp_syncookies = 1
kernel.msgmnb = 65536
kernel.msgmax = 65536
kernel.shmmax = 68719476736
kernel.shmall = 4294967296
[root@CentOS5 sys]# cat net/ipv4/ip_forward             # 可以看到已然生效
1
[root@CentOS5 sys]# sysctl -a | wc -l            # 显示所有的内核参数
639
4、编译内核步骤
(1)、首先安装编译环境"Development Tools" "Development Libraries"
[root@CentOS5 sys]# yum groupinstall -y "Development Tools" "Development Libraries"
(2)、下载Kernel源码,解压至/usr/srv目录下,并建立个软连接
[root@CentOS5 test]# tar xf linux-4.2.6.tar -C /usr/src/    # CentOS5上好像要先解压,再展开归档
[root@CentOS5 src]# ln -sv linux-4.2.6 linux          # 创建软链接
create symbolic link `linux' to `linux-4.2.6'
[root@CentOS5 src]# cd linux                  # 进入源码目录
(3)、选择编译特性,生成.config文件
[root@CentOS5 linux]# make menuconfig        # 打开一个字符界面的图形窗口,窗口最少19行,80列
[root@CentOS5 linux]# ll -a /usr/src/linux/.config         # 保存修改之后就会生成这个.config文件
-rw-r--r-- 1 root root 67541 Dec  3 17:01 /usr/src/linux/.config
(4)、编译安装
[root@CentOS5 linux]# make                            # 编译
[root@CentOS5 linux]# make modules_install            # 先要安装内核模块
[root@CentOS5 linux]# make install                    # 再安装内核核心
(5)、二次编译时清理,清理前,如果有需要,请备份配置文件.config
[root@CentOS5 linux]# make clean                        # 清理上次编译之后的二进制文件
[root@CentOS5 linux]# make mrproper                    # 包括.config文件所有的都清理
5、kernel初始化过程
①设备探测
②驱动初始化(可能会从initrd(initramfs)文件中装载设备驱动模块)
③以只读挂载根文件系统;
④装载第一个进程init(PID:1)
六、Linux系统启动流程详解之五:/sbin/init
上面说了内核最后一个任务就是执行用户空间第一个进程/sbin/init,而init程序的运行依靠其配置文件,即/etc/inittab文件。下面我们来详解inittab文件定义格式,以及它完成了哪些任务。
1、init程序的配置文件:inittab文件
字段定义格式及含义  id:runlevels:action:process

    id:标识符

    runlevels:在哪个级别运行此行

    action:在什么情况下执行此行

    process:要运行程序
ACTION:
    initdefault:设定默认运行级别

    sysinit:系统初始化

    wait:等待级别切换至此级别时执行

    respawn:一旦程序终止,会重新启动
2、/etc/inittab的任务
1、设定默认运行级别

2、运行系统初始化脚本,即/etc/rc.d/rc.sysinit

3、运行指定运行级别对应的目录下的脚本,即/etc/rc.d/rc{runlevel}.d/目录下的服务脚本

4、设定Ctrl+Alt+Del组合键的操作

5、定义UPS电源在电源故障/恢复时执行的操作

6、启动虚拟终端(2345级别)

7、启动图形终端(5级别)
3、运行级别:0-6
启动的服务不同判定了运行级别不同

    0:halt                                            # 关机
    1: single user mode,                     # 直接以管理员身份切入, s,S,single都行
    2:multi user mode, no NFS                # 多用户模式,但没有NFS
    3: multi user mode, text mode            # 文本界面的多用户模式
    4:reserved                                    # 保留未使用
    5: multi user mode, graphic mode            # 图形界面的多用户模式
    6: reboot                                        # 重启

查看当前运行级别:who -r 或runlevel

[root@CentOS5 rc.d]# runlevel
N 3                                    # 上次运行级别为无,即未切换过级别,一直都是3级别
[root@CentOS5 rc.d]# who -r
         run-level 3  2015-12-02 20:32                   last=S    # 同上,未切换过级别
4、/etc/rc.d/rc.sysinit的任务
1、激活udev和selinux

2、根据/etc/sysctl.conf文件,来设定内核参数

3、设定时钟时钟

4、装载键盘映射

5、启用交换分区

6、设置主机名

7、根文件系统检测,并以读写方式重新挂载

8、激活RAID和LVM设备

9、启用磁盘配额

10、根据/etc/fstab,检查并挂载其它文件系统

11、清理过期的锁和PID文件
5、/etc/rc.d/目录下所有文件解析
(1)、init.d目录
[root@CentOS5 rc.d]# pwd                        # 当前位于/etc/rc.d目录下
/etc/rc.d
[root@CentOS5 rc.d]# ls                          # /etc/rc.d目录下所有文件
init.d  rc  rc0.d  rc1.d  rc2.d  rc3.d  rc4.d  rc5.d  rc6.d  rc.local  rc.sysinit
[root@CentOS5 rc.d]# ls init.d/                    # init.d目录下都是服务脚本
acpid           cpuspeed   haldaemon   iscsi         messagebus      nfslock     readahead_early  single        vsftpd
anacron         crond      halt        iscsid        microcode_ctl   nscd        readahead_later  smartd        wdaemon
atd             dc_client  hidd        isdn          multipathd      ntpd        restorecond      smb           winbind
auditd          dc_server  httpd       killall       named           oddjobd     rpcgssd          spamassassin  wpa_supplicant
autofs          dnsmasq    innd        krb524        netconsole      pand        rpcidmapd        squid         xfs
avahi-daemon    dovecot    ip6tables   kudzu         netfs           pcscd       rpcsvcgssd       sshd          xinetd
avahi-dnsconfd  dund       ipmi        lvm2-monitor  netplugd        portmap     rsyslog          syslog        ypbind
bluetooth       firstboot  iptables    mcstrans      network         psacct      rwhod            tcsd          yum-updatesd
capi            functions  irda        mdmonitor     NetworkManager  rawdevices  saslauthd        tux
conman          gpm        irqbalance  mdmpd         nfs             rdisc       sendmail         vncserver
(2)、rc脚本
[root@CentOS5 rc.d]# file rc                                # rc是个脚本,后面接参数
rc: Bourne-Again shell script text executable
[root@CentOS5 rc.d]# wc -l rc
93 rc
[root@CentOS5 rc.d]# grep "rc [0-9]\>" /etc/inittab         # 运行指定运行级别对应的目录下的脚本
l0:0:wait:/etc/rc.d/rc 0
l1:1:wait:/etc/rc.d/rc 1
l2:2:wait:/etc/rc.d/rc 2
l3:3:wait:/etc/rc.d/rc 3
l4:4:wait:/etc/rc.d/rc 4
l5:5:wait:/etc/rc.d/rc 5
l6:6:wait:/etc/rc.d/rc 6
(3)、rc{runlevel}.d目录
[root@CentOS5 rc3.d]# pwd
/etc/rc.d/rc3.d
[root@CentOS5 rc.d]# ll rc3.d/            # 以rc3.d为例,其实rc{runlevel}.d目录下都是链接文件,指向../init.d中真正的服务脚本
total 332
lrwxrwxrwx 1 root root 17 Aug 28 14:48 K01dnsmasq -> ../init.d/dnsmasq
lrwxrwxrwx 1 root root 24 Aug 28 14:48 K02avahi-dnsconfd -> ../init.d/avahi-dnsconfd
lrwxrwxrwx 1 root root 24 Aug 28 14:52 K02NetworkManager -> ../init.d/NetworkManager
lrwxrwxrwx 1 root root 17 Aug 28 14:48 K02oddjobd -> ../init.d/oddjobd
lrwxrwxrwx 1 root root 16 Aug 28 14:47 K05conman -> ../init.d/conman
lrwxrwxrwx 1 root root 14 Aug 28 14:50 K05innd -> ../init.d/innd
lrwxrwxrwx 1 root root 19 Aug 28 14:48 K05saslauthd -> ../init.d/saslauthd
lrwxrwxrwx 1 root root 17 Aug 28 23:21 K05wdaemon -> ../init.d/wdaemon
lrwxrwxrwx 1 root root 19 Aug 28 14:47 K10dc_server -> ../init.d/dc_server
lrwxrwxrwx 1 root root 16 Aug 28 14:47 K10psacct -> ../init.d/psacct
lrwxrwxrwx 1 root root 14 Aug 28 14:48 K10tcsd -> ../init.d/tcsd
lrwxrwxrwx 1 root root 19 Aug 28 14:47 K12dc_client -> ../init.d/dc_client
lrwxrwxrwx 1 root root 15 Aug 28 14:48 K15httpd -> ../init.d/httpd
lrwxrwxrwx 1 root root 13 Aug 28 14:51 K20nfs -> ../init.d/nfs
lrwxrwxrwx 1 root root 15 Aug 28 14:46 K20rwhod -> ../init.d/rwhod
lrwxrwxrwx 1 root root 14 Aug 28 14:52 K24irda -> ../init.d/irda
lrwxrwxrwx 1 root root 15 Aug 28 14:50 K25squid -> ../init.d/squid
lrwxrwxrwx 1 root root 22 Aug 28 14:50 K30spamassassin -> ../init.d/spamassassin
lrwxrwxrwx 1 root root 17 Aug 28 14:50 K35dovecot -> ../init.d/dovecot
lrwxrwxrwx 1 root root 13 Aug 28 14:48 K35smb -> ../init.d/smb
lrwxrwxrwx 1 root root 19 Dec  2 16:45 K35vncserver -> ../init.d/vncserver
lrwxrwxrwx 1 root root 17 Aug 28 14:52 K35winbind -> ../init.d/winbind
lrwxrwxrwx 1 root root 20 Aug 28 14:48 K50netconsole -> ../init.d/netconsole
lrwxrwxrwx 1 root root 13 Aug 28 14:47 K50tux -> ../init.d/tux
lrwxrwxrwx 1 root root 16 Aug 28 14:49 K50vsftpd -> ../init.d/vsftpd
lrwxrwxrwx 1 root root 20 Aug 28 14:51 K69rpcsvcgssd -> ../init.d/rpcsvcgssd
lrwxrwxrwx 1 root root 14 Aug 28 17:31 K73ipmi -> ../init.d/ipmi
lrwxrwxrwx 1 root root 16 Aug 28 14:52 K73ypbind -> ../init.d/ypbind
lrwxrwxrwx 1 root root 14 Aug 28 14:47 K74nscd -> ../init.d/nscd
lrwxrwxrwx 1 root root 14 Aug 28 23:23 K74ntpd -> ../init.d/ntpd
lrwxrwxrwx 1 root root 17 Aug 28 17:31 K74rsyslog -> ../init.d/rsyslog
lrwxrwxrwx 1 root root 15 Aug 28 14:49 K85mdmpd -> ../init.d/mdmpd
lrwxrwxrwx 1 root root 20 Aug 28 14:47 K87multipathd -> ../init.d/multipathd
lrwxrwxrwx 1 root root 15 Aug 28 14:49 K87named -> ../init.d/named
lrwxrwxrwx 1 root root 24 Aug 28 14:48 K88wpa_supplicant -> ../init.d/wpa_supplicant
lrwxrwxrwx 1 root root 14 Aug 28 14:49 K89dund -> ../init.d/dund
lrwxrwxrwx 1 root root 18 Aug 28 14:47 K89netplugd -> ../init.d/netplugd
lrwxrwxrwx 1 root root 14 Aug 28 14:49 K89pand -> ../init.d/pand
lrwxrwxrwx 1 root root 15 Aug 28 14:46 K89rdisc -> ../init.d/rdisc
lrwxrwxrwx 1 root root 14 Aug 28 14:52 K91capi -> ../init.d/capi
lrwxrwxrwx 1 root root 25 Aug 28 14:50 K99readahead_later -> ../init.d/readahead_later
lrwxrwxrwx 1 root root 25 Aug 28 14:50 S04readahead_early -> ../init.d/readahead_early
lrwxrwxrwx 1 root root 15 Aug 28 14:52 S05kudzu -> ../init.d/kudzu
lrwxrwxrwx 1 root root 16 Aug 28 14:48 S07iscsid -> ../init.d/iscsid
lrwxrwxrwx 1 root root 19 Aug 28 14:46 S08ip6tables -> ../init.d/ip6tables
lrwxrwxrwx 1 root root 18 Aug 28 14:46 S08iptables -> ../init.d/iptables
lrwxrwxrwx 1 root root 18 Aug 28 14:48 S08mcstrans -> ../init.d/mcstrans
lrwxrwxrwx 1 root root 14 Aug 28 14:52 S09isdn -> ../init.d/isdn
lrwxrwxrwx 1 root root 17 Aug 28 17:31 S10network -> ../init.d/network
lrwxrwxrwx 1 root root 16 Aug 28 14:47 S11auditd -> ../init.d/auditd
lrwxrwxrwx 1 root root 21 Aug 28 14:49 S12restorecond -> ../init.d/restorecond
lrwxrwxrwx 1 root root 16 Aug 28 14:48 S12syslog -> ../init.d/syslog
lrwxrwxrwx 1 root root 18 Aug 28 14:46 S13cpuspeed -> ../init.d/cpuspeed
lrwxrwxrwx 1 root root 20 Aug 28 14:49 S13irqbalance -> ../init.d/irqbalance
lrwxrwxrwx 1 root root 15 Aug 28 14:48 S13iscsi -> ../init.d/iscsi
lrwxrwxrwx 1 root root 17 Aug 28 14:48 S13portmap -> ../init.d/portmap
lrwxrwxrwx 1 root root 17 Aug 28 14:51 S14nfslock -> ../init.d/nfslock
lrwxrwxrwx 1 root root 19 Aug 28 14:49 S15mdmonitor -> ../init.d/mdmonitor
lrwxrwxrwx 1 root root 19 Aug 28 14:51 S18rpcidmapd -> ../init.d/rpcidmapd
lrwxrwxrwx 1 root root 17 Aug 28 14:51 S19rpcgssd -> ../init.d/rpcgssd
lrwxrwxrwx 1 root root 20 Aug 28 14:48 S22messagebus -> ../init.d/messagebus
lrwxrwxrwx 1 root root 19 Aug 28 14:49 S25bluetooth -> ../init.d/bluetooth
lrwxrwxrwx 1 root root 15 Aug 28 17:31 S25netfs -> ../init.d/netfs
lrwxrwxrwx 1 root root 15 Aug 28 14:48 S25pcscd -> ../init.d/pcscd
lrwxrwxrwx 1 root root 15 Aug 28 14:49 S26acpid -> ../init.d/acpid
lrwxrwxrwx 1 root root 19 Aug 28 14:52 S26haldaemon -> ../init.d/haldaemon
lrwxrwxrwx 1 root root 14 Aug 28 14:49 S26hidd -> ../init.d/hidd
lrwxrwxrwx 1 root root 22 Aug 28 17:31 S26lvm2-monitor -> ../init.d/lvm2-monitor
lrwxrwxrwx 1 root root 16 Aug 28 14:47 S28autofs -> ../init.d/autofs
lrwxrwxrwx 1 root root 14 Aug 28 14:49 S55sshd -> ../init.d/sshd
lrwxrwxrwx 1 root root 20 Aug 28 14:48 S56rawdevices -> ../init.d/rawdevices
lrwxrwxrwx 1 root root 16 Aug 28 14:51 S56xinetd -> ../init.d/xinetd
lrwxrwxrwx 1 root root 18 Aug 28 14:48 S80sendmail -> ../init.d/sendmail
lrwxrwxrwx 1 root root 13 Aug 28 14:46 S85gpm -> ../init.d/gpm
lrwxrwxrwx 1 root root 15 Aug 28 14:48 S90crond -> ../init.d/crond
lrwxrwxrwx 1 root root 13 Aug 28 14:51 S90xfs -> ../init.d/xfs
lrwxrwxrwx 1 root root 17 Aug 28 14:46 S95anacron -> ../init.d/anacron
lrwxrwxrwx 1 root root 13 Aug 28 14:48 S95atd -> ../init.d/atd
lrwxrwxrwx 1 root root 22 Aug 28 14:52 S97yum-updatesd -> ../init.d/yum-updatesd
lrwxrwxrwx 1 root root 22 Aug 28 14:48 S98avahi-daemon -> ../init.d/avahi-daemon
lrwxrwxrwx 1 root root 19 Aug 28 14:52 S99firstboot -> ../init.d/firstboot
lrwxrwxrwx 1 root root 11 Aug 28 17:30 S99local -> ../rc.local
lrwxrwxrwx 1 root root 16 Aug 28 14:49 S99smartd -> ../init.d/smartd
(4)、rc.local脚本
[root@CentOS5 rc.d]# cat rc.local              # 2345级别系统启动最后运行的一个脚本
#!/bin/sh
#
# This script will be executed *after* all the other init scripts.
# You can put your own initialization stuff in here if you don't
# want to do the full Sys V style init stuff.

touch /var/lock/subsys/local                # 如有想要开机自动运行的脚本或命令可写在此处
(5)、rc.sysinit系统初始化脚本
[root@CentOS5 rc.d]# file rc.sysinit               # 系统初始化脚本,包括硬件初始化
rc.sysinit: Bourne-Again shell script text executable
[root@CentOS5 rc.d]# wc -l rc.sysinit              # CentOS5有900多行,具体完成的工作上面有
979 rc.sysinit
6、chkconfig命令详解
chkconfig - updates and queries runlevel information for system services

SYNOPSIS
       chkconfig --list [name]
       chkconfig --add name
       chkconfig --del name
       chkconfig [--level levels] name <on|off|reset|resetpriorities>
       chkconfig [--level levels] name
注:只要脚本中定义了# chkconfig 以及 # description两行的,并且能支持至少start|stop|restart|status这四个参数的脚本都可以当做服务脚本,以这个脚本为例
# chkconfig: runlevels SS KK  当chkconfig命令来为此脚本在rc#.d目录创建链接时\
runlevels表示默认创建为S*开头的链接,-表示没有级别默认为S*开头的链接;\
除此之外的级别默认创建为K*开头的链接;
S后面的启动优先级为SS所表示的数字;K后面关闭优先次序为KK所表示的数字;
# description: 用于说明此脚本的简单功能; \ 续行

[root@CentOS5 test]# cat /etc/rc.d/init.d/myservice
#!/bin/bash
#
# chkconfig: 2345 77 22                    # 这两行是必须有的,不然chkconfig --add无法加入服务列表
# description: Test Service
#
LOCKFILE=/var/lock/subsys/myservice

status() {
  if [ -e $LOCKFILE ]; then
    echo "Running..."
  else
    echo "Stopped."
  fi
}

usage() {
  echo "`basename $0` {start|stop|restart|status}"
}

case $1 in
start)
  echo "Starting..."
  touch $LOCKFILE ;;
stop)
  echo "Stopping..."
  rm -f $LOCKFILE &> /dev/null
  ;;
restart)
  echo "Restarting..." ;;
status)
  status ;;
*)
  usage ;;
esac
[root@CentOS5 test]# chmod +x /etc/rc.d/init.d/myservice     # 赋予可执行权限
(1)、添加至服务列表中
chkconfig --add SERVICE_NAME

[root@CentOS5 rc.d]# find ./ -name "*myservice*"
./init.d/myservice                               # 此时rc{runlevel}.d目录下并没有生成对应的服务链接
[root@CentOS5 rc.d]# chkconfig --add myservice    # 添加至服务列表
[root@CentOS5 rc.d]# find ./ -name "*myservice*"  # 此时可以看到已然生成,而且启动或关闭次序正是我们之前定义的
./rc5.d/S77myservice
./rc3.d/S77myservice
./rc2.d/S77myservice
./init.d/myservice
./rc6.d/K22myservice
./rc4.d/S77myservice
./rc0.d/K22myservice
./rc1.d/K22myservice
(2)、查看服务列表
chkconfig --list: 查看所有独立守护服务的启动设定及瞬时守护进程

[root@CentOS5 rc.d]# chkconfig --list
NetworkManager 	0:off	1:off	2:off	3:off	4:off	5:off	6:off
acpid          	0:off	1:off	2:on	3:on	4:on	5:on	6:off
anacron        	0:off	1:off	2:on	3:on	4:on	5:on	6:off
atd            	0:off	1:off	2:off	3:on	4:on	5:on	6:off
auditd         	0:off	1:off	2:on	3:on	4:on	5:on	6:off
autofs         	0:off	1:off	2:off	3:on	4:on	5:on	6:off
avahi-daemon   	0:off	1:off	2:off	3:on	4:on	5:on	6:off
avahi-dnsconfd 	0:off	1:off	2:off	3:off	4:off	5:off	6:off
bluetooth      	0:off	1:off	2:on	3:on	4:on	5:on	6:off
capi           	0:off	1:off	2:off	3:off	4:off	5:off	6:off
conman         	0:off	1:off	2:off	3:off	4:off	5:off	6:off
cpuspeed       	0:off	1:on	2:on	3:on	4:on	5:on	6:off
crond          	0:off	1:off	2:on	3:on	4:on	5:on	6:off
dc_client      	0:off	1:off	2:off	3:off	4:off	5:off	6:off
dc_server      	0:off	1:off	2:off	3:off	4:off	5:off	6:off
dnsmasq        	0:off	1:off	2:off	3:off	4:off	5:off	6:off
dovecot        	0:off	1:off	2:off	3:off	4:off	5:off	6:off
dund           	0:off	1:off	2:off	3:off	4:off	5:off	6:off
firstboot      	0:off	1:off	2:off	3:on	4:off	5:on	6:off
gpm            	0:off	1:off	2:on	3:on	4:on	5:on	6:off
haldaemon      	0:off	1:off	2:off	3:on	4:on	5:on	6:off
hidd           	0:off	1:off	2:on	3:on	4:on	5:on	6:off
httpd          	0:off	1:off	2:off	3:off	4:off	5:off	6:off
innd           	0:off	1:off	2:off	3:off	4:off	5:off	6:off
ip6tables      	0:off	1:off	2:on	3:on	4:on	5:on	6:off
ipmi           	0:off	1:off	2:off	3:off	4:off	5:off	6:off
iptables       	0:off	1:off	2:on	3:on	4:on	5:on	6:off
irda           	0:off	1:off	2:off	3:off	4:off	5:off	6:off
irqbalance     	0:off	1:off	2:on	3:on	4:on	5:on	6:off
iscsi          	0:off	1:off	2:off	3:on	4:on	5:on	6:off
iscsid         	0:off	1:off	2:off	3:on	4:on	5:on	6:off
isdn           	0:off	1:off	2:on	3:on	4:on	5:on	6:off
kudzu          	0:off	1:off	2:off	3:on	4:on	5:on	6:off
lvm2-monitor   	0:off	1:on	2:on	3:on	4:on	5:on	6:off
mcstrans       	0:off	1:off	2:on	3:on	4:on	5:on	6:off
mdmonitor      	0:off	1:off	2:on	3:on	4:on	5:on	6:off
mdmpd          	0:off	1:off	2:off	3:off	4:off	5:off	6:off
messagebus     	0:off	1:off	2:off	3:on	4:on	5:on	6:off
multipathd     	0:off	1:off	2:off	3:off	4:off	5:off	6:off
myservice      	0:off	1:off	2:on	3:on	4:on	5:on	6:off
named          	0:off	1:off	2:off	3:off	4:off	5:off	6:off
netconsole     	0:off	1:off	2:off	3:off	4:off	5:off	6:off
netfs          	0:off	1:off	2:off	3:on	4:on	5:on	6:off
netplugd       	0:off	1:off	2:off	3:off	4:off	5:off	6:off
network        	0:off	1:off	2:on	3:on	4:on	5:on	6:off
nfs            	0:off	1:off	2:off	3:off	4:off	5:off	6:off
nfslock        	0:off	1:off	2:off	3:on	4:on	5:on	6:off
nscd           	0:off	1:off	2:off	3:off	4:off	5:off	6:off
ntpd           	0:off	1:off	2:off	3:off	4:off	5:off	6:off
oddjobd        	0:off	1:off	2:off	3:off	4:off	5:off	6:off
pand           	0:off	1:off	2:off	3:off	4:off	5:off	6:off
pcscd          	0:off	1:off	2:on	3:on	4:on	5:on	6:off
portmap        	0:off	1:off	2:off	3:on	4:on	5:on	6:off
psacct         	0:off	1:off	2:off	3:off	4:off	5:off	6:off
rawdevices     	0:off	1:off	2:off	3:on	4:on	5:on	6:off
rdisc          	0:off	1:off	2:off	3:off	4:off	5:off	6:off
readahead_early	0:off	1:off	2:on	3:on	4:on	5:on	6:off
readahead_later	0:off	1:off	2:off	3:off	4:off	5:on	6:off
restorecond    	0:off	1:off	2:on	3:on	4:on	5:on	6:off
rpcgssd        	0:off	1:off	2:off	3:on	4:on	5:on	6:off
rpcidmapd      	0:off	1:off	2:off	3:on	4:on	5:on	6:off
rpcsvcgssd     	0:off	1:off	2:off	3:off	4:off	5:off	6:off
rsyslog        	0:off	1:off	2:off	3:off	4:off	5:off	6:off
rwhod          	0:off	1:off	2:off	3:off	4:off	5:off	6:off
saslauthd      	0:off	1:off	2:off	3:off	4:off	5:off	6:off
sendmail       	0:off	1:off	2:on	3:on	4:on	5:on	6:off
smartd         	0:off	1:off	2:on	3:on	4:on	5:on	6:off
smb            	0:off	1:off	2:off	3:off	4:off	5:off	6:off
spamassassin   	0:off	1:off	2:off	3:off	4:off	5:off	6:off
squid          	0:off	1:off	2:off	3:off	4:off	5:off	6:off
sshd           	0:off	1:off	2:on	3:on	4:on	5:on	6:off
syslog         	0:off	1:off	2:on	3:on	4:on	5:on	6:off
tcsd           	0:off	1:off	2:off	3:off	4:off	5:off	6:off
tux            	0:off	1:off	2:off	3:off	4:off	5:off	6:off
vncserver      	0:off	1:off	2:off	3:off	4:off	5:off	6:off
vsftpd         	0:off	1:off	2:off	3:off	4:off	5:off	6:off
wdaemon        	0:off	1:off	2:off	3:off	4:off	5:off	6:off
winbind        	0:off	1:off	2:off	3:off	4:off	5:off	6:off
wpa_supplicant 	0:off	1:off	2:off	3:off	4:off	5:off	6:off
xfs            	0:off	1:off	2:on	3:on	4:on	5:on	6:off
xinetd         	0:off	1:off	2:off	3:on	4:on	5:on	6:off
ypbind         	0:off	1:off	2:off	3:off	4:off	5:off	6:off
yum-updatesd   	0:off	1:off	2:on	3:on	4:on	5:on	6:off

xinetd based services:                       # 此为超级守护进程xinetd所管理的瞬时守护进程
	chargen-dgram: 	off
	chargen-stream:	off
	daytime-dgram: 	off
	daytime-stream:	off
	discard-dgram: 	off
	discard-stream:	off
	echo-dgram:    	off
	echo-stream:   	off
	eklogin:       	off
	ekrb5-telnet:  	off
	gssftp:        	off
	klogin:        	off
	krb5-telnet:   	off
	kshell:        	off
	rmcp:          	off
	rsync:         	off
	tcpmux-server: 	off
	time-dgram:    	off
	time-stream:   	off
[root@CentOS5 rc.d]# chkconfig --list myservice        # 只查看我们刚才添加的myservice
myservice      	0:off	1:off	2:on	3:on	4:on	5:on	6:off
(3)、调整某服务运行级别
chkconfig [--level RUNLEVELS] SERVICE_NAME {on|off}   # 如果省略级别指定,默认为2345级别

[root@CentOS5 rc.d]# chkconfig --list myservice            # 默认2345是启动的
myservice      	0:off	1:off	2:on	3:on	4:on	5:on	6:off
[root@CentOS5 rc.d]# chkconfig --level 24 myservice off        # 现在调整24级别为关闭状态
[root@CentOS5 rc.d]# chkconfig --list myservice            # 可以看到已然生效
myservice      	0:off	1:off	2:off	3:on	4:off	5:on	6:off
(4)、删除所指定的系统服务
chkconfig --del SERVICE_NAME

[root@CentOS5 rc.d]# find ./ -name "*myservice*"
./rc5.d/S77myservice
./rc3.d/S77myservice
./rc2.d/S77myservice
./init.d/myservice
./rc6.d/K22myservice
./rc4.d/S77myservice
./rc0.d/K22myservice
./rc1.d/K22myservice
[root@CentOS5 rc.d]# chkconfig --del myservice        # 删除myservice服务
[root@CentOS5 rc.d]# find ./ -name "*myservice*"      # 可以看到rc{runlevel}.d目录下的文件都被删除了
./init.d/myservice
(5)、守护进程类型
独立守护进程:就像上面的myservice一般能实现自我管理的守护进程
超级守护进程:xinetd服务,就像一个代理人
瞬时守护进程:不需要关联至运行级别,由超级守护进程xinetd管理
(6)、screen
screen - screen manager with VT100/ANSI terminal emulation    # 多窗口管理器

SYNOPSIS
       screen [ -options ] [ cmd [ args ] ]
       screen -r [[pid.]tty[.host]]
       screen -r sessionowner/[[pid.]tty[.host]]

        Ctrl+a,d: 拆除屏幕
        -ls:显示已经建立的屏幕
        -r ID:还原回某屏幕
        -S:指定会化名

[root@CentOS5 linux]# yum install -y screen            # 首先安装screen,默认是没装的
[root@CentOS5 linux]# screen                             # 打开一个新的screen会话
[detached]
[root@CentOS5 linux]# screen -ls                        # 显示哪些screen会话
There is a screen on:
	14670.pts-0.soysauce	(Detached)
1 Socket in /var/run/screen/S-root.

[root@CentOS5 linux]# screen -r 14670                    # 恢复id为14670的会话
[root@soysauce linux]# echo "A new window"
A new window
[root@CentOS5 linux]# screen -ls
There is a screen on:
	14670.pts-0.soysauce	(Detached)
1 Socket in /var/run/screen/S-root.
[root@CentOS5 linux]# screen -S "test"                    # 指定会话名
[root@CentOS5 linux]# screen -ls
There are screens on:
	14725.test	(Detached)
	14670.pts-0.soysauce	(Detached)
2 Sockets in /var/run/screen/S-root.
注:以上所有操作演示都是以CentOS5.8 x86_64为例