在上一章,我们跟踪了Producer源码的整体流程和一些细节,本章我们将重点跟踪Consumer的源码细节。
Consumer的配置文件如下:
Kafka Consumer配置:

group.id:                                指定consumer所属的consumer group
consumer.id:                             如果不指定会自动生成
socket.timeout.ms:                      网络请求的超时设定
socket.receive.buffer.bytes:            Socket的接收缓存大小
fetch.message.max.bytes:                试图获取的消息大小之和(bytes)
num.consumer.fetchers:                  该消费去获取data的总线程数
auto.commit.enable:                      如果是true, 定期向zk中更新Consumer已经获取的last message offset(所获取的最后一个batch的first message offset)
auto.commit.interval.ms:                Consumer向ZK中更新offset的时间间隔
queued.max.message.chunks:              默认为2
rebalance.max.retries:                   在rebalance时retry的最大次数,默认为4
fetch.min.bytes:                         对于一个fetch request, Broker Server应该返回的最小数据大小,达不到该值request会被block, 默认是1字节。
fetch.wait.max.ms:                        Server在回答一个fetch request之前能block的最大时间(可能的block原因是返回数据大小还没达到fetch.min.bytes规定);
rebalance.backoff.ms:                    当rebalance发生时,两个相邻retry操作之间需要间隔的时间。
refresh.leader.backoff.ms:               如果一个Consumer发现一个partition暂时没有leader, 那么Consumer会继续等待的最大时间窗口(这段时间内会refresh partition leader);
auto.offset.reset:                       当发现offset超出合理范围(out of range)时,应该设成的大小(默认是设成offsetRequest中指定的值):
                                             smallest: 自动把该consumer的offset设为最小的offset;
                                             largest: 自动把该consumer的offset设为最大的offset;
                                             anything else: throw exception to the consumer;
consumer.timeout.ms:                     如果在该规定时间内没有消息可供消费,则向Consumer抛出timeout exception;
                                             该参数默认为-1, 即不指定Consumer timeout;
client.id:                               区分不同consumer的ID,默认是group.id
先从一个消费者的demo开始:
public class ConsumerDemo {
    private final ConsumerConnector consumer;
    private final String topic;
    private ExecutorService executor;

    public ConsumerDemo(String a_zookeeper, String a_groupId, String a_topic) {
        consumer = Consumer.createJavaConsumerConnector(createConsumerConfig(a_zookeeper,a_groupId));
        this.topic = a_topic;
    }

    public void shutdown() {
        if (consumer != null)
            consumer.shutdown();
        if (executor != null)
            executor.shutdown();
    }

    public void run(int numThreads) {
        Map<String, Integer> topicCountMap = new HashMap<String, Integer>();
        topicCountMap.put(topic, new Integer(numThreads));
        Map<String, List<KafkaStream<byte[], byte[]>>> consumerMap = consumer
                .createMessageStreams(topicCountMap);
        List<KafkaStream<byte[], byte[]>> streams = consumerMap.get(topic);

        // now launch all the threads
        executor = Executors.newFixedThreadPool(numThreads);

        // now create an object to consume the messages
        //
        int threadNumber = 0;
        for (final KafkaStream stream : streams) {
            executor.submit(new ConsumerMsgTask(stream, threadNumber));
            threadNumber++;
        }
    }

    private static ConsumerConfig createConsumerConfig(String a_zookeeper,
            String a_groupId) {
        Properties props = new Properties();
        props.put("zookeeper.connect", a_zookeeper);
        props.put("group.id", a_groupId);
        props.put("zookeeper.session.timeout.ms", "400");
        props.put("zookeeper.sync.time.ms", "200");
        props.put("auto.commit.interval.ms", "1000");

        return new ConsumerConfig(props);
    }

    public static void main(String[] arg) {
        String[] args = { "172.168.63.221:2188", "group-1", "page_visits", "12" };
        String zooKeeper = args[0];
        String groupId = args[1];
        String topic = args[2];
        int threads = Integer.parseInt(args[3]);

        ConsumerDemo demo = new ConsumerDemo(zooKeeper, groupId, topic);
        demo.run(threads);

        try {
            Thread.sleep(10000);
        } catch (InterruptedException ie) {

        }
        demo.shutdown();
    }
}
上面的例子是用java编写的消费者的例子,也是官网提供的例子,那么我们的源码分析就从下面这一行开始:
Map<String, List<KafkaStream<byte[], byte[]>>> consumerMap = consumer
                .createMessageStreams(topicCountMap);
从createMessagesStreams方法进入后直接到kafka.javaapi.consumer.ZookeeperConsumerConnector类。
private[kafka] class ZookeeperConsumerConnector(val config: ConsumerConfig,
                                                val enableFetcher: Boolean) // for testing only
    extends ConsumerConnector {
  //初始化伴生对象
  private val underlying = new kafka.consumer.ZookeeperConsumerConnector(config, enableFetcher)
  private val messageStreamCreated = new AtomicBoolean(false)

  def this(config: ConsumerConfig) = this(config, true)

 // for java client
  def createMessageStreams[K,V](
        topicCountMap: java.util.Map[String,java.lang.Integer],
        keyDecoder: Decoder[K],
        valueDecoder: Decoder[V])
      : java.util.Map[String,java.util.List[KafkaStream[K,V]]] = {

    if (messageStreamCreated.getAndSet(true))
      throw new MessageStreamsExistException(this.getClass.getSimpleName +
                                   " can create message streams at most once",null)
    val scalaTopicCountMap: Map[String, Int] = {
      import JavaConversions._
      Map.empty[String, Int] ++ (topicCountMap.asInstanceOf[java.util.Map[String, Int]]: mutable.Map[String, Int])
    }
    val scalaReturn = underlying.consume(scalaTopicCountMap, keyDecoder, valueDecoder)
    val ret = new java.util.HashMap[String,java.util.List[KafkaStream[K,V]]]
    for ((topic, streams) <- scalaReturn) {
      var javaStreamList = new java.util.ArrayList[KafkaStream[K,V]]
      for (stream <- streams)
        javaStreamList.add(stream)
      ret.put(topic, javaStreamList)
    }
    ret
  }
这个类是整体Consumer的核心类,首先要初始化ZookeeperConsumerConnector的伴生对象(关于伴生对象请大家查看scala语法,实际就是一个静态对象,每一个class都要有一个伴生对象,像我们的静态方法都要定义在这里面),在createMessageStreams中,topicCountMap主要是消费线程数,这个参数和partition的数量有直接有关系。
通过val scalaReturn = underlying.consume(scalaTopicCountMap, keyDecoder, valueDecoder)这行代码,将进入到伴生对象中,直接可以跟踪消费的内部逻辑。
def consume[K, V](topicCountMap: scala.collection.Map[String,Int], keyDecoder: Decoder[K], valueDecoder: Decoder[V])
      : Map[String,List[KafkaStream[K,V]]] = {
    debug("entering consume ")
    if (topicCountMap == null)
      throw new RuntimeException("topicCountMap is null")
     //封装成一个TopicCount对象,参数分别是消费者的ids字符串和线程数map
    val topicCount = TopicCount.constructTopicCount(consumerIdString, topicCountMap)
    //解析出每个topic对应多少个消费者线程,topicThreadsIds是一个map结构
    val topicThreadIds = topicCount.getConsumerThreadIdsPerTopic

    //针对每一个消费者线程创建一个BlockingQueue队列,队列中存储的是FetchedDataChunk数据块,每一个数据块中包括多条记录。
    val queuesAndStreams = topicThreadIds.values.map(threadIdSet =>
      threadIdSet.map(_ => {
        val queue =  new LinkedBlockingQueue[FetchedDataChunk](config.queuedMaxMessages)
        val stream = new KafkaStream[K,V](
          queue, config.consumerTimeoutMs, keyDecoder, valueDecoder, config.clientId)
        (queue, stream)
      })
    ).flatten.toList

    val dirs = new ZKGroupDirs(config.groupId)
    //将consumer的topic信息注册到zookeeper中,格式如下:
    //Consumer id registry:/consumers/[group_id]/ids[consumer_id] -> topic1,...topicN
    registerConsumerInZK(dirs, consumerIdString, topicCount)
    reinitializeConsumer(topicCount, queuesAndStreams)

    loadBalancerListener.kafkaMessageAndMetadataStreams.asInstanceOf[Map[String, List[KafkaStream[K,V]]]]
  }
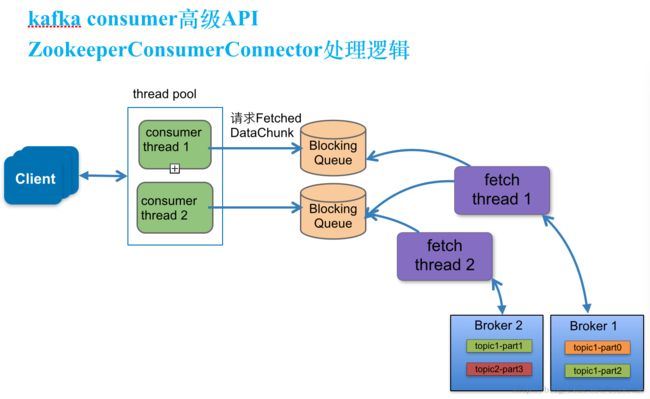
结合代码中的注释请看下面的图:
说明:
创建consumer thread
consumer thread数量与BlockingQueue一一对应。
a.当consumer thread count=1时
此时有一个blockingQueue1,三个fetch thread线程,该topic分布在几个node上就有几个fetch thread,每个fetch thread会于kafka broker建立一个连接。3个fetch thread线程去拉取消息数据,最终放到blockingQueue1中,等待consumer thread来消费。
接着看上面代码中的这个方法:
registerConsumerInZK(dirs, consumerIdString, topicCount)
这个方法是将consumer的topic信息注册到zookeeper中,格式如下:
Consumer id registry:
/consumers/[group_id]/ids[consumer_id] -> topic1,...topicN
进入重新初始化Consumer方法:
registerConsumerInZK(dirs, consumerIdString, topicCount)
这个方法会建立一系列的侦听器:
1、负载平衡器侦听器:ZKRebalancerListener。
2、会话超时侦听器:ZKSessionExpireListener。
3、监控topic和partition变化侦听器:ZKTopicPartitionChangeListener。
客户端启动后会在消费者注册目录上添加子节点变化的监听ZKRebalancerListener,ZKRebalancerListener实例会在内部创建一个线程,这个线程定时检查监听的事件有没有执行(消费者发生变化),如果没有变化则wait1秒钟,当发生了变化就调用 syncedRebalance 方法,去rebalance消费者,代码如下:
 private val watcherExecutorThread = new Thread(consumerIdString + "_watcher_executor") {
      override def run() {
        info("starting watcher executor thread for consumer " + consumerIdString)
        var doRebalance = false
        while (!isShuttingDown.get) {
          try {
            lock.lock()
            try {
              if (!isWatcherTriggered)
                cond.await(1000, TimeUnit.MILLISECONDS) // wake up periodically so that it can check the shutdown flag
            } finally {
              doRebalance = isWatcherTriggered
              isWatcherTriggered = false
              lock.unlock()
            }
            if (doRebalance)
              syncedRebalance
          } catch {
            case t: Throwable => error("error during syncedRebalance", t)
          }
        }
        info("stopping watcher executor thread for consumer " + consumerIdString)
      }
    }
    watcherExecutorThread.start()

    @throws(classOf[Exception])
    def handleChildChange(parentPath : String, curChilds : java.util.List[String]) {
      rebalanceEventTriggered()
    }

    def rebalanceEventTriggered() {
      inLock(lock) {
        isWatcherTriggered = true
        cond.signalAll()
      }
    }
syncedRebalance方法在内部会调用def rebalance(cluster: Cluster): Boolean方法,去真正执行操作。
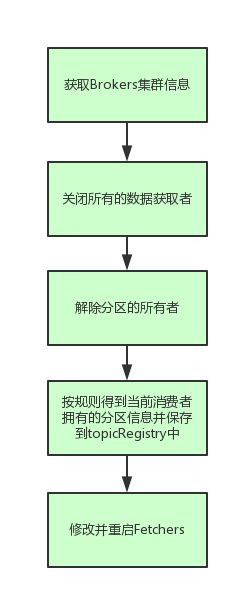
在这个方法中,获取者必须停止,避免重复的数据,重新平衡尝试失败,被释放的分区被另一个consumers拥有。如果我们不首先停止获取数据,消费者将继续并发的返回数据,所以要先停止之前的获取者,再更新当前的消费者信息,重新更新启动获取者。代码如下:
private def rebalance(cluster: Cluster): Boolean = {
      val myTopicThreadIdsMap = TopicCount.constructTopicCount(
        group, consumerIdString, zkClient, config.excludeInternalTopics).getConsumerThreadIdsPerTopic
      val brokers = getAllBrokersInCluster(zkClient)
      if (brokers.size == 0) {
        // This can happen in a rare case when there are no brokers available in the cluster when the consumer is started.
        // We log an warning and register for child changes on brokers/id so that rebalance can be triggered when the brokers
        // are up.
        warn("no brokers found when trying to rebalance.")
        zkClient.subscribeChildChanges(ZkUtils.BrokerIdsPath, loadBalancerListener)
        true
      }
      else {
        /**
         * fetchers must be stopped to avoid data duplication, since if the current
         * rebalancing attempt fails, the partitions that are released could be owned by another consumer.
         * But if we don't stop the fetchers first, this consumer would continue returning data for released
         * partitions in parallel. So, not stopping the fetchers leads to duplicate data.
         */
         //在这行要先停止之前的获取者线程,再更新启动当前最新消费者的。
        closeFetchers(cluster, kafkaMessageAndMetadataStreams, myTopicThreadIdsMap)

        releasePartitionOwnership(topicRegistry)

        val assignmentContext = new AssignmentContext(group, consumerIdString, config.excludeInternalTopics, zkClient)
        val partitionOwnershipDecision = partitionAssignor.assign(assignmentContext)
        val currentTopicRegistry = new Pool[String, Pool[Int, PartitionTopicInfo]](
          valueFactory = Some((topic: String) => new Pool[Int, PartitionTopicInfo]))

        // fetch current offsets for all topic-partitions
        val topicPartitions = partitionOwnershipDecision.keySet.toSeq

        val offsetFetchResponseOpt = fetchOffsets(topicPartitions)

        if (isShuttingDown.get || !offsetFetchResponseOpt.isDefined)
          false
        else {
          val offsetFetchResponse = offsetFetchResponseOpt.get
          topicPartitions.foreach(topicAndPartition => {
            val (topic, partition) = topicAndPartition.asTuple
            val offset = offsetFetchResponse.requestInfo(topicAndPartition).offset
            val threadId = partitionOwnershipDecision(topicAndPartition)
            addPartitionTopicInfo(currentTopicRegistry, partition, topic, offset, threadId)
          })

          /**
           * move the partition ownership here, since that can be used to indicate a truly successful rebalancing attempt
           * A rebalancing attempt is completed successfully only after the fetchers have been started correctly
           */
          if(reflectPartitionOwnershipDecision(partitionOwnershipDecision)) {
            allTopicsOwnedPartitionsCount = partitionOwnershipDecision.size

            partitionOwnershipDecision.view.groupBy { case(topicPartition, consumerThreadId) => topicPartition.topic }
                                      .foreach { case (topic, partitionThreadPairs) =>
              newGauge("OwnedPartitionsCount",
                new Gauge[Int] {
                  def value() = partitionThreadPairs.size
                },
                ownedPartitionsCountMetricTags(topic))
            }

            topicRegistry = currentTopicRegistry
            updateFetcher(cluster)
            true
          } else {
            false
          }
        }
      }
    }
上面代码的流程图如下:
我们要了解Rebalance如何动作,看下updateFetcher怎么实现的。
private def updateFetcher(cluster: Cluster) {
      // 遍历topicRegistry中保存的当前消费者的分区信息,修改Fetcher的partitions信息
      var allPartitionInfos : List[PartitionTopicInfo] = Nil
      for (partitionInfos <- topicRegistry.values)
        for (partition <- partitionInfos.values)
          allPartitionInfos ::= partition
      info("Consumer " + consumerIdString + " selected partitions : " +
        allPartitionInfos.sortWith((s,t) => s.partition < t.partition).map(_.toString).mkString(","))

      fetcher match {
        case Some(f) =>
          // 调用fetcher的startConnections方法,初始化Fetcher并启动它
          f.startConnections(allPartitionInfos, cluster)
        case None =>
      }
    }
注意下面这行代码:
f.startConnections(allPartitionInfos, cluster)在这个方法里面其实是启动了一个LeaderFinderThread线程的,这个线程主要是通过ClientUtils的io,获取最新的topic元数据,将topic:partitionLeaderId和brokerId对应起来,封装成Map结构。
 for ((brokerAndFetcherId, partitionAndOffsets) <- partitionsPerFetcher) {
        var fetcherThread: AbstractFetcherThread = null
        fetcherThreadMap.get(brokerAndFetcherId) match {
          case Some(f) => fetcherThread = f
          case None =>
            fetcherThread = createFetcherThread(brokerAndFetcherId.fetcherId, brokerAndFetcherId.broker)
            fetcherThreadMap.put(brokerAndFetcherId, fetcherThread)
            fetcherThread.start
        }

        fetcherThreadMap(brokerAndFetcherId).addPartitions(partitionAndOffsets.map { case (topicAndPartition, brokerAndInitOffset) =>
          topicAndPartition -> brokerAndInitOffset.initOffset
        })
      }
对每个broker创建一个FetcherRunnable线程,插入到fetcherThreadMap中并启动它。这个线程负责从服务器上不断获取数据,把数据插入内部阻塞队列的操作 。
下面看一下ConsumerIterator的实现,客户端用它不断的从分区信息的内部队列中取数据。它实现了IteratorTemplate的接口,它的内部保存一个Iterator的属性current,每次调用makeNext时会检查它,如果有则从中取否则从队列中取。下面给出代码
protected def makeNext(): MessageAndMetadata[T] = {
    var currentDataChunk: FetchedDataChunk = null
    // if we don't have an iterator, get one,从内部变量中取数据
    var localCurrent = current.get()
    if(localCurrent == null || !localCurrent.hasNext) {
// 内部变量中取不到值,检查timeout的值
      if (consumerTimeoutMs < 0)
        currentDataChunk = channel.take // 是负数(-1),则表示永不过期,如果接下来无新数据可取,客户端线程会在channel.take阻塞住
      else {
// 设置了过期时间,在没有新数据可用时,pool会在相应的时间返回,返回值为空,则说明没有取到新数据,抛出timeout的异常
        currentDataChunk = channel.poll(consumerTimeoutMs, TimeUnit.MILLISECONDS)
        if (currentDataChunk == null) {
          // reset state to make the iterator re-iterable
          resetState()
          throw new ConsumerTimeoutException
        }
      }
// kafka把shutdown的命令也做为一个datachunk放到队列中,用这种方法来保证消息的顺序性
      if(currentDataChunk eq ZookeeperConsumerConnector.shutdownCommand) {
        debug("Received the shutdown command")
        channel.offer(currentDataChunk)
        return allDone
      } else {
        currentTopicInfo = currentDataChunk.topicInfo
        if (currentTopicInfo.getConsumeOffset != currentDataChunk.fetchOffset) {
          error("consumed offset: %d doesn't match fetch offset: %d for %s;\n Consumer may lose data"
                        .format(currentTopicInfo.getConsumeOffset, currentDataChunk.fetchOffset, currentTopicInfo))
          currentTopicInfo.resetConsumeOffset(currentDataChunk.fetchOffset)
        }
// 把取出chunk中的消息转化为iterator
        localCurrent = if (enableShallowIterator) currentDataChunk.messages.shallowIterator
                       else currentDataChunk.messages.iterator
// 使用这个新的iterator初始化current,下次可直接从current中取数据
        current.set(localCurrent)
      }
    }
// 取出下一条数据,并用下一条数据的offset值设置consumedOffset
    val item = localCurrent.next()
    consumedOffset = item.offset
// 解码消息,封装消息和它的topic信息到MessageAndMetadata对象,返回
    new MessageAndMetadata(decoder.toEvent(item.message), currentTopicInfo.topic)
  }
下面看一下它的next方法的逻辑:
