C++ MFC实现基于RFID读写器的上位机软件
C++ MFC实现基于RFID读写器的上位机软件
该博客涉及的完整工程托管在https://github.com/Wsine/UpperMonitor,觉得好请给个Star (/▽\=)
运行和测试环境
- Windows 10
- Visual Studio 2013
- msado15.dll(工程自带)
- ZM124U.dll(工程自带)
- RFID读写器ZM124U
理论支持全部Win32运行环境
参考内容
- https://github.com/Wsine/UpperMonitor/blob/master/references/ZM12xUE系列接口函数说明_20130712.pdf
- http://durant35.github.io/categories/物联网技术导论实验课/
- MSDN Microsoft Developer Network MFC&ATL VS2013
代码实现
软件框架
在消息响应函数OnInitDialog()中完成整个框架的内容设置,包括插入Tab选项卡标签,关联对话框,调整大小和设置默认选项卡
BOOL CUpperMonitorDlg::OnInitDialog() {
    CDialogEx::OnInitDialog();

    // TODO: 在此添加额外的初始化代码
    // 1. 插入Tab选项卡标签
    TCITEM tcItemDebugger;
    tcItemDebugger.mask = TCIF_TEXT;
    tcItemDebugger.pszText = _T("调试助手");
    m_MainMenu.InsertItem(0, &tcItemDebugger);
    TCITEM tcItemAppdev;
    tcItemAppdev.mask = TCIF_TEXT;
    tcItemAppdev.pszText = _T("应用开发");
    m_MainMenu.InsertItem(1, &tcItemAppdev);
    // 2. 关联对话框,将TAB控件设为选项卡对应对话框的父窗口
    m_MenuDebugger.Create(IDD_DEBUGGER, GetDlgItem(IDC_TAB));
    m_MenuAppdev.Create(IDD_APPDEV, GetDlgItem(IDC_TAB));
    // 3. 获取TAB控件客户区大小,用于调整选项卡对话框在父窗口中的位置
    CRect rect;
    m_MainMenu.GetClientRect(&rect);
    rect.top += 22;
    rect.right -= 3;
    rect.bottom -= 2;
    rect.left += 1;
    // 4. 设置子对话框尺寸并移动到指定位置
    m_MenuDebugger.MoveWindow(&rect);
    m_MenuAppdev.MoveWindow(&rect);
    // 5. 设置默认选项卡,对选项卡对话框进行隐藏和显示
    m_MenuDebugger.ShowWindow(SW_SHOWNORMAL);
    m_MenuAppdev.ShowWindow(SW_HIDE);
    m_MainMenu.SetCurSel(0);

    return TRUE;  // 除非将焦点设置到控件,否则返回 TRUE
}
在消息响应函数OnSelchangeTab()中完成选项卡切换,其实内容都一直存在,只是把非该选项卡的内容隐藏了,把该选项卡的内容显示出来,仅此而已
void CUpperMonitorDlg::OnSelchangeTab(NMHDR *pNMHDR, LRESULT *pResult) {
    *pResult = 0;

    // 获取当前点击选项卡标签下标
    int cursel = m_MainMenu.GetCurSel();
    // 根据下标将相应的对话框显示,其余隐藏
    switch(cursel) {
        case 0:
            m_MenuDebugger.ShowWindow(SW_SHOWNORMAL);
            m_MenuAppdev.ShowWindow(SW_HIDE);
            break;
        case 1:
            m_MenuDebugger.ShowWindow(SW_HIDE);
            m_MenuAppdev.ShowWindow(SW_SHOWNORMAL);
            break;
        default:
            break;
    }
}
调用ZM12xUE API
首先需要在工程中include相应的文件,就是已经封装好的ZM124U.lib和ZM124U.h
#pragma comment(lib, "./libs/ZM124U.lib")
#include "./libs/ZM124U.h"
然后就可以当作已经实现的函数一样,直接调用即可。库函数的传入参数和返回值全部都可以在上面的参考文件中找到,返回值一般使用IFD_OK足够了。下面以打开设备为例,展示一下如何使用
void CDebugger::OnBnClickedBtnopendevice() {
    if(IDD_PowerOn() == IFD_OK) {
        // 更新状态栏,成功
        isDeviceOpen = true;
        ((CEdit*)GetDlgItem(IDC_EDITSTATUS))->SetWindowTextW(_T("开启设备成功"));
    }
    else {
        // 更新状态栏,失败
        isDeviceOpen = false;
        ((CEdit*)GetDlgItem(IDC_EDITSTATUS))->SetWindowTextW(_T("开启设备失败"));
    }
}
类型转换
unsigned char转CString
这部分和printf函数相似,就是使用CString.Format()函数把它转换为相应的内容,然后拼接到最终的CString对象中。大多数类型转CString都可以使用这种方法,说明CString封装得好。CString.Format()函数的第一个参数的写法类似于printf的输出时的写法。详看MSDN上面的说明。
CString uid, temp;
unsigned char buff[1024];
uid.Empty();
for(int i = 0; i < buff_len; i++) {
    // 将获得的UID数据(1 byte)转为16进制
    temp.Format(_T("%02x"), buff[i]);
    uid += temp;
}
CString转int / long
前提CString的内容是数字。使用函数_ttoi(CString) | _ttol(CString)即可,如需转unsigned char类型,再使用强制转换类型即可
CString mecNum;
int mecNumInt = _ttoi(mecNum);
long mecNumLong = _ttol(mecLong);
unsigned char point = (unsigned char)_ttoi(mecNum) + 1;
CString转char*
说实话没有找到好的方法,但是只要char*空间足够,可以使用=直接赋值,内置转换,我觉得一定有这个API的,但是我没找到而已
void CUtils::CString2CharStar(const CString& s, char* ch, int len) {
    int i;
    for (i = 0; i < len; i++) {
        ch[i] = s[i];
    }
    ch[i] = '\0';
    return;
}
十六进制CString转UnsignedChar*
这里要求传入参数必须是偶数个字符,同时操作两个字符的转换方法
void CUtils::HexCString2UnsignedCharStar(const CString& hexStr, unsigned char* asc, int* asc_len) {
    *asc_len = 0;
    int len = hexStr.GetLength();

    char temp[200];
    char tmp[3] = { 0 };
    char* Hex;
    unsigned char* p;

    CString2CharStar(hexStr, temp, len);
    Hex = temp;
    p = asc;

    while (*Hex != '\0') {
        tmp[0] = *Hex;
        Hex++;
        tmp[1] = *Hex;
        Hex++;
        tmp[2] = '\0';
        *p = (unsigned char)strtol(tmp, NULL, 16);
        p++;
        (*asc_len)++;
    }
    *p = '\0';
    return;
}
界面美化
设置控件颜色
在每个控件开始绘制内容在窗口的时候,都会向父窗口发送WM_CTLCOLOR消息,因此我们只需要重载相应的父窗口消息响应函数OnCtlColor()即可,程序会运行完响应函数的代码再开始绘制内容。因此在响应函数中判断并改变刷子颜色即可。
#define RED RGB(255, 0, 0)
#define BLUE RGB(0, 0, 255)
#define BLACK RGB(0, 0, 0)

HBRUSH CDebugger::OnCtlColor(CDC* pDC, CWnd* pWnd, UINT nCtlColor) {
    HBRUSH hbr = CDialogEx::OnCtlColor(pDC, pWnd, nCtlColor);

    // TODO: 在此更改 DC 的任何特性
    switch(pWnd->GetDlgCtrlID()) {
        case IDC_EDITSTATUS:
            if(this->isDeviceOpen)
                pDC->SetTextColor(BLUE);
            else
                pDC->SetTextColor(RED);
            break;
        case IDC_EDITIOSTATUS:
            if(this->canIO)
                pDC->SetTextColor(BLUE);
            else
                pDC->SetTextColor(RED);
            break;
        case IDC_EDITVERSIONINFO:
        case IDC_EDITCARDUID:
            pDC->SelectObject(&m_font);
            break;
        default:
            pDC->SetTextColor(BLACK);
            break;
    }

    return hbr;
}
设置控件字体
在窗口的类中声明CFont类型的字体,在窗口的构造函数中为字体其赋值,在数据交换的消息响应函数中把字体绑定到响应的控件中去。注意,Create出来的GDI对象都是需要手动删除的,否则会造成GDI泄漏。【听说把Windows系统的2000多个GDI泄漏完了,系统就绘制不了任何东西了,看来就像电脑卡了哈哈o(^▽^)o不知道新版VS有没有修复,我没有试过,有人试了记得告诉我...
/* Debugger.h */
class CDebugger : CDialogEx {
private:
    CFont m_font;
};

/* Debugger.cpp */
CDebugger::CDebugger(CWnd* pParent) : CDialogEx(CDebugger::IDD, pParent) {
    // 创建字体
    m_font.CreatePointFont(93, _T("楷体"));
}

CDebugger::~CDebugger() {
    DeleteObject(m_font);
}

void CDebugger::DoDataExchange(CDataExchange* pDX) {
    CDialogEx::DoDataExchange(pDX);
    GetDlgItem(IDC_OpenDevice)->SetFont(&m_font);
    GetDlgItem(IDC_GETCARDINFO)->SetFont(&m_font);
}
数据库操作
这里使用的是ODBC(Open Database Connection)技术和OLE DB(对象链接与嵌入数据库)技术。ODBC API可以与任何具有ODBC驱动程序的关系数据库进行通信;OLE DB扩展了ODBC,提供数据库编程的COM接口,提供可用于关系型和非关系型数据源的接口[也就是可以操作电子表格、文本文件等]。
这部分的理论知识建议参考上面提及的参考内容
配置数据库
- mysql
- mysql-connector-odbc
- ZD124UE_DEMO.sql(工程文件包含)
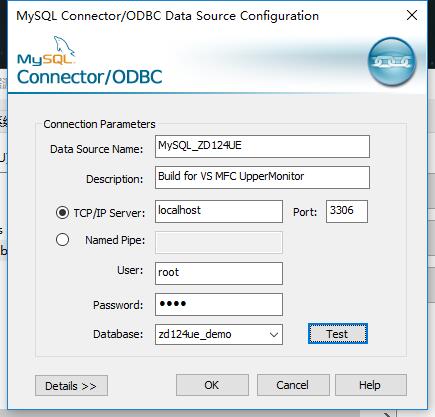
安装过程省略,首先需要建表,双击ZD124UE_DEMO.sql即可新建一个数据库及其相应的表格。然后配置数据源,参照下图,点击Test查看连通情况
连接数据库
注意:这里Open函数的字符串需要和上面配置的数据源一致
BOOL CAdoMySQLHelper::MySQL_Connect(){
    // 初始化OLE/COM库环境
    CoInitialize(NULL);

    try{
        // 通过名字创建Connection对象
        HRESULT hr = this->m_pConnection.CreateInstance("ADODB.Connection");
        if (FAILED(hr)){
            AfxMessageBox(_T("创建_ConnectionPtr智能指针失败"));
            return false;
        }
        // 设置连接超时时间
        this->m_pConnection->ConnectionTimeout = 600;
        // 设置执行命令超时时间
        this->m_pConnection->CommandTimeout = 120;

        // 连接数据库
        this->m_pConnection->Open("DSN=MySQL5.5;Server=localhost;Database=ZD124UE_DEMO",
            "root",
            "root",
            adModeUnknown);
    }
    catch (_com_error &e){
        // 若连接打开,需要在异常处理中关闭和释放连接
        if ((NULL != this->m_pConnection) && this->m_pConnection->State){
            this->m_pConnection->Close();
            this->m_pConnection.Release();
            this->m_pConnection = NULL;
        }
        // 非CView和CDialog需要使用全局函数AfxMessageBox
        AfxMessageBox(e.Description());
    }
    return true;
}
断开数据库
void CAdoMySQLHelper::MySQL_Close(){
    if ((NULL != this->m_pConnection) && (this->m_pConnection->State)){
        this->m_pConnection->Close(); // 关闭连接
        this->m_pConnection.Release();// 释放连接
        this->m_pConnection = NULL;
    }

    // 访问完COM库后,卸载COM库
    CoUninitialize();
}
执行SQL语句
这部分可以完成数据库四大操作中的增、删、改三大操作,也就是用一行SQL语句完成
BOOL CAdoMySQLHelper::MySQL_ExecuteSQL(CString sql){
    _CommandPtr m_pCommand;
    try{
        m_pCommand.CreateInstance("ADODB.Command");

        _variant_t vNULL;
        vNULL.vt = VT_ERROR;
        // 定义为无参数
        vNULL.scode = DISP_E_PARAMNOTFOUND;
        // 将建立的连接赋值给它
        m_pCommand->ActiveConnection = this->m_pConnection;

        // SQL语句
        m_pCommand->CommandText = (_bstr_t)sql;
        // 执行SQL语句
        m_pCommand->Execute(&vNULL, &vNULL, adCmdText);
    }
    catch (_com_error &e){
        // 需要在异常处理中释放命令对象
        if ((NULL != m_pCommand) && (m_pCommand->State)){
            m_pCommand.Release();
            m_pCommand = NULL;
        }
        // 非CView和CDialog需要使用全局函数AfxMessageBox
        AfxMessageBox(e.Description());
        return false;
    }
    return true;
}
查询获取返回值
查询内容的方式实现如下面的代码实现。同时为了可以查询不同的表格,使用了void*作为返回值,具体使用方法看下面
void* CAdoMySQLHelper::MySQL_Query(CString cond, CString table){
    // 打开数据集SQL语句
    _variant_t sql = "SELECT * FROM " + (_bstr_t)table + " WHERE " + (_bstr_t)cond;

    OnRecord* pOnRecord = NULL;
    RemainTime* pRemainTime = NULL;
    try{
        // 定义_RecordsetPtr智能指针
        _RecordsetPtr m_pRecordset;
        HRESULT hr = m_pRecordset.CreateInstance(__uuidof(Recordset));
        if (FAILED(hr)){
            AfxMessageBox(_T("创建_RecordsetPtr智能指针失败"));
            return (void*)false;
        }
        // 打开连接,获取数据集
        m_pRecordset->Open(sql,
            _variant_t((IDispatch*)(this->m_pConnection), true),
            adOpenForwardOnly,
            adLockReadOnly,
            adCmdText);
        // 确定表不为空
        if (!m_pRecordset->ADOEOF){
            // 移动游标到最前
            m_pRecordset->MoveFirst();
            // 循环遍历数据集
            while (!m_pRecordset->ADOEOF){
                if (table == ONTABLE) {
                    /********* Get UID ********/
                    _variant_t varUID = m_pRecordset->Fields->GetItem(_T("UID"))->GetValue();
                    varUID.ChangeType(VT_BSTR);
                    CString strUID = varUID.bstrVal;
                    /********* Get RemainSeconds ********/
                    _variant_t varRemainTime = m_pRecordset->Fields->GetItem(_T("RemainTime"))->GetValue();
                    varRemainTime.ChangeType(VT_INT);
                    int intRemainTime = varRemainTime.intVal;
                    /********** Get StartTime ******************/
                    _variant_t varStartTime = m_pRecordset->GetCollect(_T("StartTime"));
                    COleDateTime varDateTime = (COleDateTime)varStartTime;
                    CString strStartTime = varDateTime.Format(TIMEFORMAT);
                    /*********** Get isOverTime ***********/
                    _variant_t varIsOverTime = m_pRecordset->Fields->GetItem(_T("isOverTime"))->GetValue();
                    varIsOverTime.ChangeType(VT_BOOL);
                    bool boolIsOverTime = varIsOverTime.boolVal;
                    /************ Generate OnRecord ****************/
                    pOnRecord = new OnRecord(strUID, intRemainTime, strStartTime, boolIsOverTime);
                }
                else if(table == REMAINTIMETABLE) {
                    /********* Get UID ********/
                    _variant_t varUID = m_pRecordset->Fields->GetItem(_T("UID"))->GetValue();
                    varUID.ChangeType(VT_BSTR);
                    CString strUID = varUID.bstrVal;
                    /********* Get RemainSeconds ********/
                    _variant_t varRemainTime = m_pRecordset->Fields->GetItem(_T("RemainTime"))->GetValue();
                    varRemainTime.ChangeType(VT_INT);
                    int intRemainTime = varRemainTime.intVal;
                    /************ Generate RemainTime ****************/
                    pRemainTime = new RemainTime(strUID, intRemainTime);
                }

                break; // Only Return one struct
                m_pRecordset->MoveNext();
            }
        }
    }
    catch (_com_error &e){
        AfxMessageBox(e.Description());
    }
    if (table == ONTABLE)
        return (void*)pOnRecord;
    else
        return (void*)pRemainTime;
}
调用方法如下:
void CAppdev::OnBnClickedBtnstartweb() {
    OnRecord* pRecord = (OnRecord*)adoMySQLHelper.MySQL_Query(cond, ONTABLE);
    // do something you want
    delete(pRecord); // Important!
}

void CAppdev::OnBnClickedBtnexitweb() {
    RemainTime* pRemainTime = (RemainTime*)adoMySQLHelper.MySQL_Query(cond, REMAINTIMETABLE);
    // do something you want
    delete(pRemainTime); // important!
}
定时器实现
首先需要创建一个定时器,调用SetTimer()函数设置一个定时器并用一个UINT_PTR记录下该定时器,这里设置的定时器计时单位是毫秒;然后在消息响应函数OnTimer()中对其进行相关的操作;切记定时器也是需要销毁的,但需要在消息响应函数DestroyWindow()中完成,不能在析构函数中完成
/* Appdev.h */
class CAppdev : public CDialogEx {
private:
    UINT_PTR m_ActiveTimer;
};

/* Appdev.cpp */
void CAppdev::DoDataExchange(CDataExchange* pDX) {
    CDialogEx::DoDataExchange(pDX);
    // 启动定时器
    m_ActiveTimer = SetTimer(SCANTIMER_ID, SCANTIMER * 1000, NULL);
}

void CAppdev::OnTimer(UINT_PTR nIDEvent) {
    // 在此添加消息处理程序代码和/或调用默认值
    switch (nIDEvent){
        case SCANTIMER_ID:
            // do something here
            break;
        default:
            break;
    }

    CDialogEx::OnTimer(nIDEvent);
}

BOOL CAppdev::DestroyWindow() {
    // 销毁定时器
    KillTimer(m_ActiveTimer);
    return CDialogEx::DestroyWindow();
}
临界区问题
软件是一个读写器的上位机软件,那么系统会定时更新数据库即用户的余时,并将已经超时的用户移除和标记。若此时也有用户访问数据库,由于ADO DB使用的是读写模式打开的,因此多并发访问会出问题。因此,这个问题就变成了一个经典的临界区问题,所以可以用经典的临界区解法=。=在定时器操作数据库的时候获得锁,定时器结束释放锁,用户只有当定时器没获得锁的时候才能访问数据库,其余情况阻塞
void CAppdev::OnBnClickedBtnretimedefinit() {
    while (this->isWritingRemainTimeTable) { Sleep(100); } // 休眠0.1s等待定时器操作完成
    adoMySQLHelper.MySQL_UpdateRemainTime(uid, DEFAULTREMAINTIME, REMAINTIMETABLE);
}

void CAppdev::OnTimer(UINT_PTR nIDEvent){
    // 在此添加消息处理程序代码和/或调用默认值
    switch (nIDEvent){
        case SCANTIMER_ID:
            this->isWritingRemainTimeTable = true;
            adoMySQLHelper.MySQL_ScanOnTable(SCANTIMER);
            this->isWritingRemainTimeTable = false;
            break;
        default:
            break;
    }

    CDialogEx::OnTimer(nIDEvent);
}
文件操作
在读写文件的时候,打开文件时添加参数CFile::modeNoTruncate,该参数会打开指定路径的文件,若没有该文件,则新建文件后打开,因此不用考虑文件是否存在的情况
文件编码
原本的文件只能支持英文,为了能支持中文甚至全部语言,选择使用Unicode编码格式,自定义文件的时候往文件头添加Unicode编码头0xFEFF即可让程序知道该文件的编码方式
BOOL FileUnicodeEncode(CFile &mFile) {
    WORD unicode = 0xFEFF;
    mFile.SeekToBegin();
    mFile.Write(&unicode, 2); // Unicode
    return true;
}
写入文件
默认写到文件末尾,不用烦恼各种插入问题,毕竟不是链表,插入比较麻烦
void CRecordHelper::SaveRecharges(CString uid, CString accounts, long remainings, CString result){
    // 打开文件
    CFile mFile(this->mSaveFile, CFile::modeCreate | CFile::modeNoTruncate | CFile::modeReadWrite);
    // 获取当前时间
    CTime curTime = CTime::GetCurrentTime();
    // 格式化输出
    CString contents;
    contents.Format(_T("卡号:%s\r\n时间:%s\r\n结果:%s\r\n内容:用户充值\r\n金额:%s\r\n余额:%d\r\n\r\n"),
        uid, curTime.Format(TIMEFORMAT), result, accounts, remainings);
    // 指向文件末尾并写入
    mFile.SeekToEnd();
    mFile.Write(contents, wcslen(contents)*sizeof(wchar_t));
    // 关闭文件
    mFile.Close();
}
读取文件
读取文件由于要求用户最新的内容输出在最开头,因此选择读取的时候倒序分段读取,拼接字符串即可。写入文件时使用CFile类即可,但是要实现按行读取使用CStdioFile类比较方便,该类如其名,CStdioFIle::ReadString()操作可以读取一行,剩下的就是判断一段即可
CString CRecordHelper::LoadRecords(){
    // 打开文件
    CStdioFile mFile(this->mSaveFile, CFile::modeCreate | CFile::modeNoTruncate | CFile::modeRead | CFile::typeUnicode);
    // 指向开头并循环读入
    mFile.SeekToBegin();
    CString contents, line, multiLine;
    contents.Empty();
    multiLine.Empty();
    // 倒序分段读取
    while (mFile.ReadString(line)) {
        line.Trim();
        if (line.IsEmpty()) {
            contents = multiLine + _T("\r\n") + contents;
            multiLine.Empty();
        }
        else {
            multiLine += (line + _T("\r\n"));
        }
    }
    contents = multiLine + _T("\r\n") + contents;
    // 关闭文件并返回结果
    mFile.Close();
    return contents;
}
清空文件
这里调用构造CFile对象的时候去掉CFile::modeNoTruncate参数,就默认新建一个文件了
BOOL CRecordHelper::EmptyRecords(){
    // 清空文件
    CFile mFile(this->mSaveFile, CFile::modeCreate | CFile::modeReadWrite);
    FileUnicodeEncode(mFile);
    mFile.Close();
    return true;
}
运行截图
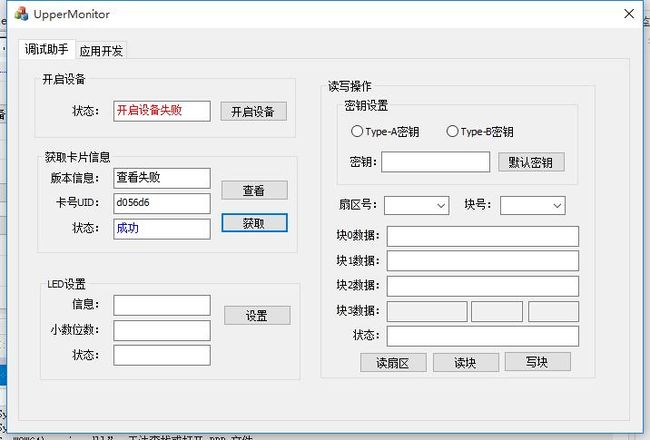
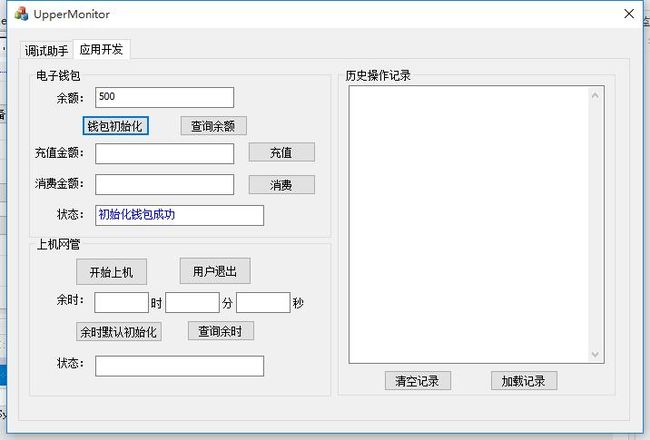
这里贴两张运行截图,运行结果都是正确的,只是展示一下界面和字体及颜色


