iOS网络编程-iCloud文档存储编程实例
iCloud文档存储编程相对键值数据存储而言比较复杂,涉及到自定义文档类、获得iCloud文档目录、查找Ubiquity容器中的文档、保存文档和解决文档冲突等内容。
实例:iCloud文档存储编程设计
实例介绍一下iCloud文档存储编程过程,画面中有一个文本框和一个按钮控件,在设备1输入内容,点击“保存数据”按钮,将数据保存iCloud服务器。右图是设备2画面,过几秒钟后设备2上会读取iCloud服务器端数据,并显示在文本框中。
配置Xcode工程
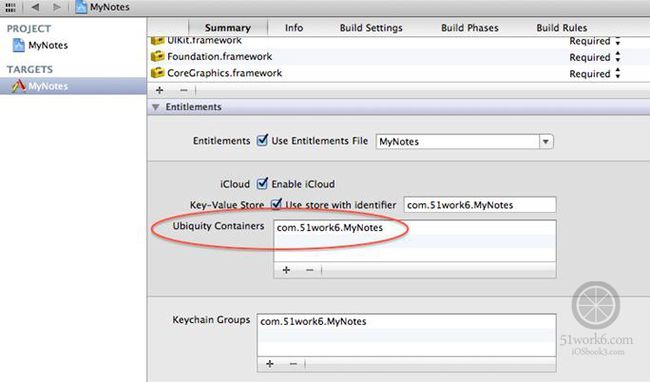
编写iCloud文档存储编应用程序也需要在Xcode工程中进行一些配置,选择TAGETS→MyNotes→Summary→Entitlements
在图中Ubiquity Contrainers添加com.51work6.MyNotes,这是Ubiquity容器标识,可以有多个Ubiquity容器标识,这个容器标识代表着不同的目录。com.51work6.MyNotes代表目录如下所示:
/var/mobile/Library/Mobile Documents/98Z3R5XU29~com~51work6~MyNotes/
其中的98Z3R5XU29是在iOS开发者配置门户网站创建App ID时候生成的,它被称为Team ID。
如果应用中没有使用iCloud键值数据存储key-Value Store可以不用配置。
自定义文档类
我们需要自己封装一个文档类,它继承抽象类UIDocument,而UIDocument实现NSFilePresenter协议。实现NSFilePresenter协议的类,它所代表的文件和目录可以被查看和编辑,这些NSFilePresenter实现类与文件协调者类NSFileCoordinator结合使用,可以协调管理文件或目录。
这个类我们命名为MyCloudDocument, MyCloudDocument的代码如下:
#import <UIKit/UIKit.h>


@interface MyCloudDocument : UIDocument ①

@property (strong, nonatomic) NSString *contents;

@end


#import ”MyCloudDocument.h”

@implementation MyCloudDocument


//加载数据

- (BOOL)loadFromContents:(id)contents ofType:(NSString *)typeName error:(NSError **)outError ②

{

if ([contents length] > 0)

{

self.contents = [[NSString alloc] initWithData:contents encoding:NSUTF8StringEncoding]; ③

}

return YES;

}

//保存数据

- (id)contentsForType:(NSString *)typeName error:(NSError **)outError ④

{

return [self.contents dataUsingEncoding:NSUTF8StringEncoding];  ⑤

}

@end
获得iCloud文档目录
iCloud文档目录是指在Ubiquity容器下的Document目录,因此获得了Ubiquity容器的根目录,就可以获得的iCloud文档目录了。
ViewController.m中的 ubiquitousDocumentsURL方法可以iCloud文档目录:
//请求本地Ubiquity容器,从容器中获得Document目录URL

- (NSURL *)ubiquitousDocumentsURL {

NSFileManager* fileManager = [NSFileManager defaultManager]; ①

NSURL* containerURL = [fileManager

URLForUbiquityContainerIdentifier:@"98Z3R5XU29.com.51work6.MyNotes"]; ②

containerURL = [containerURL URLByAppendingPathComponent:@"Documents"]; ③

return containerURL;

}
查找Ubiquity容器中的文档
获得iCloud文档目录后,我们需要找到容器中的文件。查询容器中的文件需要注册两个广播通知:
NSMetadataQueryDidFinishGatheringNotification 查询结束发出通知;
NSMetadataQueryDidUpdateNotification 查询结束,进入开始更新阶段发出的通知;
ViewController.m中注册和解除通知代码如下:
- (void)viewDidLoad

{

[super viewDidLoad];

//为查询iCloud文件的变化,注册通知

[[NSNotificationCenter defaultCenter] addObserver:self

selector:@selector(updateUbiquitousDocuments:)

name:NSMetadataQueryDidFinishGatheringNotification object:nil];

[[NSNotificationCenter defaultCenter] addObserver:self

selector:@selector(updateUbiquitousDocuments:)

name:NSMetadataQueryDidUpdateNotification object:nil];


//查询iCloud文件的变化

[self searchFilesOniCloud];


}

- (void)didReceiveMemoryWarning

{

[super didReceiveMemoryWarning];

[[NSNotificationCenter defaultCenter] removeObserver:self];

}
保存文档
保存文档很简单,它是在ViewController.m中的 saveClick:方法处理的,saveClick:方法是点击按钮时候触发:
- (IBAction)saveClick:(id)sender {

_myCloudDocument.contents = _txtContent.text;

[_myCloudDocument updateChangeCount:UIDocumentChangeDone];

[_txtContent resignFirstResponder];

}
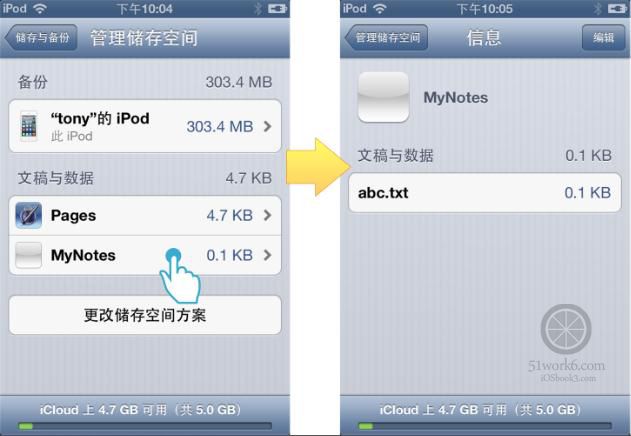
保存成功之后我们可以在其它设备上看看是否iCloud中已经有abc.txt文档了。如果使用Mac OS X系统电脑,我们可以在“系统偏好设置”中打开iCloud对话框,点击“管理”按钮可以打开iCloud空间管理对话框,其中的MyNotes是我应用名,右边的abc.txt创建的文件。
如果在iPhone、iPod touch和iPad等iOS设备中查看,可以启动设置应用程序,也进入到存储空间管理中,我的iPod touch中查看的情况。
出自《iOS网络编程与云端应用最佳实践》作者:关东升 @tony_关东升


