下载量已超越千万的爆红游戏2048(同名小3传奇、1024)源代码解密和下载(第二篇)
CocosEditor版源代码下载:
cocos2d-js源代码请到集中营下载:http://blog.makeapp.co/?p=523
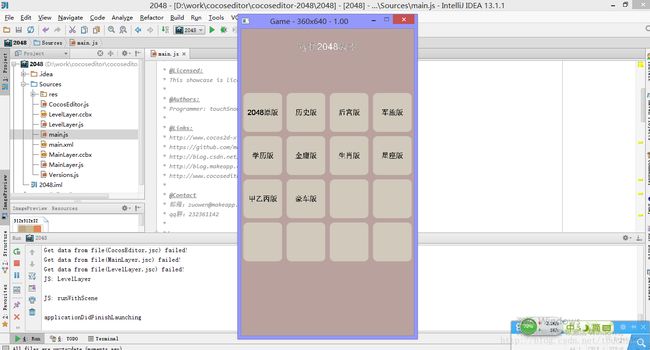
效果图:
代码分析
1 建立JS数组,有三个数组 背景颜色-等级分数-版本选择 建好之后可以在程序里面直接调用;
版本数组里面每一个版本名字、类型、字体大小和等级数组
COLOR = [cc.c3b(255, 255, 255),
    cc.c3b(238, 246, 246), cc.c3b(172, 141, 173), cc.c3b(255, 237, 196),
    cc.c3b(242, 197, 170), cc.c3b(191, 164, 157), cc.c3b(125, 125, 106),
    cc.c3b(247, 240, 145), cc.c3b(221, 204, 163), cc.c3b(251, 96, 191), cc.c3b(254, 128, 128),
    cc.c3b(211, 84, 113), cc.c3b(63, 130, 211),

    //other
    cc.c3b(100, 85, 39), cc.c3b(75, 34, 255), cc.c3b(58, 68, 104),
    cc.c3b(7, 0, 234), cc.c3b(153, 45, 85), cc.c3b(15, 254, 36), cc.c3b(78, 2, 34),
    cc.c3b(255, 125, 64), cc.c3b(237, 145, 33)
];
SCORES = [0, 2, 4, 8, 16, 32, 64, 128, 256, 512, 1024, 2048];

VERSIONS = [
    {
        num: 1,
        name: "2048原版",
        type: "number",
        labelFontSize: 50,
        array: [0, 2, 4, 8, 16, 32, 64, 128, 256, 512, 1024, 2048]
    },
    {
        num: 2,
        name: "历史版",
        type: "string",
        labelFontSize: 50,
        array: [" ", "商", "周", "秦", "汉", "唐", "宋", "元", "明", "清", "民国", "天朝"]
    },
    {
        num: 3,
        name: "后宫版",
        type: "string",
        labelFontSize: 40,
        array: [" ", "宫女", "答应", "常在", "贵人", "嫔", "妃", "贵妃", "皇贵妃", "皇后", "皇太后", "太皇太后"]
    },
    {
        num: 4,
        name: "军旅版",
        type: "string",
        labelFontSize: 40,
        array: [" ", "小兵", "班长", "排长", "连长", "营长", "团长", "旅长", "师长", "军长", "司令", "军委主席"]
    },
    {
        num: 5,
        name: "学历版",
        type: "string",
        labelFontSize: 40,
        array: [" ", "幼儿", "小学", "中学", "高中", "专科", "本科", "研究", "硕士", "博士", "博士后", "院士"]
    },
    {
        num: 6,
        name: "金庸版",
        type: "string",
        labelFontSize: 40,
        array: [" ", "令狐冲", "杨过", "郭靖", "虚竹", "风清扬", "张三丰", "东方不败", "逍遥老祖", "独孤求败", "扫地神僧", "达摩老祖"]
    },
    {
        num: 7,
        name: "生肖版",
        type: "string",
        labelFontSize: 40,
        array: [" ", "鼠", "牛", "虎", "兔", "龙", "蛇", "马", "羊", "猴", "鸡", "狗", "猪", "龙"]
    },
    {
        num: 8,
        name: "星座版",
        type: "string",
        labelFontSize: 40,
        array: [" ", "白羊座", "金牛座", "双子座", "巨蟹座", "狮子座", "处女座", "天秤座", "天蝎座", "射手座", "魔羯座", "水瓶座", "双鱼座"]
    },
    {
        num: 9,
        name: "甲乙丙版",
        type: "string",
        labelFontSize: 40,
        array: [" ", "甲", "乙", "丙", "丁", "戊", "己", "庚", "辛", "壬", "癸"]
    },
    {
        num: 10,
        name: "豪车版",
        type: "string",
        labelFontSize: 40,
        array: [" ", "大众", "奔驰", "悍马", "法拉利", "奥迪", "宝马", "兰博基尼", "凯迪拉克", "世爵"]
    }
];
2 然后找到建好的版本选择LevelLayer.js,初始化4*4版本选择表格和点击单个表格跳转到不同的版本里面
#把plist加入缓存addSpriteFrames();
#双层循环this.tables,每一个单元格放入一个新建的精灵cell=cc.MySprite.create(this.rootNode, "6.png", cc.p(px, py), 1)
#根据i,j确定cell的编号num=4*i+j;
#有了编号num可以从VERSIONS数组里面获取版本名字VERSIONS[num].name
#建立文字标签cellLabel = cc.MySprite.createLabel(cell, VERSIONS[num].name);
#表格初始化之后需要添加触摸事件;又一次双层循环this.tables
#检测精灵触摸cc.rectContainsPoint(sprite.getBoundingBox(), loc)
#找到编号num,传值到全局变量indexVersions=num;主场景就根据这个标示来确定版本;
#跳转到主场景cc.BuilderReader.runScene("", "MainLayer");
LevelLayer.prototype.onEnter = function () {
    cc.SpriteFrameCache.getInstance().addSpriteFrames("res/main.plist");
    this.initX = 9;
    this.initY = 850;
    this.cellSize = 162;
    this.cellSpace = 18;

    this.tables = new Array(4);
    for (var j = 0; j < 4; j++) {
        var sprites = new Array(4);
        for (var i = 0; i < 4; i++) {
            var px = this.initX + this.cellSize / 2 + i * (this.cellSize + this.cellSpace);
            var py = this.initY + this.cellSize / 2 - j * (this.cellSize + this.cellSpace);
            var cell = cc.MySprite.create(this.rootNode, "6.png", cc.p(px, py), 1);
            var num = 4 * j + i;
            if (num < VERSIONS.length) {
                var cellLabel = cc.MySprite.createLabel(cell, VERSIONS[num].name);
                cellLabel.setFontSize(30);
            }
            sprites[i] = cell;
        }
        this.tables[j] = sprites;
    }

};

LevelLayer.prototype.onTouchesBegan = function (touches, event) {
    cc.log("onTouchesBegan");
    var loc = touches[0].getLocation();

    for (var j = 0; j < 4; j++) {
        for (var i = 0; i < 4; i++) {
            var sprite = this.tables[j][i];
            if (cc.rectContainsPoint(sprite.getBoundingBox(), loc)) {
                var num = 4 * j + i;
                cc.log("num==" + num);
                if (num < VERSIONS.length) {
                    indexVersions = num;
                    cc.BuilderReader.runScene("", "MainLayer");
                }
            }
        }
    }

};
3 进入主场景,根据第二步得到的indexVersions,从数组VERSIONS里面获取版本实体this.indexVersion = VERSIONS[this.versionNum];
MainLayer.prototype.onEnter = function () {
    //version
    this.versionNum = indexVersions;
    this.indexVersion = VERSIONS[this.versionNum];
    this.title.setString(this.indexVersion.name + "目标:" + this.indexVersion.array[this.indexVersion.array.length - 1] + "");}
4 刷新按钮事件和返回按钮;刷新按钮比较简单,关键是返回按钮,它是一个文字标签,cocos里面没有关联点击事件;这里笔者通过触摸和创建矩形的方法来解决了这个问题;
MainLayer.prototype.onRefreshClicked = function () {
    cc.BuilderReader.runScene("", "MainLayer");
};

MainLayer.prototype.onTouchesBegan = function (touches, event) {
    this.pBegan = touches[0].getLocation();

    //back
    var backRect = cc.rectCreate(this.back.getPosition(), [50, 30]);
    if (cc.rectContainsPoint(backRect, this.pBegan)) {
        this.back.runAction(cc.Sequence.create(cc.ScaleTo.create(0.2, 1.1),
            cc.CallFunc.create(function () {
                cc.AudioEngine.getInstance().stopAllEffects();
                cc.BuilderReader.runScene("", "LevelLayer");
            })
        ));
    }
};
两篇博文完结;
