Pro Android学习笔记(一四一):List Widgets(3):Remote views Service和Factory
文章转载只能用于非商业性质,且不能带有虚拟货币、积分、注册等附加条件。转载须注明出处http://blog.csdn.net/flowingflying/以及作者@恺风Wei。
继承RemoteViewsService的代码
Android通过一个后台服务(RemoteViews Service的继承)对list view的数据进行设置。整个过程Android进行了很好的封装,我们只需在onGetViewFactory()中返回一个Remote list adapter,而这个adapter的类型是RemoteViewsFactory。
public class TestRemoteViewsService extends RemoteViewsService{
@Override /* 参数intent就是在remote view的setRemoteAdapter()中传递的intent,我们使用同一个intent作为factory构造函数的参数 */
public RemoteViewsFactory onGetViewFactory(Intent intent) {
Log.d("Service", Thread.currentThread().getName()); //main
return new TestRemoteViewsFactory(getApplicationContext(), intent);
}
}
由于RemoteViewsService是service,需要在AndroidManifest.xml中进行声明,如下:
<service android:name=".TestRemoteViewsService"
android:permission="android.permission.BIND_REMOTEVIEWS"
android:exported="false"/>
继承RemoteViewsFactory的代码
RemoteViewsFactory的接口和adapter很相似。
public class TestRemoteViewsFactory implements RemoteViewsFactory{
private static String tag = "Factory";
private Context context = null;
private int widgetId;
public TestRemoteViewsFactory(Context context, Intent intent){
this.context = context;
widgetId = intent.getIntExtra(AppWidgetManager.EXTRA_APPWIDGET_ID, AppWidgetManager.INVALID_APPWIDGET_ID);
Log.d(tag,"Factory constructed.");
}
@Override /* 我们可能会想象,每个widget对象(如果创建了多个)都会对应有一个factory,在provider中我们将widgetId放入intent,传递到RemoteViewsService,然后在传递到factory中,这是不对的。当Service的onGetViewFactory()调用,生成factory对象时,这时onCreate()被调用,同时这个对象被缓存起来。当另一个widget生成时,在Provider(不同的provider对象)中确实创建了一个新Service的对象,但仍使用被缓存的factory对象,而没有再次调用onGetViewFactory()。而这个缓存的factory对象,widgetId仍是原先的值。因此,Provider中的Intent没有必要携带widgetId的信息,本例只是作为验证。一般而言,多个widget的情况并不多见,不用太过纠结,此外,我们可以在代码中设法保证只开启一个Service。factory中构造函数和onCreate()在main中运行,其他的是后他线程Binder_x中运行。*/
public void onCreate() {
Log.d(tag,"Widget " + widgetId + "第一次构造, onCreate() is called. ");
}
@Override /*当告知AppWidgetManager,remote View List要发生变化时,触发onDataSetChanged(),我们可以在provider中,通过广播接收等方式得知要求更新List数据,然后通过appWidgetManager.notifyAppWidgetViewDataChanged(widgetId, R.id.listwidget_list_view);来触发onDataSetChanged(),并由此更新list的数据。注意,在本例子中,当时间间隔到期,provider再次执行updateWidget(),并不能触发onDataSetChanged(),即不能更新list数据,但设备重启时可以。 */
public void onDataSetChanged() {
Log.d(tag,"Widget " + widgetId + "onDataSetChanged() is called. ");
}
@Override /* onDestroy()和onCreate()是一对的,由于factory是cached,被各个widget对象使用,因此当没有widget对象时,onDestroy()将被调用。*/
public void onDestroy() {
// TODO Auto-generated method stub
Log.d(tag,"Widget " + widgetId + " onDestory() is called. ");
}
@Override //返回items的数目
public int getCount() {
Log.d(tag,"Widget " + widgetId + "getCount() is called, return 20.");
return 20;
}
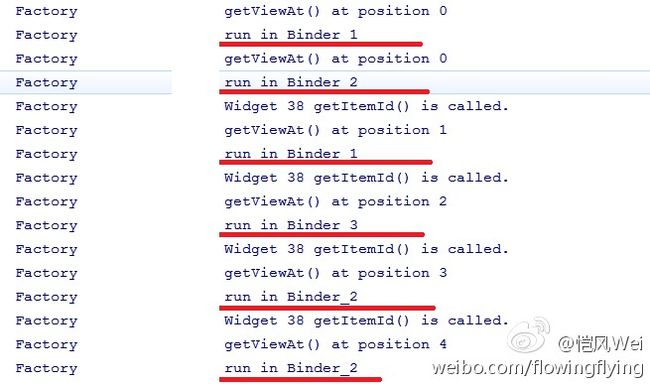
@Override //返回item对应的子Remote View,本例有20个item,即会调用20次,每个子remote view在后台线程中运行,检查结果如下图 。在本例,layout/test_list_item.xml定义list中子view,只含有一个TextView,id为R.id.testview_item_id。

public RemoteViews getViewAt(int position) {
Log.d(tag,"getViewAt() at position " + position);
Log.d(tag,"run in " + Thread.currentThread().getName());
RemoteViews rv = new RemoteViews(context.getPackageName(),R.layout.test_list_item);
String itemText = "Item:" + position;
rv.setTextViewText(R.id.testview_item_id, itemText);
loadItemOnClickExtras(rv,position); //设置item的onClick处理
return rv;
}
//为itemt设置onClick处理
private void loadItemOnClickExtras(RemoteViews rv, int position){
Intent intent = new Intent();
intent.putExtra(TestListWidgetProvider.EXTRA_LIST_ITEM_TEXT, "Position of Item Clicked : " + position);
/* 为每一个item都设置pendingIntent是很繁琐的,需要很多很多的pendingIntent,因此不允许这样做。之前在provider,通过setPendingIntentTemplate()我们已经为整个remote list统一设置了item点击触发的pending intent模板,tag设置为FLAG_UPDATE_CURRENT,可以更新extra。setOnClickFillInIntent()在模板的基础上为具体的item设置fillInIntent,每个item触发,相同的部分在模板,不同的部分在fillInIntent */
rv.setOnClickFillInIntent(R.id.testview_item_id, intent);
}
@Override /* 在返回getCount()时得知item的数目,然后通过getViewAt()对具体的item进行绘制,在getViewAt()尚未有return时,即正在loading子view的时候,可由getLoadingView()设置item在显示某些内容,如果返回null,则采用缺省的模式,对于TextView,缺省显示“Loading…”*/
public RemoteViews getLoadingView() {
Log.d(tag,"Widget " + widgetId + " getLoadingView() is called. ");
return null;
}
@Override /* 返回remote list中的子view的类型数目,本例返回1 */
public int getViewTypeCount() {
Log.d(tag,"Widget " + widgetId + " getViewTypeCount() is called. ");
return 1;
}
@Override /* 根据position获取内部ID */
public long getItemId(int position) {
Log.d(tag,"Widget " + widgetId + " getItemId() is called. ");
return position;
}
@Override //如果是true,同一个子view,getItemId中返回相同的id
public boolean hasStableIds() {
Log.d(tag,"Widget " + widgetId + " hasStableIds() is called. ");
return true;
}
}
res/layout/test_list_item.xml文件如下:
<?xml version="1.0" encoding="utf-8"?>
<TextView xmlns:android="http://schemas.android.com/apk/res/android"
android:id="@+id/testview_item_id"
android:layout_width="match_parent"
android:layout_height="wrap_content"
android:text="Temporary" >
</TextView>
小例子代码在:Pro Android学习:list widget小例子
相关链接:我的Android开发相关文章