使用VCS MX仿真VHDL
使用VCS MX仿真VHDL分为4步,我用的是VCS 2009.06。
1.“Step 1: Setting Up The Environment”
2.“Step 2: Analysis”
3.“Step 3: Elaboration”
4.“Step 4: Simulation”
下面使用一个具体的例子来分析:
isequal.vhd文件:
library ieee;
use ieee.std_logic_1164.all;

entity compab is port(
   clk: in std_logic;
	reset: in std_logic;
	a,b: in std_logic;
	isequal: out std_logic);
end compab;

architecture rtl of compab is
begin
comp: process(a, b)
	begin
		if a = b then
		 isequal <= '1';
		else
		 isequal <= '0';
		end if;
	end process comp;
end rtl;
testbench.vhd文件:
LIBRARY ieee;
USE ieee.std_logic_1164.ALL;

-- Uncomment the following library declaration if using
-- arithmetic functions with Signed or Unsigned values
--USE ieee.numeric_std.ALL;

ENTITY testbench IS
END testbench;

ARCHITECTURE behavior OF testbench IS

    -- Component Declaration for the Unit Under Test (UUT)

    COMPONENT compab
    PORT(
         clk : IN  std_logic;
         reset : IN  std_logic;
         a : IN  std_logic;
         b : IN  std_logic;
         isequal : OUT  std_logic
        );
    END COMPONENT;


   --Inputs
   signal clk : std_logic := '0';
   signal reset : std_logic := '0';
   signal a : std_logic := '0';
   signal b : std_logic := '0';

 	--Outputs
   signal isequal : std_logic;

   -- Clock period definitions
   constant clk_period : time := 10 ns;

BEGIN

	-- Instantiate the Unit Under Test (UUT)
   uut: compab PORT MAP (
          clk => clk,
          reset => reset,
          a => a,
          b => b,
          isequal => isequal
        );

   -- Clock process definitions
   clk_process :process
   begin
		clk <= '0';
		wait for clk_period/2;
		clk <= '1';
		wait for clk_period/2;
   end process;


   -- Stimulus process
   stim_proc: process
   begin
      -- hold reset state for 100 ns.
      wait for 100 ns;

      wait for clk_period*10;

      -- insert stimulus here

      wait;
   end process;

	a_process :process
   begin
		a <= '0';
		wait for 20 ns;
		a <= '1';
		wait for 20 ns;
   end process;

	b_process :process
   begin
		b <= '0';
		wait for 15 ns;
		b <= '1';
		wait for 15 ns;
   end process;
END;
第一步:Setting Up The Environment
使用默认环境
第二步:Analysis
[hackersun@server ~/tmp]$ vhdlan *.vhd
Synopsys 1076 VHDL Analyzer
Version C-2009.06 -- May 19, 2009
Copyright(c) 1990-2008 by Synopsys Inc.
ALL RIGHTS RESERVED
This program is proprietary and confidential information of Synopsys Inc.
and may be used and disclosed only as authorized in a license agreement
controlling such use and disclosure.
Parsing design file 'isequal.vhd'
Parsing design file 'testbench.vhd'
第三步:Elaboration
[hackersun@server ~/tmp]$ vcs -debug testbench
Doing common elaboration
..
Note-[SIMU-RESOLUTION] Simulation time resolution
Simulation time resolution is 1 NS
注:这里vcs -debug testbench中的testbench是顶层模块名
第四步:Simulation
[hackersun@server ~/tmp]$ ./simv -gui
Warning: DVE does not have write permission for /home/sunguoli113/tmp/DVEfiles/dve_history.log in this directory.
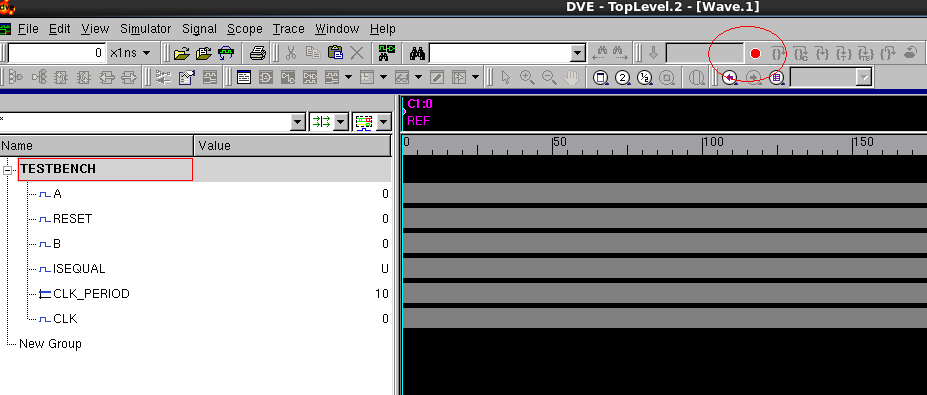
然后就出现了DVE,选中下面的TESTBENCH,然后点击波形按钮
出现一个可以看波形的窗口,见下图。然后点击蓝色按钮运行。
过一会儿后,点击下图红色按钮,停止运行。
然后就可以看到下图的波形了。


