spark应用开发---Spark学习笔记6
如何部署和开发一个spark应用程序呢?
首先要选好环境,我用的是incubator-spark-0.8.1-incubating,那么对应的是scala版本是2.9.3。
如果使用maven或者sbt构建,则可以使用gav
groupId = org.apache.spark
artifactId = spark-core_2.9.3
version = 0.8.1-incubating groupId = org.apache.hadoop
artifactId = hadoop-client
version = <your-hdfs-version>打包后将其加入到你项目的classpath里。
spark使用hadoop-client来和HDFS或其它HADOOP存储系统通信,因为HDFS协议在hadoop里面已经变更了好几个版本,所以必须指定版本,默认的spark链接的是hadoop1,0,4版本,在编译的时候可以使用SPARK_HADOOP_VERSION参数来指定版本
SPARK_HADOOP_VERSION=2.2.0 sbt/sbt assembly
SPARK_HADOOP_VERSION=2.0.5-alpha SPARK_YARN=true sbt/sbt assembly
import org.apache.spark.SparkContext
import org.apache.spark.SparkContext._
new SparkContext(master, appName, [sparkHome], [jars])创建一个spark应用程序,首先要声明一个SparkContext对象。
1.master指定的是要连接到的集群,mesos, yarn or local。
2.appName是你的应用名称,在集群监控web界面可以追溯。
3.sparkHome和jar是应用部署到分布式环境所需。
运行spark-shell,可以指定参数
$ MASTER=local[4] ./spark-shellubuntu里察看核心cat /proc/cpuinfo,我的电脑才2个。。。。
victor@victor-ubuntu:~/software/spark$ more /proc/cpuinfo
processor	: 0
vendor_id	: GenuineIntel
cpu family	: 6
model		: 23
model name	: Intel(R) Core(TM)2 Duo CPU     T6600  @ 2.20GHz
stepping	: 10
microcode	: 0xa07
cpu MHz		: 2200.000
cache size	: 2048 KB
physical id	: 0
siblings	: 2
core id		: 0
cpu cores	: 2
apicid		: 0
initial apicid	: 0
fdiv_bug	: no
hlt_bug		: no
f00f_bug	: no
coma_bug	: no
fpu		: yes
fpu_exception	: yes
cpuid level	: 13
wp		: yes
flags		: fpu vme de pse tsc msr pae mce cx8 apic sep mtrr pge mca cmov
pat pse36 clflush dts acpi mmx fxsr sse sse2 ss ht tm pbe nx lm constant_tsc arc
h_perfmon pebs bts aperfmperf pni dtes64 monitor ds_cpl est tm2 ssse3 cx16 xtpr
pdcm sse4_1 xsave lahf_lm dtherm
bogomips	: 4388.84
clflush size	: 64
cache_alignment	: 64
address sizes	: 36 bits physical, 48 bits virtual
power management:

processor	: 1
vendor_id	: GenuineIntel
cpu family	: 6
model		: 23
model name	: Intel(R) Core(TM)2 Duo CPU     T6600  @ 2.20GHz
stepping	: 10
microcode	: 0xa07
cpu MHz		: 1200.000
cache size	: 2048 KB
physical id	: 0
siblings	: 2
core id		: 1
cpu cores	: 2
apicid		: 1
initial apicid	: 1
fdiv_bug	: no
hlt_bug		: no
f00f_bug	: no
coma_bug	: no
fpu		: yes
fpu_exception	: yes
cpuid level	: 13
wp		: yes
flags		: fpu vme de pse tsc msr pae mce cx8 apic sep mtrr pge mca cmov
pat pse36 clflush dts acpi mmx fxsr sse sse2 ss ht tm pbe nx lm constant_tsc arc
h_perfmon pebs bts aperfmperf pni dtes64 monitor ds_cpl est tm2 ssse3 cx16 xtpr
pdcm sse4_1 xsave lahf_lm dtherm
bogomips	: 4388.84
clflush size	: 64
cache_alignment	: 64
address sizes	: 36 bits physical, 48 bits virtual
power management:
也可以在启动的时候就添加一些jar
$ MASTER=local[4] ADD_JARS=code.jar ./spark-shellMaster URLs
The master URL passed to Spark can be in one of the following formats:
| Master URL | Meaning |
|---|---|
| local | Run Spark locally with one worker thread (i.e. no parallelism at all). |
| local[K] | Run Spark locally with K worker threads (ideally, set this to the number of cores on your machine). |
| spark://HOST:PORT | Connect to the given Spark standalone cluster master. The port must be whichever one your master is configured to use, which is 7077 by default. |
| mesos://HOST:PORT | Connect to the given Mesos cluster. The host parameter is the hostname of the Mesos master. The port must be whichever one the master is configured to use, which is 5050 by default. |
If no master URL is specified, the spark shell defaults to “local”.
For running on YARN, Spark launches an instance of the standalone deploy cluster within YARN; see running on YARN for details.
Deploying Code on a Cluster
If you want to run your application on a cluster, you will need to specify the two optional parameters to SparkContext to let it find your code:
sparkHome: The path at which Spark is installed on your worker machines (it should be the same on all of them).jars: A list of JAR files on the local machine containing your application’s code and any dependencies, which Spark will deploy to all the worker nodes. You’ll need to package your application into a set of JARs using your build system. For example, if you’re using SBT, the sbt-assembly plugin is a good way to make a single JAR with your code and dependencies.
If you run spark-shell on a cluster, you can add JARs to it by specifying the ADD_JARS environment variable before you launch it. This variable should contain a comma-separated list of JARs. For example, ADD_JARS=a.jar,b.jar ./spark-shell will launch a shell with a.jar and b.jar on its classpath. In addition, any new classes you define in the shell will automatically be distributed.
Ok,现在开始动手写一个Spark应用。
环境:Idellj idea 12.1.7 with scala plugin
创建一个项目wordcount,添加一下jar包到classpath,有scala2.9.3jar包库,还有编译好的spark0.8.1-hadoop2.2.0.jar
1.首先创建一个scala Object
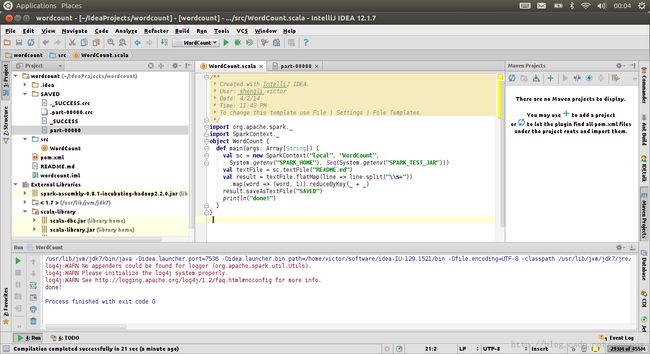
创建一个SparkContext,使用local Mode,输入源是我拷贝来的README.md,输出地址是SAVED文件夹
先创建textFile这个RDD,然后用flatMap将每一行通过空格分隔,变成Seq[word1,word2,word3...]。
调用map,输出word,1 最后reduceByKey来统计词频。
注:这里flatMap,map以及reduceByKey都是transformation.不是action。
上代码:
/**
 * Created with IntelliJ IDEA.
 * User: shengli.victor
 * Date: 4/2/14
 * Time: 11:43 PM
 * To change this template use File | Settings | File Templates.
 */
import org.apache.spark._
import SparkContext._
object WordCount {
  def main(args: Array[String]) {
    val sc = new SparkContext("local", "WordCount",
      System.getenv("SPARK_HOME"), Seq(System.getenv("SPARK_TEST_JAR")))
    val textFile = sc.textFile("README.md")
    val result = textFile.flatMap(line => line.split("\\s+"))
      .map(word => (word, 1)).reduceByKey(_ + _)
    result.saveAsTextFile("SAVED")
  }
}
| reduceByKey(func, [numTasks]) | When called on a dataset of (K, V) pairs, returns a dataset of (K, V) pairs where the values for each key are aggregated using the given reduce function. Like in groupByKey, the number of reduce tasks is configurable through an optional second argument. |

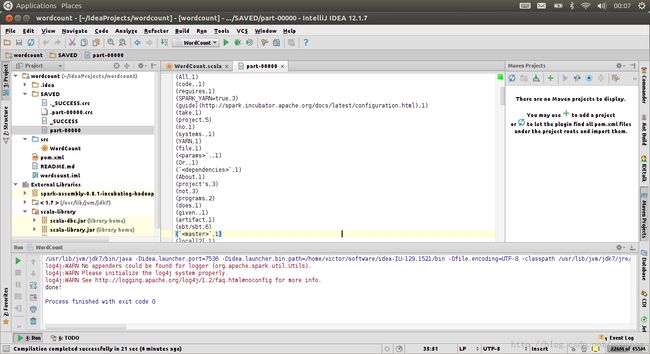
这里我们看到了熟悉的part-00000文件和_SUCCESS文件,说明本地模式运行成功。
如果想运行在yarn上面,则需要注意将local模式改为yarn-standalone模式。
将README.md上传到hdfs://host:port/dw/wordcount/input目录下。
则对应的输入目录可以是hdfs://host:port/dw/wordcount/input
输出目录可以是hdfs://host:port/dw/dw/wordcount/output
不出意外,结果应该是一致的。
原创,转载请注明出处http://blog.csdn.net/oopsoom/article/details/22827083
