cvFindContours && cvDrawContours 的应用2-----图像内轮廓填充
本文根据 http://geniusshare.i.sohu.com/blog/view/149925914.htm 整理而来, 若查看原文,请点击这里 ![]()
图像内轮廓填充通常称为孔洞填充,主要用于目标提取。
//test

#include "stdafx.h"
#include "cxcore.h"
#include "cv.h"
#include "highgui.h"


// 内轮廓填充
// 参数:
// 1. pBinary: 输入二值图像,单通道,位深IPL_DEPTH_8U。
// 2. dAreaThre: 面积阈值,当内轮廓面积小于等于dAreaThre时,进行填充。
void FillInternalContours(IplImage *pBinary, double dAreaThre)
{
	double dConArea;
	CvSeq *pContour = NULL;
	CvSeq *pConInner = NULL;
	CvMemStorage *pStorage = NULL;
	// 执行条件
	if (pBinary)
	{
		// 查找所有轮廓
		pStorage = cvCreateMemStorage(0);
		cvFindContours(pBinary, pStorage, &pContour, sizeof(CvContour), CV_RETR_CCOMP, CV_CHAIN_APPROX_SIMPLE);
		// 填充所有轮廓
		cvDrawContours(pBinary, pContour, CV_RGB(255, 255, 255), CV_RGB(255, 255, 255), 2, CV_FILLED, 8, cvPoint(0, 0));
		// 外轮廓循环
		int wai = 0;
		int nei = 0;
		for (; pContour != NULL; pContour = pContour->h_next)
		{
			wai++;
			// 内轮廓循环
			for (pConInner = pContour->v_next; pConInner != NULL; pConInner = pConInner->h_next)
			{
				nei++;
				// 内轮廓面积
				dConArea = fabs(cvContourArea(pConInner, CV_WHOLE_SEQ));
				printf("%f\n", dConArea);
				if (dConArea <= dAreaThre)
				{
					cvDrawContours(pBinary, pConInner, CV_RGB(255, 255, 255), CV_RGB(255, 255, 255), 0, CV_FILLED, 8, cvPoint(0, 0));
				}
			}
		}
		printf("wai = %d, nei = %d", wai, nei);
		cvReleaseMemStorage(&pStorage);
		pStorage = NULL;
	}
}
int Otsu(IplImage* src)
{
	int height=src->height;
	int width=src->width;

	//histogram
	float histogram[256] = {0};
	for(int i=0; i < height; i++)
	{
		unsigned char* p=(unsigned char*)src->imageData + src->widthStep * i;
		for(int j = 0; j < width; j++)
		{
			histogram[*p++]++;
		}
	}
	//normalize histogram
	int size = height * width;
	for(int i = 0; i < 256; i++)
	{
		histogram[i] = histogram[i] / size;
	}

	//average pixel value
	float avgValue=0;
	for(int i=0; i < 256; i++)
	{
		avgValue += i * histogram[i];  //整幅图像的平均灰度
	}

	int threshold;
	float maxVariance=0;
	float w = 0, u = 0;
	for(int i = 0; i < 256; i++)
	{
		w += histogram[i];  //假设当前灰度i为阈值, 0~i 灰度的像素(假设像素值在此范围的像素叫做前景像素) 所占整幅图像的比例
		u += i * histogram[i];  // 灰度i 之前的像素(0~i)的平均灰度值: 前景像素的平均灰度值

		float t = avgValue * w - u;
		float variance = t * t / (w * (1 - w) );
		if(variance > maxVariance)
		{
			maxVariance = variance;
			threshold = i;
		}
	}

	return threshold;
}

int main()
{
	IplImage *img = cvLoadImage("c://temp.jpg", 0);
	IplImage *bin = cvCreateImage(cvGetSize(img), 8, 1);

	int thresh = Otsu(img);
	cvThreshold(img, bin, thresh, 255, CV_THRESH_BINARY);

	FillInternalContours(bin, 200);

	cvNamedWindow("img");
	cvShowImage("img", img);

	cvNamedWindow("result");
	cvShowImage("result", bin);

	cvWaitKey(-1);

	cvReleaseImage(&img);
	cvReleaseImage(&bin);

	return 0;
}
原图:
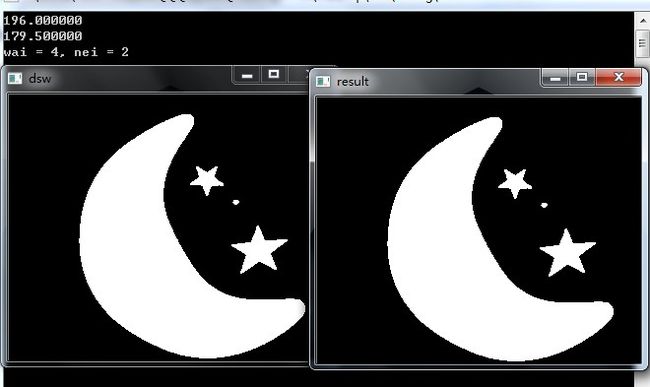
二值化之后的图 && 填充之后的图:
=====================
PS:
特意 在大月亮里面 涂了 两个大点点 !哈哈哈
是为了要看看 cvFindContours 函数中返回的 pContour 中的元素是如何存储的。
嗯, 看见了么? O(∩_∩)O哈哈~
pContour ->h_next 连接的是图中的四个大轮廓: 一个大月亮, 两颗小星星 和一个小白点。
pContour->v_next 连接的是每个大轮廓下面的 孩子们 。 pContour->v_next 指向第一个孩子,第二个孩子 在 第一个孩子 的 水平 方向 而不是 垂直方向, 所以 第二个孩子是
pContour->v_next->h_next 哦~~~
所以 大月亮轮廓里面有 2个 小轮廓, 就是我们要找的内轮廓。 找到 之后, 当其 面积 < 200个像素 的时候,才对其进行填充 。。。。 这样做是为了考虑到, 当 内部轮廓不是 目标空洞 而是 目标背景时, 防止填错 。。。。

