Cocos2d-x版的HelloWorld工程分析
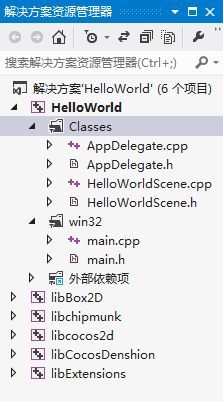
打开上一篇博客中的HelloWorld工程后,会看到下图所示的工程文件
main.cpp文件中的代码(本人已经注释)
#include "main.h"
#include "AppDelegate.h"
#include "CCEGLView.h"

USING_NS_CC;

//Cocos2d-X的主函数(相当于C/C++中的main函数)
int APIENTRY _tWinMain(HINSTANCE hInstance,
                       HINSTANCE hPrevInstance,
                       LPTSTR    lpCmdLine,
                       int       nCmdShow)
{
    //表示lpCmdLine、nCmdShow是两个没用的参数
    UNREFERENCED_PARAMETER(hPrevInstance);
    UNREFERENCED_PARAMETER(lpCmdLine);

    //定义一个app对象
    AppDelegate app;
    /*
    定义好app对象后首先调用CCApplicationPratocol(app对象的基类)的构造函数
    然后调用CCApplication(派生类)的构造函数,最后调用APPDeletegate(派生类)的构造函数
    */

    //创建一个窗口
    CCEGLView* eglView = CCEGLView::sharedOpenGLView();

    //设置窗口的名字
    eglView->setViewName("HelloWorld");

    //设置窗口的大小
    eglView->setFrameSize(480, 320);

    //执行app对象的run函数。进入帧循环
    return CCApplication::sharedApplication()->run();
}
//sharedApplication()返回的是app对象
main.cpp中的代码只是实现了下面的操作
1、定义一个App对象
2、创建一个窗口
3、设置窗口的名字
4、设置窗口的大小
5、执行App对象进入帧循环
注释:其中程序中真正重要的是最后一行代码中的run函数,run函数在后面的游戏开发中起到了至关重要的作用
AppDelegate.h文件中的代码(本人已经注释了)
#ifndef  _APP_DELEGATE_H_
#define  _APP_DELEGATE_H_

#include "cocos2d.h"

//AppDelegate私有继承CCApplication
class  AppDelegate : private cocos2d::CCApplication
{
public:
    AppDelegate();//AppDelegate的构造函数
    virtual ~AppDelegate();//AppDelegate的析构函数

   //程序启动完成后会进入的函数
    virtual bool applicationDidFinishLaunching();

    //当程序进入后台后调用的函数(当在玩游戏时忽然别人打来电话时,程序进入后台)
    virtual void applicationDidEnterBackground();

    //当程序重新被激活的时候调用的函数(声音重新响起)
    virtual void applicationWillEnterForeground();
};

#endif
AppDelegate.cpp文件中的代码(本人已经注释了)
#include "AppDelegate.h"
#include "HelloWorldScene.h"

//命名控制
USING_NS_CC;

//构造函数
AppDelegate::AppDelegate() {

}

//析构函数
AppDelegate::~AppDelegate()
{
}

//程序启动完成后会进入的函数
bool AppDelegate::applicationDidFinishLaunching() {

    //初始化导演类()
    CCDirector* pDirector = CCDirector::sharedDirector();

    //获取以前创建的窗口(在程序设计中叫做单例对象(程序中只有一个对象))
    CCEGLView* pEGLView = CCEGLView::sharedOpenGLView();

    //设置openGL视图(单例对象)
    pDirector->setOpenGLView(pEGLView);

    //显示调试信息
    pDirector->setDisplayStats(true);

    //设置动画的帧数动画的间隔是1/60秒
    pDirector->setAnimationInterval(1.0 / 60);

    //调用场景
    CCScene *pScene = HelloWorld::scene();

    //游戏真正的开始(运行场景)
    pDirector->runWithScene(pScene);

    return true;
}

//当程序进入后台后调用的函数(当在玩游戏时忽然别人打来电话时,程序进入后台)
void AppDelegate::applicationDidEnterBackground() {

	//停止播放动画
	CCDirector::sharedDirector()->stopAnimation();

    //当有背景音乐的时候,暂停播放背景音乐
    //SimpleAudioEngine::sharedEngine()->pauseBackgroundMusic();
}

//当程序重新被激活的时候调用的函数(声音重新响起)
void AppDelegate::applicationWillEnterForeground() {

	//播放动画
	CCDirector::sharedDirector()->startAnimation();

    //当有背景音乐的时候,恢复播放背景音乐
    //SimpleAudioEngine::sharedEngine()->resumeBackgroundMusic();
}
AppDelegate.cpp中的代码主要实现了游戏启动后执行的操作,游戏启动后的操作:
1、初始化导演类
2、获取以前创建的窗口
3、设置openGL视频
4、设置是否显示调试信息
5、设置动画的帧数
6、调用场景(游戏真正的开始)
7、运行场景
HelloWorldScene.h中的代码(本人已经注释)
#ifndef __HELLOWORLD_SCENE_H__
#define __HELLOWORLD_SCENE_H__

#include "cocos2d.h"

class HelloWorld : public cocos2d::CCLayer
{
public:

    //初始化层
    virtual bool init();

    //创建场景
    static cocos2d::CCScene* scene();

    //响应菜单消息
    void menuCloseCallback(CCObject* pSender);

    //用于创建:场景、菜单、层等东西
    CREATE_FUNC(HelloWorld);
};

#endif // __HELLOWORLD_SCENE_H_
HelloWorldScene.cpp中的代码(本人已经注释)
#include "HelloWorldScene.h"

USING_NS_CC;

//创建场景
CCScene* HelloWorld::scene()
{
    //创建场景
    CCScene *scene = CCScene::create();

    //创建层
    HelloWorld *layer = HelloWorld::create();

    //将层加到场景上
    scene->addChild(layer);

    //返回场景
    return scene;
}

//初始化实例
bool HelloWorld::init()
{
    //调用CCLayer的父类的初始化函数
    if ( !CCLayer::init() )
    {
        return false;
    }

    //得到窗口的大小
    CCSize visibleSize = CCDirector::sharedDirector()->getVisibleSize();

    //得到窗口的坐标
    CCPoint origin = CCDirector::sharedDirector()->getVisibleOrigin();

     //用图片创建菜单项
    //第一个参数:正常状态下的图片
    //第二个参数:被选中时的图片
    //第三个参数:Object*
    //第四个参数:响应函数
    CCMenuItemImage *pCloseItem = CCMenuItemImage::create(
                                        "CloseNormal.png",
                                        "CloseSelected.png",
                                        this,
                                        menu_selector(HelloWorld::menuCloseCallback));

    //设置菜单项的位置
	pCloseItem->setPosition(ccp(origin.x + visibleSize.width - pCloseItem->getContentSize().width/2 ,
                                origin.y + pCloseItem->getContentSize().height/2));

    //创建菜单
    CCMenu* pMenu = CCMenu::create(pCloseItem, NULL);

    //设置菜单的坐标原点为左下角(菜单中默认的坐标原点在窗口的中央)
    pMenu->setPosition(CCPointZero);

    //将菜单加到层中
    this->addChild(pMenu, 1);

    //创建一个标签
    //第一个参数:标签中的内容
    //第二个参数:字体
    //第三个参数:字体大小
    CCLabelTTF* pLabel = CCLabelTTF::create("Hello World", "Arial", 24);

    //设置标签显示的位置
    pLabel->setPosition(ccp(origin.x + visibleSize.width/2,
                            origin.y + visibleSize.height - pLabel->getContentSize().height));

    //将标签加到层上
    this->addChild(pLabel, 1);

    //创建精灵
    CCSprite* pSprite = CCSprite::create("HelloWorld.png");

    //设置精灵的位置
    pSprite->setPosition(ccp(visibleSize.width/2 + origin.x, visibleSize.height/2 + origin.y));

    //将精灵加到层上
    this->addChild(pSprite, 0);

    return true;
}

//处理菜单点击事件
void HelloWorld::menuCloseCallback(CCObject* pSender)
{
#if (CC_TARGET_PLATFORM == CC_PLATFORM_WINRT) || (CC_TARGET_PLATFORM == CC_PLATFORM_WP8)
	CCMessageBox("You pressed the close button. Windows Store Apps do not implement a close button.","Alert");
#else
    CCDirector::sharedDirector()->end();//结束场景
#if (CC_TARGET_PLATFORM == CC_PLATFORM_IOS)
    exit(0);
#endif
#endif
}
HelloWorldScene.cpp中的代码中的CCScene* HelloWorld::scene(),实现了创建场景的过程:
1、创建场景
2、创建层
3、将层加到场景上
4、返回场景
HelloWorldScene.cpp中的代码中的CCScene* HelloWorld::init(),实现了初始化实例:
1、初始化父类的Layer
2、得到窗口的大小
3、得到窗口的坐标
4、创建菜单项
5、设置菜单项的位置
6、设置菜单的位置
7、将菜单加到层中
8、创建标签
9、设置标签的位置
10、将标签加到层上
11、创建精灵
12、设置精灵的位置
13、将精灵加到层上
