Android中常见的几种布局及事例
http://blog.csdn.net/hccblack/article/details/7051332
Android中常见的几种布局方式:线性布局(LinearLayout)、相对布局(RelativeLayout)、表格布局(Tablelayout)、嵌套布局(FrameLayout)以及帧布局。
下面通过几个事例来解释一下这几种布局方式:
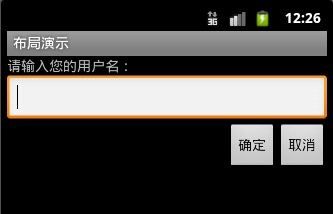
线性布局,显而易见,从字面上可以看出这周布局方式是在一条线上一样,可以是垂直的(vertical),也可以是水平的(horizontal),下面是一段事例的代码:
- <?xml version="1.0" encoding="utf-8"?>
- <LinearLayout xmlns:android="http://schemas.android.com/apk/res/android"
- android:layout_width="fill_parent"
- android:layout_height="fill_parent"
- <!--垂直布局-->
- android:orientation="vertical" >
- <TextView
- android:layout_width="wrap_content"
- android:layout_height="wrap_content"
- <!--给name_text赋值-->
- android:text="@string/name_text"
- />
- <EditText
- android:layout_width="fill_parent"
- android:layout_height="wrap_content"
- />
- <Button
- android:layout_width="wrap_content"
- android:layout_height="wrap_content"
- android:text="@string/ok_text"
- />
- <Button
- android:layout_width="wrap_content"
- android:layout_height="wrap_content"
- android:text="@string/cancel_text"
- />
- </LinearLayout>
“Layout_width”是指该元素的宽度,可选值有三种:“fill_parent”、“wrap_content”、具体数字(单位为px)。其中“fill_parent”代表填满其父元素,对于顶级元素来说,其父元素就是整个手机屏幕(即在根节点出fill_parent代表的是全屏幕)。“wrap_content”代表该元素的大小仅包裹其自身内容,而数字则代表其占相应的px。
下面是虚拟机上运行的截图:
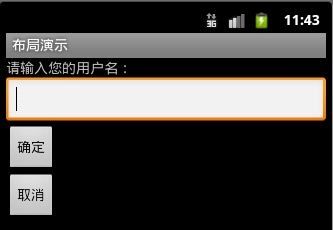
一般单纯的线性布局做出来的效果比较差,会用嵌套布局,后边嵌套布局会详解。
相对布局,就是利用相对位置布局,添加各个元素后,如果不加布局属性,会全部重叠在一起,下面的例子是一个梅花的形状,效果图是这样的,
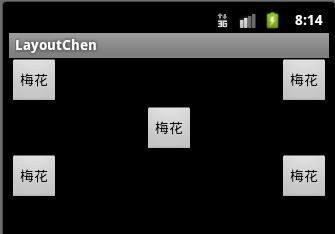
它的原理就是,先把上边两个button的属性定义成“置顶”,左边的button用居左,右边的居右,中间的定义为在上边一层的下边和居中,下面的代码中会有详细注释,下边的两个button定义为在上一层的下边和分别居两边。
- <?xml version="1.0" encoding="utf-8"?>
- <RelativeLayout xmlns:android="http://schemas.android.com/apk/res/android"
- android:layout_width="match_parent"
- android:layout_height="match_parent" >
- <Button
- <!--给元素一个id-->
- android:id="@+id/one"
- android:layout_width="wrap_content"
- android:layout_height="wrap_content"
- <!--居右-->
- android:layout_alignParentRight="true"
- <!--置顶-->
- android:layout_alignParentTop="true"
- android:text="@string/btn" />
- <Button
- <!--给元素一个id-->
- android:id="@+id/two"
- android:layout_width="wrap_content"
- android:layout_height="wrap_content"
- <!--居左-->
- android:layout_alignParentLeft="true"
- <!--置顶-->
- android:layout_alignParentTop="true"
- android:text="@string/btn" />
- <Button
- <!--给元素一个id-->
- android:id="@+id/three"
- android:layout_width="wrap_content"
- android:layout_height="wrap_content"
- <!--以id为two的元素为基,下移一层-->
- android:layout_below="@id/two"
- <!--居中-->
- android:layout_centerHorizontal="true"
- android:text="@string/btn" />
- <Button
- android:layout_width="wrap_content"
- android:layout_height="wrap_content"
- <!--居右-->
- android:layout_alignParentRight="true"
- <!--以id为three的元素为基,下移一层-->
- android:layout_below="@id/three"
- android:text="@string/btn" />
- <Button
- android:layout_width="wrap_content"
- android:layout_height="wrap_content"
- <!--居左-->
- android:layout_alignParentLeft="true"
- <!--以id为three的元素为基,下移一层-->
- android:layout_below="@id/three"
- android:text="@string/btn" />
- </RelativeLayout>
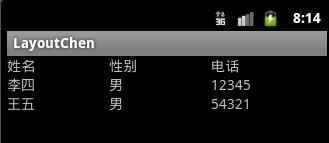
下面说一下表格布局,这个比较容易理解,里边的行是:<TableRow ></TableRow >可以在中间添加元素,下面一个示例:
- <?xml version="1.0" encoding="utf-8"?>
- <TableLayout xmlns:android="http://schemas.android.com/apk/res/android"
- android:layout_width="match_parent"
- android:layout_height="match_parent"
- <!--等比例分-->
- android:stretchColumns="*"
- >
- <TableRow >
- <TextView
- android:layout_width="wrap_content"
- android:layout_height="wrap_content"
- android:text="@string/name"
- />
- <TextView
- android:layout_width="wrap_content"
- android:layout_height="wrap_content"
- android:text="@string/sex"
- />
- <TextView
- android:layout_width="wrap_content"
- android:layout_height="wrap_content"
- android:text="@string/tel"
- />
- </TableRow>
- <TableRow >
- <TextView
- android:layout_width="wrap_content"
- android:layout_height="wrap_content"
- android:text="@string/namels"
- />
- <TextView
- android:layout_width="wrap_content"
- android:layout_height="wrap_content"
- android:text="@string/sexls"
- />
- <TextView
- android:layout_width="wrap_content"
- android:layout_height="wrap_content"
- android:text="@string/tells"
- />
- </TableRow>
- <TableRow >
- <TextView
- android:layout_width="wrap_content"
- android:layout_height="wrap_content"
- android:text="@string/nameww"
- />
- <TextView
- android:layout_width="wrap_content"
- android:layout_height="wrap_content"
- android:text="@string/sexww"
- />
- <TextView
- android:layout_width="wrap_content"
- android:layout_height="wrap_content"
- android:text="@string/telww"
- />
- </TableRow>
- </TableLayout>
效果图:
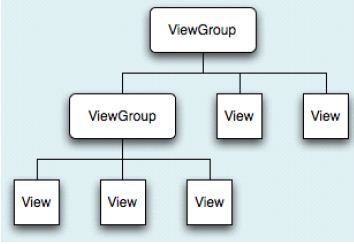
下面说一下嵌套布局,看下图,这是Android布局的图示,由图可以看出,可以多种布局方式互相包含,这就大大的增加了布局的灵活性。
下边是一个线性布局嵌套线性布局的示例,这是为了更好的实现效果:
- <?xml version="1.0" encoding="utf-8"?>
- <LinearLayout xmlns:android="http://schemas.android.com/apk/res/android"
- android:layout_width="fill_parent"
- android:layout_height="fill_parent"
- <!--垂直布局-->
- android:orientation="vertical" >
- <EditText
- android:layout_width="fill_parent"
- android:layout_height="wrap_content"
- />
- <!--注意,从这里开始嵌套,一直到这个标签的结束-->
- <LinearLayout
- android:layout_width="wrap_content"
- android:layout_height="fill_parent"
- <!--水平布局-->
- android:orientation="horizontal"
- android:layout_gravity="center"
- >
- <Button
- android:text="@string/enter"
- android:layout_width="wrap_content"
- android:layout_height="wrap_content"
- />
- <Button
- android:text="@string/reset"
- android:layout_width="wrap_content"
- android:layout_height="wrap_content"
- />
- </LinearLayout>
- </LinearLayout>
效果图:

下面是一个线性布局嵌套相对布局的示例:
- <?xml version="1.0" encoding="utf-8"?>
- <LinearLayout xmlns:android="http://schemas.android.com/apk/res/android"
- android:layout_width="match_parent"
- android:layout_height="match_parent"
- android:orientation="vertical" >
- <TextView
- android:layout_width="wrap_content"
- android:layout_height="wrap_content"
- android:text="@string/name_text"
- />
- <EditText
- android:layout_width="fill_parent"
- android:layout_height="wrap_content"
- />
- <!--开始嵌套-->
- <RelativeLayout
- android:layout_width="fill_parent"
- android:layout_height="wrap_content"
- >
- <Button
- android:layout_width="wrap_content"
- android:layout_height="wrap_content"
- android:text="@string/cancel_text"
- android:id="@+id/cancel_button"
- android:layout_alignParentRight="true"
- />
- <Button
- android:layout_width="wrap_content"
- android:layout_height="wrap_content"
- android:text="@string/ok_text"
- android:layout_toLeftOf="@id/cancel_button"
- />
- </RelativeLayout>
- </LinearLayout>
效果图:
帧布局中的每一个组件都代表一个画面,默认以屏幕左上角作为(0,0)坐标,按组件
定义的先后顺序依次逐屏显示,后面出现的会覆盖前面的画面。用该布局可以实现动画效果。
下面是一个示例,实现一个文字颜色变化过程,实质上是几个图片之间的循环切换:
编写main.xml文件其内容如下:
- <?xml version="1.0" encoding="utf-8"?>
- <FrameLayout
- xmlns:android="http://schemas.android.com/apk/res/android"
- android:layout_width="wrap_content"
- android:layout_height="wrap_content"
- android:layout_gravity="center"
- android:id="@+id/frame">
- </FrameLayout>
在该布局文件中定义一个id为frame的帧布局文件。在FramerLayoutTestActivity.java中编写java代码:
- package cn.class3g.activity;
- import android.app.Activity;
- import android.graphics.drawable.Drawable;
- import android.os.Bundle;
- import android.os.Handler;
- import android.os.Message;
- import android.view.View;
- import android.view.View.OnClickListener;
- import android.widget.FrameLayout;
- public class FrameLayoutTestActivity extends Activity {
- FrameLayout frame = null;
- private boolean flag = true;
- public void onCreate(Bundle savedInstanceState) {
- super.onCreate(savedInstanceState);
- this.setContentView(R.layout.main);
- findViews();
- //创建一个Handler子类对象,要调用其他方法
- final MyHandler myHandler = new MyHandler();
- myHandler.sleep(10);
- //为fram设置点击事件,当其被点击时,在开始与暂停直接切换
- frame.setOnClickListener(new OnClickListener() {
- public void onClick(View v) {
- flag = !flag;
- myHandler.sleep(10);
- }
- });
- }
- private void findViews() {
- frame = (FrameLayout) this.findViewById(R.id.frame);
- }
- //由该类两个方法间的循环调用,实现界面不断更新。
- class MyHandler extends Handler {
- int i = 0;
- public void handleMessage(Message msg) {
- i++;
- show(i % 6);// 设置frame前景图片
- //调用sleep方法
- sleep(600);
- }
- public void sleep(long delayMillis) {
- //判断是否继续变换颜色
- if (flag) {
- //实质上是调用了一次handleMessage
- this.sendMessageDelayed(this.obtainMessage(10), delayMillis);
- }
- }
- }
- //该方法是被调用以更新帧布局的前景图片
- void show(int id) {
- //获取6张图片
- Drawable[] pic = new Drawable[8];
- pic[0] = this.getResources().getDrawable(R.drawable.p1);
- pic[1] = this.getResources().getDrawable(R.drawable.p2);
- pic[2] = this.getResources().getDrawable(R.drawable.p3);
- pic[3] = this.getResources().getDrawable(R.drawable.p4);
- pic[4] = this.getResources().getDrawable(R.drawable.p5);
- pic[5] = this.getResources().getDrawable(R.drawable.p6);
- frame.setForeground(pic[id]);
- }
- }
效果图:
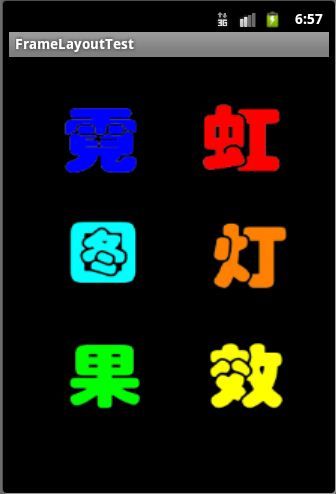
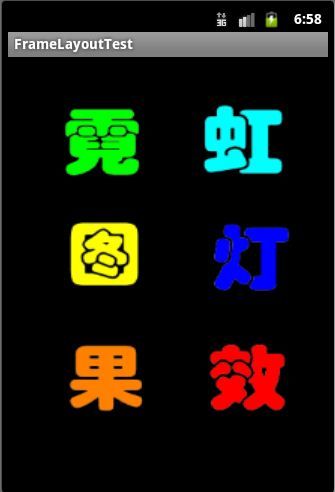
由于FrameLayout中后出现的UI控件会覆盖前面出现的UI控件,每次只能显示一个UI控
件,因此,我们可以通过在Activity中对每次显示的图片内容进行切换以实现动画效果。或许可以开启一条线程来控制切换,但在非主线程中不能更新UI界面,所以,使用了Android提供的消息通讯类Handler。该类可以实现非主线程和负责UI的主线程之间的通信,进而间接实现非主线程更新UI界面。由于sleep方法中的sendMessageDelayed(obtainMessage(0),delayMillis);本身会延迟发送一个消息,该消息会被框架传递给handleMessage事件。我们在handleMessage()方法中再次调用sleep()方法,
形成一个循环调用。在我们对界面进行点击之前,两个方法会一直循环调用。前景图片也会不断的切换,进而实现动画的效果。