中断之中断向量表IDT的初始化
中断的初始化是在哪里完成的呢?是在start_kernel()中:
512	trap_init();

535    /* init some links before init_ISA_irqs() */
536    early_irq_init();
537    init_IRQ(); //最终调用native_init_IRQ,由它来完成主要工作。
中断向量表的初始化分为两个部分:
(1)对0~19号和0x80号系统保留中断向量的初始化,在trap_init中完成
(2)对其它中断向量的初始化,在init_IRQ中完成。
我们首先来看对系统保留中断向量的初始化,这部分的初始化工作实在trap_init中完成的:
void __init trap_init(void)
{
	int i;

#ifdef CONFIG_EISA
	void __iomem *p = early_ioremap(0x0FFFD9, 4);

	if (readl(p) == 'E' + ('I'<<8) + ('S'<<16) + ('A'<<24))
		EISA_bus = 1;
	early_iounmap(p, 4);
#endif

	set_intr_gate(0, ÷_error);
	set_intr_gate_ist(2, &nmi, NMI_STACK);
	/* int4 can be called from all */
	set_system_intr_gate(4, &overflow);
	set_intr_gate(5, &bounds);
	set_intr_gate(6, &invalid_op);
	set_intr_gate(7, &device_not_available);
#ifdef CONFIG_X86_32
	set_task_gate(8, GDT_ENTRY_DOUBLEFAULT_TSS);
#else
	set_intr_gate_ist(8, &double_fault, DOUBLEFAULT_STACK);
#endif
	set_intr_gate(9, &coprocessor_segment_overrun);
	set_intr_gate(10, &invalid_TSS);
	set_intr_gate(11, &segment_not_present);
	set_intr_gate_ist(12, &stack_segment, STACKFAULT_STACK);
	set_intr_gate(13, &general_protection);
	set_intr_gate(15, &spurious_interrupt_bug);
	set_intr_gate(16, &coprocessor_error);
	set_intr_gate(17, &alignment_check);
#ifdef CONFIG_X86_MCE
	set_intr_gate_ist(18, &machine_check, MCE_STACK);
#endif
	set_intr_gate(19, &simd_coprocessor_error);

	/* Reserve all the builtin and the syscall vector: */
	for (i = 0; i < FIRST_EXTERNAL_VECTOR; i++)
		set_bit(i, used_vectors);

#ifdef CONFIG_IA32_EMULATION
	set_system_intr_gate(IA32_SYSCALL_VECTOR, ia32_syscall);
	set_bit(IA32_SYSCALL_VECTOR, used_vectors);
#endif

#ifdef CONFIG_X86_32
	set_system_trap_gate(SYSCALL_VECTOR, &system_call);
	set_bit(SYSCALL_VECTOR, used_vectors);
#endif

	/*
	 * Should be a barrier for any external CPU state:
	 */
	cpu_init();

	x86_init.irqs.trap_init();  //这个是什么意思呢?好像跟虚拟机有关,我们不用关注。
}
程序中首先设置中断向量表的头19个陷阱门,这些中断向量表都是CPU保留用于异常处理的。
接着,有这样的操作:
	/* Reserve all the builtin and the syscall vector: */
	for (i = 0; i < FIRST_EXTERNAL_VECTOR; i++)
		set_bit(i, used_vectors);
系统设置了一个位图used_vectors,来表示每个中断向量表的使用情况,FIRST_EXTERNAL_VECTOR = 20,可以看到,这里是将前20(0~19)个向量表项对应的位图设置为1,表示已经被占用了。
紧接着:
set_system_trap_gate(SYSCALL_VECTOR, &system_call);初始化系统调用向量。SYS_CALL_VECTOR = 0x80。这里有一个这样的问题,为什么用的是set_system_trap_gate,而不是像2.4那样用set_system_gate呢?我们可以将系统调用看成是trap,因为它同样要陷入内核空间,可以这样理解,当陷入陷阱时,EIP指向的是下一条指令,而当故障(fault)发生时,EIP指向当前指令,当异常发生时,EIP的指向是不固定的,因此想想系统调用后EIP的变化,它必然是属于陷阱范畴的。
接下来,看这样一个操作cpu_init()
/*
 * cpu_init() initializes state that is per-CPU. Some data is already
 * initialized (naturally) in the bootstrap process, such as the GDT
 * and IDT. We reload them nevertheless, this function acts as a
 * 'CPU state barrier', nothing should get across.
 * A lot of state is already set up in PDA init for 64 bit
 */

void __cpuinit cpu_init(void)
{
    int cpu = smp_processor_id();
    struct task_struct *curr = current;
    struct tss_struct *t = &per_cpu(init_tss, cpu);
    struct thread_struct *thread = &curr->thread;

    if (cpumask_test_and_set_cpu(cpu, cpu_initialized_mask)) { //test a bit and return its old value;测试cpumask是否已经被设置了。
        printk(KERN_WARNING "CPU#%d already initialized!\n", cpu);
        for (;;)
            local_irq_enable(); //实际上就是执行开中断指令:sti
    }

    printk(KERN_INFO "Initializing CPU#%d\n", cpu);

    if (cpu_has_vme || cpu_has_tsc || cpu_has_de)
        clear_in_cr4(X86_CR4_VME|X86_CR4_PVI|X86_CR4_TSD|X86_CR4_DE);

    load_idt(&idt_descr); //下文详述
    switch_to_new_gdt(cpu);

    /*
     * Set up and load the per-CPU TSS and LDT
     */
    atomic_inc(&init_mm.mm_count);
    curr->active_mm = &init_mm;
    BUG_ON(curr->mm);
    enter_lazy_tlb(&init_mm, curr);

    load_sp0(t, thread);
    set_tss_desc(cpu, t);
    load_TR_desc();
    load_LDT(&init_mm.context);

    t->x86_tss.io_bitmap_base = offsetof(struct tss_struct, io_bitmap);

#ifdef CONFIG_DOUBLEFAULT
    /* Set up doublefault TSS pointer in the GDT */
    __set_tss_desc(cpu, GDT_ENTRY_DOUBLEFAULT_TSS, &doublefault_tss);
#endif

    clear_all_debug_regs();
    dbg_restore_debug_regs();

    fpu_init();
    xsave_init();
}
我们来看一下load_idt()操作,这是一个宏定义:
#define load_idt(dtr) native_load_idt(dtr)在展开宏之前,先来看一下idt_descr结构:
struct desc_ptr idt_descr = { NR_VECTORS * 16 - 1, (unsigned long) idt_table };

//desc_ptr结构体如下:
struct desc_ptr {
    unsigned short size;
    unsigned long address;
} __attribute__((packed)) ;

//idt_table如下:
extern gate_desc idt_table[];
//接着看gate_desc:
typedef struct desc_struct gate_desc;

//好了,我们终于来到了终极目标,desc_struct:

/*
 * FIXME: Accessing the desc_struct through its fields is more elegant,
 * and should be the one valid thing to do. However, a lot of open code
 * still touches the a and b accessors, and doing this allow us to do it
 * incrementally. We keep the signature as a struct, rather than an union,
 * so we can get rid of it transparently in the future -- glommer
 */
/* 8 byte segment descriptor */
struct desc_struct {
    union {
        struct {
            unsigned int a;
            unsigned int b;
        };
        struct {
            u16 limit0;
            u16 base0;
            unsigned base1: 8, type: 4, s: 1, dpl: 2, p: 1;
            unsigned limit: 4, avl: 1, l: 1, d: 1, g: 1, base2: 8;
        };
    };
} __attribute__((packed));
这样可以看到,idt_desc实际上是以idt_table为起始地址,拥有NR_VECTOR*16-1个8个字节长的描述符,而这个描述符结构包含了任务门、中断门、陷阱门和调用门,这几种门的基本结构是相同的,只是相关的字段的设置不同而已,可以参考《情景分析》中相关内容理解。
接下来,看下面一个函数switch_new_gdt():
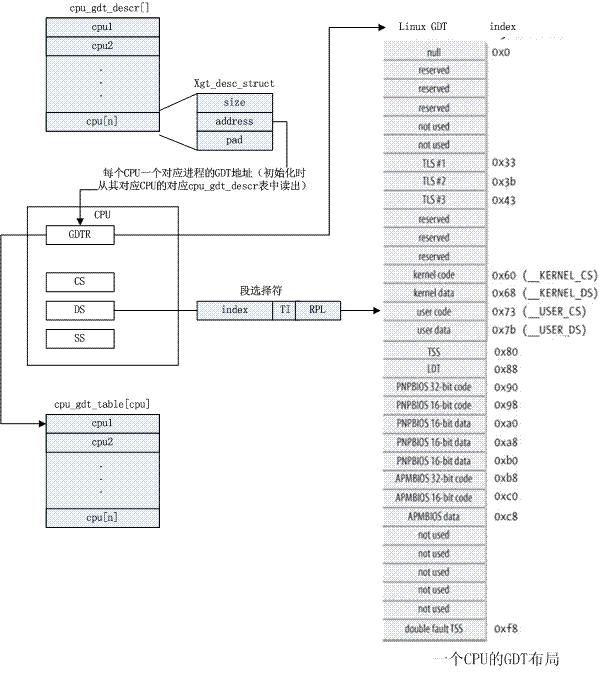
/*
 * Current gdt points %fs at the "master" per-cpu area: after this,
 * it's on the real one.
 */
void switch_to_new_gdt(int cpu)
{
	struct desc_ptr gdt_descr;

	gdt_descr.address = (long)get_cpu_gdt_table(cpu); //指向给定cpu的gdt (有个问题,难倒每个CPU都有一个GDT么?)
	gdt_descr.size = GDT_SIZE - 1;  //gdb_desc为32项
	load_gdt(&gdt_descr); //执行lgdt指令将gdb_descr的地址加载到相应的寄存器中。

             //#define load_gdt(dtr)                native_load_gdt(dtr)

             //static inline void native_load_gdt(const struct desc_ptr *dtr)
             //{
             //  asm volatile("lgdt %0"::"m" (*dtr));
             //}


        /* Reload the per-cpu base */

	load_percpu_segment(cpu);
}
这样看来,应该是每个CPU对应一个GDT的。
我们好像忘了很重要的东西:
(1)set_intr_gate
/*
 * This needs to use 'idt_table' rather than 'idt', and
 * thus use the _nonmapped_ version of the IDT, as the
 * Pentium F0 0F bugfix can have resulted in the mapped
 * IDT being write-protected.
 */
static inline void set_intr_gate(unsigned int n, void *addr)
{
	BUG_ON((unsigned)n > 0xFF);
	_set_gate(n, GATE_INTERRUPT, addr, 0, 0, __KERNEL_CS); //设置中断门
}
(2)set_system_intr_gate/* * This routine sets up an interrupt gate at directory privilege level 3. */ static inline void set_system_intr_gate(unsigned int n, void *addr) { BUG_ON((unsigned)n > 0xFF); _set_gate(n, GATE_INTERRUPT, addr, 0x3, 0, __KERNEL_CS); //设置中断门 }(3)set_task_gate
static inline void set_task_gate(unsigned int n, unsigned int gdt_entry)
{
	BUG_ON((unsigned)n > 0xFF);
	_set_gate(n, GATE_TASK, (void *)0, 0, 0, (gdt_entry<<3)); //设置任务门
}
(4)set_system_trap_gate
static inline void set_system_trap_gate(unsigned int n, void *addr)
{
	BUG_ON((unsigned)n > 0xFF);
	_set_gate(n, GATE_TRAP, addr, 0x3, 0, __KERNEL_CS); //设置陷阱门
}
我们观察一下这几个函数,都是调用_set_gate,区别在于第二个和第四个参数。第二个参数对应于中断门或陷阱门格式中的D标志位加上类型位段;第四个参数对应于DPL。下面,我们来看一下_set_gate函数:
static inline void _set_gate(int gate, unsigned type, void *addr,
			     unsigned dpl, unsigned ist, unsigned seg)
{
	gate_desc s;

	pack_gate(&s, type, (unsigned long)addr, dpl, ist, seg); //根据门的类型、入口地址等信息,组装一个64位的门描述符,保存在a,b中
	/*
	 * does not need to be atomic because it is only done once at
	 * setup time
	 */
	write_idt_entry(idt_table, gate, &s); //将a,b写入idt。
}
其第一个操作pack_gate():static inline void pack_gate(gate_desc *gate, unsigned char type, unsigned long base, unsigned dpl, unsigned flags, unsigned short seg) { gate->a = (seg << 16) | (base & 0xffff); //设置门的低32位 gate->b = (base & 0xffff0000) | (((0x80 | type | (dpl << 5)) & 0xff) << 8); //设置门的高32位 }而wirte_idt_entry():#define write_idt_entry(dt, entry, g) native_write_idt_entry(dt, entry, g)
static inline void native_write_idt_entry(gate_desc *idt, int entry, const gate_desc *gate)
{
	memcpy(&idt[entry], gate, sizeof(*gate));
}
以上我们在trap_init()中设置了一些为CPU保留专用的IDT表项以及系统调用所用的陷阱门。
下面,就进入init_IRQ()设置大量用于外设的通用中断门了:
void __init init_IRQ(void)
{
	int i;

	/*
	 * We probably need a better place for this, but it works for
	 * now ...
	 */
	x86_add_irq_domains();

	/*
	 * On cpu 0, Assign IRQ0_VECTOR..IRQ15_VECTOR's to IRQ 0..15.
	 * If these IRQ's are handled by legacy interrupt-controllers like PIC,
	 * then this configuration will likely be static after the boot. If
	 * these IRQ's are handled by more mordern controllers like IO-APIC,
	 * then this vector space can be freed and re-used dynamically as the
	 * irq's migrate etc.
	 */
	for (i = 0; i < legacy_pic->nr_legacy_irqs; i++) //对于单CPU结构,
		per_cpu(vector_irq, 0)[IRQ0_VECTOR + i] = i;

	x86_init.irqs.intr_init();
}
我们来看这个函数的最后一个操作:
首先,我们得知道x86_init.irqs.intr_init是什么东西。
/*
 * The platform setup functions are preset with the default functions
 * for standard PC hardware.
 */
struct x86_init_ops x86_init __initdata = {

	.resources = {
		.probe_roms		= probe_roms,
		.reserve_resources	= reserve_standard_io_resources,
		.memory_setup		= default_machine_specific_memory_setup,
	},

	.mpparse = {
		.mpc_record		= x86_init_uint_noop,
		.setup_ioapic_ids	= x86_init_noop,
		.mpc_apic_id		= default_mpc_apic_id,
		.smp_read_mpc_oem	= default_smp_read_mpc_oem,
		.mpc_oem_bus_info	= default_mpc_oem_bus_info,
		.find_smp_config	= default_find_smp_config,
		.get_smp_config		= default_get_smp_config,
	},

	.irqs = {
		.pre_vector_init	= init_ISA_irqs,
		.intr_init		= native_init_IRQ,
		.trap_init		= x86_init_noop,
	},

	。。。。。。。
        。。。。。。。
 };
原来在init_IRQ的最后一行调用的是native_init_IRQ函数!
void __init native_init_IRQ(void)
{
    int i;

    /* Execute any quirks before the call gates are initialised: */
    x86_init.irqs.pre_vector_init(); //调用 init_ISA_irqs ,我们将在“中断队列初始化”的博文中详述

    apic_intr_init(); //不关心

    /*
     * Cover the whole vector space, no vector can escape
     * us. (some of these will be overridden and become
     * 'special' SMP interrupts)
     */
    for (i = FIRST_EXTERNAL_VECTOR; i < NR_VECTORS; i++) { //设置20~255号中断
        /* IA32_SYSCALL_VECTOR could be used in trap_init already. */
        if (!test_bit(i, used_vectors)) //要除去0x80中断
            set_intr_gate(i, interrupt[i-FIRST_EXTERNAL_VECTOR]);
    }

    if (!acpi_ioapic && !of_ioapic)
        setup_irq(2, &irq2);

#ifdef CONFIG_X86_32
    /*
     * External FPU? Set up irq13 if so, for
     * original braindamaged IBM FERR coupling.
     */
    if (boot_cpu_data.hard_math && !cpu_has_fpu)
        setup_irq(FPU_IRQ, &fpu_irq);

    irq_ctx_init(smp_processor_id());
#endif
}
现在,我们需要看一下好好看一下interrupt数组,它保存的是每个中断服务程序的入口地址,它的定义是在entry_32.S中,一下代码的解释参考
http://blog.csdn.net/jinhongzhou/article/details/6015551:
.section .init.rodata,"a"  //定义一个段,.init.rodata表示该段可以被读写操作,"a"表示需要为该段分配内存
ENTRY(interrupt)           //定义数据段的入口为interrupt

.text     //是告诉连接器,这部分数据是程序代码
    .p2align 5     //advances the location counter until it a multiple of 32. If the location counter is already a multiple of 32, no change is needed. //按32字节对齐
                       ///.p2align指定下一行代码的对齐方式,第1参数表示按2的多少次幂字节对齐,第2参数表示对齐是跨越的位置用什么数据来填充,第3字节表示最多允许跨越多少字节。


    .p2align CONFIG_X86_L1_CACHE_SHIFT         //如果上一行.p2align 5没有执行,那么执行这一条:按2的CONFIG_X86_L1_CACHE_SHIFT次幂的字节对齐,其中CONFIG_X86_L1_CACHE_SHIFT是在内核配置中设定的

ENTRY(irq_entries_start)   //代码段的入口定义为irq_entries_start


    RING0_INT_FRAME       //宏展开:.macro RING0_INT_FRAME        //# can't unwind into user space anyway
                                         CFI_STARTPROC simple   #define CFI_STARTPROC .cfi_startproc //用在每个函数的开始,用于初始化一些内部数据结构
                                         CFI_SIGNAL_FRAME      //#define CFI_SIGNAL_FRAME    .cfi_signal_frame;作用和上面一句类似
                                         CFI_DEF_CFA esp, 3*4  #define CFI_DEF_CFA .cfi_def_cfa //定义计算CFA的规则
                                         /*CFI_OFFSET cs, -2*4;*/
                                         CFI_OFFSET eip, -3*4  //#define CFI_OFFSET .cfi_offset //xx reg ,offset reg中的值保存在offset中,offset是CFA的
                                        .endm

vector=FIRST_EXTERNAL_VECTOR   //#define FIRST_EXTERNAL_VECTOR        0x20  在irq_verctors.h中,定义了0~31号内部中断
.rept (NR_VECTORS-FIRST_EXTERNAL_VECTOR+6)/7              //.rept表示循环,#define NR_VECTORS             256,为256-32+6=230;230/7=32
    .balign 32                                       //按32字节对齐

  .rept    7                                               //加上前面的那个rept,则需要循环32*7=224次,这有点类似于两个for循环,在每次进行内循环时都要进行32字节的对齐操作


    .if vector < NR_VECTORS               //vector=0x20;NR_VECCTORS=256;
      .if vector <> FIRST_EXTERNAL_VECTOR
    CFI_ADJUST_CFA_OFFSET -4     //#define CFI_ADJUST_CFA_OFFSET .cfi_adjust_cfa_offset //xx offset 修改计算CFA的规则,修改前面一个offset。达到按4字节对齐
      .endif
1:    pushl $(~vector+0x80)    /* Note: always in signed byte range */   ????
    CFI_ADJUST_CFA_OFFSET 4     //4字节对齐
      .if ((vector-FIRST_EXTERNAL_VECTOR)%7) <> 6    //当vector=41,48 等等时,if为假,则不jmp到标号2执行,而这样的情况总共有32次:我不知道为什么??
    jmp 2f                   //数字定义的标号为临时标号,可以任意重复定义,例如:"2f"代表正向第一次出现的标号"2:",3b代表反向第一次出现的标号"3:"
      .endif
      .previous      //.previous使汇编器返回到该自定义段之前的段进行汇编,则回到上面的数据段
    .long 1b     //在数据段中执行标号1的操作
      .text          //回到代码段
vector=vector+1      //vector增加1
    .endif
  .endr
2:    jmp common_interrupt
.endr   //结束224次循环
END(irq_entries_start)  //结束代码段

.previous  //返回数据段,结束数据段的interrupt
END(interrupt)
.previous  //返回定义数据段之前定义的那个段
如果你没有兴趣仔细研读这段代码,那么记着下面的解释就行了:数组中每个元素的初始值是标号1的地址。因此访问数组中的元素时,都会跳到标号1处,执行相应的指令。
也就是,在除了0~19号和0x80号中断外,其余的所有中断在进入其自己的中断服务程序之前,必须是先条转执行common_interrupt的,而在“中断队列初始化”的博文中,我将详细讲述有关common_interrupt的知识。
现在,我们已经把中断向量表IDT初始化完毕了。