Android Gallary扩展实现 WheelView(Gallary竖着滑实现时间现实)
整理+源码实现
我们都知道,在iOS里面有一种控件------滚筒控件(Wheel View),这通常用于设置时间/日期,非常方便,但Android SDK并没有提供类似的控件。这里介绍一下如何Android实现WheelView。
源码下载:http://download.csdn.net/detail/heng615975867/6521189
先来看一看iOS中的WheelView的效果图:
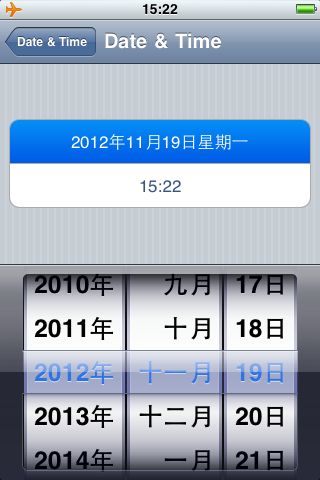
这个效果不错吧,我们应该如何实现呢?
那在Android如果也要实现这样一个效果,应该怎么做呢?
1.Android WheelView效果图
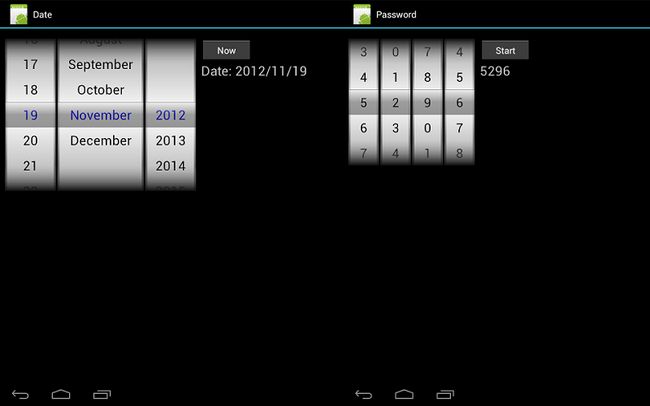
上图是我实现的DEMO的运行效果图。
2.网上的开源代码
我们从网上找到了一个开源的代码,它也实现了这样的效果,而且效果也不错,大家可以用SVN来checkout:
http://android-wheel.googlecode.com/svn/trunk
它这个Demo最本质是自己写布局,好像是利用一个LinearLayout来布局child,然后调用LinearLayout.draw(canvas)方法,把child绘制在指定的canvas上面。它同时还提供了类似AdapterView的访问方式,用户可以设置Adapter来提供数据。我在这里主要不是讲解这个Demo的结构,如果大家感兴趣,可以自己下载代码研究。
3.实现思路
由于网上的Demo也是提供了类似于AdapterView的访问方式,所以,我在想,我们能不能换一种方式来实现,试想,如果这个滚筒是横着的,那么我们就可以利用Gallery来实现,Gallery的特点跟WheelView有相似之处,比如:选中的项始终在View中间,只不过它是横着布局的。
由于我之前修改过Gallery的源代码,可以使其循环滚动,并且第一个child可以排列在最左端,所以,我在想,如果我能把Gallery修改成竖的(垂直排列),那这个不就是OK了吗?基于这样的想法,我就准备修改代码了。
我们这里需要把Gallery的源码复制到我们的工程中,然后修改,保证能编译通过。
与Gallery相关的的几个文件如下所示,它们都是放在widget文件夹和res/value文件夹下面。
- AbsSpinner.java
- AdapterView.java
- Gallery.java
- attr.xml
修改的过程比较麻烦,我这里不详细说明(要细说的话,内容太多了),在修改之后,我们的Gallery提供了一个方法:setOrientation(int),你可以让这个Gallery水平滑动,也可以垂直滑动。
我们还应该提供以下几个核心方法:
- setOnEndFlingListener ------ 当Gallery停止滑动时的回调用,这样调用者可以在停止滑动时来得到当前选中的项。
- setOrientation(int) ------ 支持布局方向:HORIZONTAL和VERTICAL。
- setScrollCycle(boolean) ------ 是否支持循环滑动。
- setSlotInCenter(boolean) ------ 是否让Gallery选中的项居中。
4. 扩展Gallery
在修改完Gallery后,我们就可以来使用它了,还得做一些事情,就是先要扩展Gallery,实现一个WheelView,在这个类里面,我们要去绘制中间选择的矩形、背景图片、上下阴影等。
这个WheelView扩展了Gallery,同时还应该提供设置背景图片,选择矩形的图片和上下阴影的图片等功能。
WheelView的完整实现代码如下:
- package com.nj1s.lib.widget;
- import android.content.Context;
- import android.graphics.Canvas;
- import android.graphics.Rect;
- import android.graphics.drawable.Drawable;
- import android.graphics.drawable.GradientDrawable;
- import android.graphics.drawable.GradientDrawable.Orientation;
- import android.util.AttributeSet;
- import android.view.Gravity;
- import android.view.View;
- import com.nj1s.lib.R;
- public class WheelView extends TosGallery
- {
- private Drawable mSelectorDrawable = null;
- private Rect mSelectorBound = new Rect();
- private GradientDrawable mTopShadow = null;
- private GradientDrawable mBottomShadow = null;
- private static final int[] SHADOWS_COLORS =
- {
- 0xFF111111,
- 0x00AAAAAA,
- 0x00AAAAAA
- };
- public WheelView(Context context)
- {
- super(context);
- initialize(context);
- }
- public WheelView(Context context, AttributeSet attrs)
- {
- super(context, attrs);
- initialize(context);
- }
- public WheelView(Context context, AttributeSet attrs, int defStyle)
- {
- super(context, attrs, defStyle);
- initialize(context);
- }
- private void initialize(Context context)
- {
- this.setVerticalScrollBarEnabled(false);
- this.setSlotInCenter(true);
- this.setOrientation(TosGallery.VERTICAL);
- this.setGravity(Gravity.CENTER_HORIZONTAL);
- this.setUnselectedAlpha(1.0f);
- // This lead the onDraw() will be called.
- this.setWillNotDraw(false);
- // The selector rectangle drawable.
- this.mSelectorDrawable =
- getContext().getResources().getDrawable(R.drawable.wheel_val);
- this.mTopShadow =
- new GradientDrawable(Orientation.TOP_BOTTOM, SHADOWS_COLORS);
- this.mBottomShadow =
- new GradientDrawable(Orientation.BOTTOM_TOP, SHADOWS_COLORS);
- // The default background.
- this.setBackgroundResource(R.drawable.wheel_bg);
- }
- @Override
- protected void dispatchDraw(Canvas canvas)
- {
- super.dispatchDraw(canvas);
- // After draw child, we do the following things:
- // +1, Draw the center rectangle.
- // +2, Draw the shadows on the top and bottom.
- drawCenterRect(canvas);
- drawShadows(canvas);
- }
- /**
- * setOrientation
- */
- @Override
- public void setOrientation(int orientation)
- {
- if (TosGallery.HORIZONTAL == orientation)
- {
- throw new IllegalArgumentException("The orientation must be VERTICAL");
- }
- super.setOrientation(orientation);
- }
- @Override
- protected void onLayout(boolean changed, int l, int t, int r, int b)
- {
- super.onLayout(changed, l, t, r, b);
- int galleryCenter = getCenterOfGallery();
- View v = this.getChildAt(0);
- int height = (null != v) ? v.getMeasuredHeight() : 50;
- int top = galleryCenter - height / 2;
- int bottom = top + height;
- mSelectorBound.set(
- getPaddingLeft(),
- top,
- getWidth() - getPaddingRight(),
- bottom);
- }
- private void drawCenterRect(Canvas canvas)
- {
- if (null != mSelectorDrawable)
- {
- mSelectorDrawable.setBounds(mSelectorBound);
- mSelectorDrawable.draw(canvas);
- }
- }
- private void drawShadows(Canvas canvas)
- {
- int height = (int)(2.0 * mSelectorBound.height());
- mTopShadow.setBounds(0, 0, getWidth(), height);
- mTopShadow.draw(canvas);
- mBottomShadow.setBounds(0, getHeight() - height, getWidth(), getHeight());
- mBottomShadow.draw(canvas);
- }
- }
上面代码没有什么特别的东西,只是有几点需要注意:
[1] 不要重写onDraw(),为什么呢?因为onDraw()是绘制自己,如果你在onDraw()中来绘制阴影的话,那么最后的效果可能是Child在上面,阴影在下面。因此,我们应该是在绘制完Child之后,再绘制阴影,怎么做呢?请看第二步。
[2] 重写dispatchDraw(),如果对这个方法不明白的话,请自己看文档,这里不解释,总之,这个方法是用来绘制Child的,因此,重写这个方法,先调用super.dispatchDraw()方法,然后再绘制阴影,OK,万事大吉。
[3] 你可以调用#setScrollCycle(boolean)来指定这个WheelView是否可以循环滑动。
5. 如何使用
关于如何使用,其实很简单,就跟使用GridView/ListView一样,通过Adapter来提供View。
- // 设置listener
- mDateWheel.setOnEndFlingListener(mListener);
- // 设置滑动时的声音
- mDateWheel.setSoundEffectsEnabled(true);
- // 设置adapter
- mDateWheel.setAdapter(new WheelTextAdapter(this));
- // Adapter的实现
- protected class WheelTextAdapter extends BaseAdapter
- {
- ArrayList<TextInfo> mData = null;
- int mWidth = ViewGroup.LayoutParams.MATCH_PARENT;
- int mHeight = 50;
- Context mContext = null;
- public WheelTextAdapter(Context context)
- {
- mContext = context;
- }
- public void setData(ArrayList<TextInfo> data)
- {
- mData = data;
- this.notifyDataSetChanged();
- }
- public void setItemSize(int width, int height)
- {
- mWidth = width;
- mHeight = height;
- }
- @Override
- public int getCount()
- {
- return (null != mData) ? mData.size() : 0;
- }
- @Override
- public Object getItem(int position)
- {
- return null;
- }
- @Override
- public long getItemId(int position)
- {
- return 0;
- }
- @Override
- public View getView(int position, View convertView, ViewGroup parent)
- {
- TextView textView = null;
- if (null == convertView)
- {
- convertView = new TextView(mContext);
- convertView.setLayoutParams(new TosGallery.LayoutParams(mWidth, mHeight));
- textView = (TextView)convertView;
- textView.setGravity(Gravity.CENTER);
- textView.setTextSize(26);
- textView.setTextColor(Color.BLACK);
- }
- if (null == textView)
- {
- textView = (TextView)convertView;
- }
- TextInfo info = mData.get(position);
- textView.setText(info.mText);
- textView.setTextColor(info.mColor);
- return convertView;
- }
- }