Nutch,一个爬虫或者搜索引擎(加上索引的话)。
现在Nutch的最新版本是Nutch2.0,但是还没有bin版本,只有src版本。Nutch所有的版本可在这个网址下载http://archive.apache.org/dist/nutch/,这里使用的是Nutch1.4。
1. 下载Nutch1.4. 到http://archive.apache.org/dist/nutch/下载apache-nutch-1.4-bin.tar.gz,别下错了,别下成apache-nutch-1.4-src.tar.gz,否则后面缺少文件。
2. 解压缩。终端 tar -zxvf apache-nutch-1.4-bin.tar.gz
3. 终端下cd到目录 apache-nutch-1.4-bin/runtime/local,下面会有bin conf lib logs plugins test 几个文件夹
4. 输入命令 bin/nutch ,如果出现下面的提示,说明nutch可用。可能会出现权限不够的提示,chmod 755 bin/nutch ,付给nutch执行权限。
Usage: nutch [-core] COMMAND
where COMMAND is one of:
crawl one-step crawler for intranets
readdb read / dump crawl db
mergedb merge crawldb-s, with optional filtering
readlinkdb read / dump link db
inject inject new urls into the database
generate generate new segments to fetch from crawl db
freegen generate new segments to fetch from text files
fetch fetch a segment's pages
parse parse a segment's pages
readseg read / dump segment data
mergesegs merge several segments, with optional filtering and slicing
updatedb update crawl db from segments after fetching
invertlinks create a linkdb from parsed segments
mergelinkdb merge linkdb-s, with optional filtering
solrindex run the solr indexer on parsed segments and linkdb
solrdedup remove duplicates from solr
solrclean remove HTTP 301 and 404 documents from solr
parsechecker check the parser for a given url
indexchecker check the indexing filters for a given url
domainstats calculate domain statistics from crawldb
webgraph generate a web graph from existing segments
linkrank run a link analysis program on the generated web graph
scoreupdater updates the crawldb with linkrank scores
nodedumper dumps the web graph's node scores
plugin load a plugin and run one of its classes main()
junit runs the given JUnit test
or
CLASSNAME run the class named CLASSNAME
Most commands print help when invoked w/o parameters.
Expert: -core option is for developers only. It avoids building the job jar,
instead it simply includes classes compiled with ant compile-core.
NOTE: this works only for jobs executed in 'local' mode
5. 继续测试,输入bin/nutch crawl,如果提示Error: JAVA_HOME is not set. 说明计算机或者没有安装jdk或者没有设定环境变量。
你可以在终端输入javac,如果没有提示安装,说明已有jdk,问题就出在环境变量那。
如果提示你安装,说明你还没装jdk。按照提示安装一个,比如openjdk-6-jdk,安装 sudo apt-get install openjdk-6-jdk。这是可在终端输入java -version
sunny@ubuntu:~$ java -version
java version "1.6.0_24"
OpenJDK Runtime Environment (IcedTea6 1.11.3) (6b24-1.11.3-1ubuntu0.11.04.1)
OpenJDK Server VM (build 20.0-b12, mixed mode)
说明jdk安装成功。
然后设定环境变量sudo gedit /etc/environment, 在里面加入
JAVA_HOME="/usr/lib/jvm/java-1.6.0-openjdk"
CLASSPATH=.:/usr/lib/jvm/java-1.6.0-openjdk/lib:/usr/lib/jvm/java-1.6.0-openjdk/jre/lib
并在PATH后面追加上java的执行路径,即 PATH="/usr/bin:*********:/bin:/usr/lib/jvm/java-1.6.0-openjdk/bin"
保存退出,重启或注销!再进入到local目录。
注:
a)环境变量都是以冒号分割
b)不要忘掉CALSSPATH=的第一个句号,它表示首先查找当前目录!
c)环境变量不要改错了,如果前两个错了还无所谓,顶多是java用不了,如果PATH改错了,可能开机不能登录了,因为系统找不到必须的命令了。如果出现那样的情况,可以开机到修复模式下重新修改PATH。
d)openjdk只实现了jdk部分功能,sun并没有开源jdk,可能后面使用的时候会出现某些问题,可以考虑下载一个完整版的JDK代替openjdk。具体google。
此时再输入bin/nutch crawl 会出现crawl的参数形式,Usage: Crawl <urlDir> -solr <solrURL> [-dir d] [-threads n] [-depth i] [-topN N]
其中,
urlDir就是种子url的目录地址
-solr <solrUrl>为solr的地址(如果没有则为空)
-dir 是保存爬取文件的目录
-threads 是爬取线程数量(默认10)
-depth 是爬取深度 (默认5)
-topN 是访问的广度 (默认是Long.max)
6. 配置nutch-site.xml文件。在local/conf目录下找到nutch-site.xml和nutch-default.xml,打开nutch-default.xml,找到
<property>
<name>http.agent.name</name>
<value></value>
<description>HTTP 'User-Agent' request header. MUST NOT be empty -
please set this to a single word uniquely related to your organization.
NOTE: You should also check other related properties:
http.robots.agents
http.agent.description
http.agent.url
http.agent.email
http.agent.version
and set their values appropriately.
</description>
</property>
将其复制到nutch-site.xml的
<configuration></configuration>中间,并用一个单词表示http.agent.name的value值,最后的结果如下。
<?xml version="1.0"?>
<?xml-stylesheet type="text/xsl" href="configuration.xsl"?>
<!-- Put site-specific property overrides in this file. -->
<configuration>
<property>
<name>http.agent.name</name>
<value>oscar</value>
<description>HTTP 'User-Agent' request header. MUST NOT be empty -
please set this to a single word uniquely related to your organization.
NOTE: You should also check other related properties:
http.robots.agents
http.agent.description
http.agent.url
http.agent.email
http.agent.version
and set their values appropriately.
</description>
</property>
</configuration>
这个是Nutch服从Robot协议,所以要改。
7. 添加种子url。在local目录下建文件夹如urls,在urls里面建文件如url,里面加入你要爬取的网站的入口url,如http://www.163.com/
8 配置regex-urlfilter.txt。同样在local/conf下找到regex-urlfilter.txt文件,注释掉最后一行。
# accept anything else
+.
添上你要抓取的网站的域名
# accept anything else
#+.
+^http://([a-z0-9]*\.)*163\.com/
这个很重要! 这是正则表达式匹配,不要写错,上面是163的网站,只要改成你想爬取的网站的域名就行,其它的一个都不要改,除非你很熟悉正则表达式的语法,你可以写自己想爬取的特定url格式,正则表达式可见http://zh.wikipedia.org/zh-cn/%E6%AD%A3%E5%88%99%E8%A1%A8%E8%BE%BE%E5%BC%8F
9. 现在就可以爬取163所有的网页了。 在local目录下新建文件夹163保存爬取内容,选择合适的参数, bin/nutch crawl urls -dir 163
10. 等爬取完成后,在163的文件夹下会有三个文件夹crawldb linkdb segments,其中crawldb是所有需要爬取的超链接,Linkdb 中存放的是所有超连接及其每个连接的链入地址和锚文本,segments存放的是抓取的页面,以爬取的时间命名,个数不多于爬取的深度,Nutch的爬取策略是广度优先,每一层url生成一个文夹夹,直到没有新的url。在segments有6个文件夹,
crawl_generate : names a set of urls to be fetched(待爬取的url)
crawl_fetch : contains the status of fetching each url(爬取的url的状态)
content : contains the content of each url(页面内容)
parse_text : contains the parsed text of each url(网页的文本信息)
parse_data : contains outlinks and metadata parsed from each url(url解析出来的外链和元数据)
crawl_parse : contains the outlink urls, used to update the crawldb(更信crawldb的外链)
但是这些文夹都是不可读的,以方便存取并在高一层进行检索用。如果想看到具体内容,要使用Nutch定义的读取命令,如下
1)查看crawldb
bin/nutch readdb
选择合适的参数即可。如下
查看url地址总数和它的状态及评分:bin/nutch readdb 163/crawldb/ -stats

导出每个url地址的详细内容:bin/nutch readdb 163/crawldb/ -dump crawldb(导出的地址)
2)查看linkdb
查看链接情况:bin/nutch readlinkdb 163/linkdb/ -url http://www.163.com/
导出linkdb数据库文件:bin/nutch readlinkdb 163/linkdb/ -dump linkdb(导出的地址)
3)查看segments
bin/nutch readseg -list -dir 163/segments/ 可以看到每一个segments的名称,产生的页面数,抓取的开始时间和结束时间,抓取数和解析数。
bin/nutch readseg -dump 163/segments/20090309103156 segdb 导出segments,其中url/segments/20090309103156为一个segments文件夹,segdb为存放转换后的内容的文件夹.
最后一个命令可能是最有用的,用于获得页面内容,一般会加上几个选项
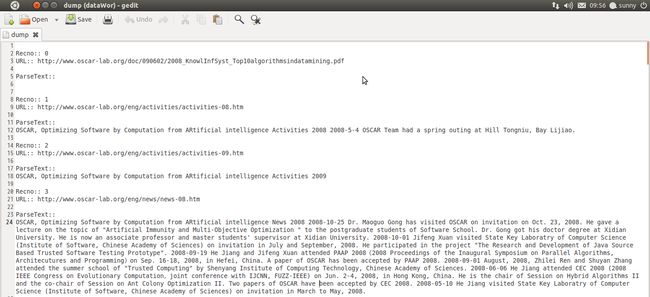
bin/nutch readseg -dump 163/segments/20120823201609/ 163_oscar/segments -nofetch -nogenerate -noparse -noparsedata -nocontent 这样得到的dump文件只包含网页的正文信息,没有标记。


