Struts2拦截器介绍
Struts2拦截器
一、理解Struts2拦截器
1、Struts2拦截器是在访问某个action或者action方法的之前或者之后实施拦截的,并且Struts2拦截器是可拔插的,拦截器是AOP的一种实现。
2、拦截器栈(Interceptor Stack)。Struts2拦截器栈是将拦截器按照一定的顺序结成一条链。在访问被拦截的方法或者字段时,Struts2拦截器栈中的拦截器就会按照之前定义的顺序被调用。
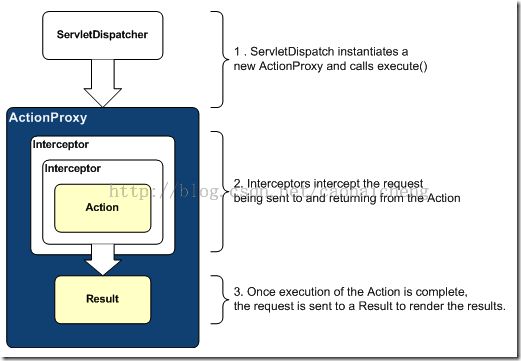
二、实现Struts2拦截器的原理
struts2拦截器的原理相对比较简单,请求action时,struts2会查找配置文件,并根据配置实例化对应的拦截器对象,然后串联成一个列表,最终一个一个调用列表中的拦截器。
三、部署拦截器
为了能够正常使用拦截器,首先我们必须在struts.xml中正确部署拦截器。具体的做法为在<interceptor></interceptor>标签对内使用<interceptor/>标签引入具体拦截器,需要指定拦截器的名称和类:
|
|
<?
xml
version
=
"1.0"
encoding
=
"UTF-8"
?>
<!DOCTYPE struts PUBLIC
"-//Apache Software Foundation//DTD Struts Configuration 2.0//EN"
"http://struts.apache.org/dtds/struts-2.0.dtd">
<
struts
>
<
package
name
=
"wwfy"
extends
=
"struts-default"
>
<
interceptors
>
<
interceptor
name
=
"拦截器名称1"
class
=
"拦截器类1"
/>
<
interceptor
name
=
"拦截器名称2"
class
=
"拦截器类2"
/>
………………………………………………………………………………………………………………………………………………
<
interceptor
name
=
"拦截器名称N"
class
=
"拦截器类N"
/>
</
interceptors
>
<!--省略Action配置信息-->
</
package
>
</
struts
>
|
1、为Action应用添加拦截器配置
部署好拦截器之后,我们就可以利用拦截器为指定的Action应用添加功能了。具体的做法是在<action></action>标签对内使用<interceptor-ref/>标签引入所需的拦截器:
|
|
<?
xml
version
=
"1.0"
encoding
=
"UTF-8"
?>
<!DOCTYPE struts PUBLIC
"-//Apache Software Foundation//DTD Struts Configuration 2.0//EN"
"http://struts.apache.org/dtds/struts-2.0.dtd">
<
struts
>
<
package
name
=
"wwfy"
extends
=
"struts-default"
>
<!--省略拦截器配置信息-->
<
action
name
=
"Action名"
class
=
"Action类"
>
<!--省略Action结果配置信息-->
<
interceptor-ref
name
=
"defaultStack"
/>
<
interceptor-ref
name
=
"拦截器名1"
/>
<
interceptor-ref
name
=
"拦截器名2"
/>
……………………………………………………………………………………………………
<
interceptor-ref
name
=
"拦截器名N"
/>
</
action
>
</
package
>
</
struts
>
|
当我们单独为某个Action单独配置拦截器的时候,系统默认的拦截器将会失效。此时为了Action仍然能够顺利执行,我们一般要通过<interceptor-ref name="defaultStack"/>手动引入defaultStack。
2、拦截器参数设置
|
|
<?
xml
version
=
"1.0"
encoding
=
"UTF-8"
?>
<!DOCTYPE struts PUBLIC
"-//Apache Software Foundation//DTD Struts Configuration 2.0//EN"
"http://struts.apache.org/dtds/struts-2.0.dtd">
<
struts
>
<
package
name
=
"wwfy"
extends
=
"struts-default"
>
<
interceptors
>
<
interceptor
name
=
"拦截器名称"
class
=
"拦截器类"
>
<
param
name
=
"参数名"
>参数值</
param
>
</
interceptor
>
</
interceptors
>
<
action
name
=
"Action名"
class
=
"Action类"
>
<!--省略Action结果配置信息-->
<
interceptor-ref
name
=
"拦截器名"
>
<
param
name
=
"参数名"
>参数值</
param
>
</
interceptor-ref
>
</
action
>
</
package
>
</
struts
>
|
四、如何使用拦截器栈
1、部署拦截器栈
一个拦截器栈可以包括一个或者多个拦截器,也可以包括其他拦截器栈。
|
|
<?
xml
version
=
"1.0"
encoding
=
"UTF-8"
?>
<!DOCTYPE struts PUBLIC
"-//Apache Software Foundation//DTD Struts Configuration 2.0//EN"
"http://struts.apache.org/dtds/struts-2.0.dtd">
<
struts
>
<
package
name
=
"wwfy"
extends
=
"struts-default"
>
<
interceptors
>
<
interceptor
name
=
"拦截器名称1"
class
=
"拦截器类1"
/>
<
interceptor
name
=
"拦截器名称2"
class
=
"拦截器类2"
/>
………………………………………………………………………………………………………………………………………………
<
interceptor
name
=
"拦截器名称N"
class
=
"拦截器类N"
/>
<
interceptor-stack
name
=
"拦截器栈1"
>
<
interceptor-ref
name
=
"拦截器名称1"
/>
<
interceptor-ref
name
=
"拦截器名称2"
/>
<
interceptor-ref
name
=
"拦截器名称N"
/>
</
interceptor-stack
>
<
interceptor-stack
name
=
"拦截器栈2"
>
<
interceptor-ref
name
=
"拦截器栈1"
/>
<
interceptor-ref
name
=
"拦截器名称3"
/>
</
interceptor-stack
>
</
interceptors
>
</
package
>
</
struts
>
|
2、为Action应用添加拦截器栈配置
这部分和拦截器的配置一样,可通过<interceptor-ref/>标签引入
五、如何自定义拦截器
自定义拦截器有2种实现方式,一种是实现Interceptor接口,另一种是继承AbstractInterceptor类
1、实现Interceptor接口
|
|
package
wwfy.interceptor;
import
com.opensymphony.xwork2.ActionInvocation;
import
com.opensymphony.xwork2.interceptor.Interceptor;
@SuppressWarnings
(
"serial"
)
public
class
CustomInterceptor1
implements
Interceptor {
public
void
destroy() {
// TODO Auto-generated method stub
}
public
void
init() {
// TODO Auto-generated method stub
}
public
String intercept(ActionInvocation invocation)
throws
Exception {
System.out.println(
"--------拦截器开始----------"
);
String result = invocation.invoke();
System.out.println(
"--------拦截器结束----------"
);
return
result;
}
}
|
2、继承AbstractInterceptor类
|
|
package
wwfy.interceptor;
import
com.opensymphony.xwork2.ActionInvocation;
import
com.opensymphony.xwork2.interceptor.AbstractInterceptor;
@SuppressWarnings
(
"serial"
)
public
class
CustomInterceptor2
extends
AbstractInterceptor {
@Override
public
String intercept(ActionInvocation invocation)
throws
Exception {
System.out.println(
"--------拦截器开始----------"
);
String result = invocation.invoke();
System.out.println(
"--------拦截器结束----------"
);
return
result;
}
}
|
3、invocation.invoke()的作用
在这个实现类中,实际上已经实现了最简单的拦截器的雏形。或许大家对这样的代码还比较陌生,这没有关系。我在这里需要指出的是一个很重要的方法invocation.invoke()。这是ActionInvocation中的方法,而ActionInvocation是Action调度者,所以这个方法具备以下2层含义:
- 如果拦截器堆栈中还有其他的Interceptor,那么invocation.invoke()将调用堆栈中下一个Interceptor的执行。
- 如果拦截器堆栈中只有Action了,那么invocation.invoke()将调用Action执行。
所以,我们可以发现,invocation.invoke()这个方法其实是整个拦截器框架的实现核心。基于这样的实现机制,我们还可以得到下面2个非常重要的推论:
- 如果在拦截器中,我们不使用invocation.invoke()来完成堆栈中下一个元素的调用,而是直接返回一个字符串作为执行结果,那么整个执行将被中止。
- 我们可以以invocation.invoke()为界,将拦截器中的代码分成2个部分,在invocation.invoke()之前的代码,将会在Action之前被依次执行,而在invocation.invoke()之后的代码,将会在Action之后被逆序执行。
由此,我们就可以通过invocation.invoke()作为Action代码真正的拦截点,从而实现AOP。
4、拦截器的执行顺序
定义中有这样一个拦截器栈
|
|
<
interceptor-stack
name
=
"xaStack"
>
<
interceptor-ref
name
=
"thisWillRunFirstInterceptor"
/>
<
interceptor-ref
name
=
"thisWillRunNextInterceptor"
/>
<
interceptor-ref
name
=
"followedByThisInterceptor"
/>
<
interceptor-ref
name
=
"thisWillRunLastInterceptor"
/>
</
interceptor-stack
>
|
整个拦截器栈的执行顺序为: