Android 4.0开发之GridLayOut布局实践
在上一篇教程中http://blog.csdn.net/dawanganban/article/details/9952379,我们初步学习了解了GridLayout的布局基本知识,通过学习知道,GridLayout可以用来做一个象TableLayout这样的布局样式,但其性能及功能都要比tablelayout要好,比如GridLayout的布局中的单元格可以跨越多行,而tablelayout则不行,此外,其渲染速度也比tablelayout要快。在本文中,将指导读者进一步加深对GridLayout的认识,带大家实做一个简单的数字键盘布局,从中体会GridLayout的用法。
开始设计
首先,我们先设计下将要设计的键盘布局图,如下图:
可以看到这个布局的一些特点:
1) 有5行4列
2)每行的单元格和列方向的单元格的大小都是不一定相等的,比如“+”号这个按钮,在纵向上是横跨了两行的
可以看到,如果要用传统的tablelayout布局样式,要实现以上的布局,可能要外加嵌套linarlayout布局样式,这样就会使的布局设计十分麻烦,而如果有了GridLayout样式,则可以很容易地解决这些问题。
GridLayout布局策略
GridLayout布局样式和LinearLayout样式一样,可以有水平和垂直两个方向的布局方式。即如果设置为垂直方向布局,则下一个单元格将会在下一行的同一位置或靠右一点的位置出现,而水平方向的布局,则意味着下一个单元格将会在当前单元格的右边出现,也有可能会跨越下一行(因为有可能GridLayout布局样式中。在我们的这个例子中,如果从最右边的除号算起,使用水平布局的话则是4列,其代码如下所示:
android:layout_width = " wrap_content "
android:layout_height = " wrap_content "
android:layout_gravity = " center "
android:columnCount = " 4 "
android:orientation = " horizontal " >
</ GridLayout >
定义简单的单元格
在GridLayout中,定义每个子控件跟以前使用布局中定义的方法有点不同,默认的是对所有的子控件使用wrap_content的方式,而不是显式声明宽度和高度并使用wrap_conent和match_parent,更多的相关规则可以参考GridLayout的文档,这里只需要在GridLayout本身的属性中,定义android:layout_width 均为wrap_conent即可。
因此,我们接着在控件中,添加各个数字按钮,如下:
< Button android:text = " 2 " />
………………………
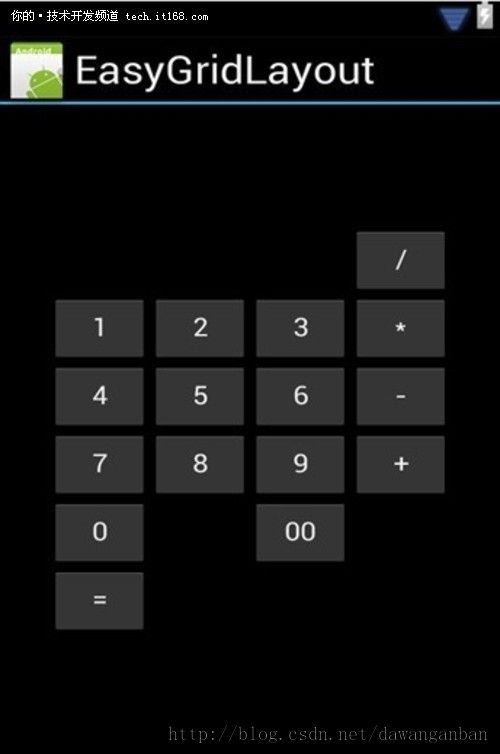
运行后,可以看到一个初步的效果如下图所示:
美化页面布局
我们可以看到在上图中,依然出现了很多空位,跟我们预想的草稿图有一定差距,这里其实可以调整每个数字按钮中的位置即可,可以利用android 4.0 GridLayout布局中的
layout_gravity属性,设置每个按钮中的位置,只需要设置layout_gravity属性为fill,即可将每个控件填充到其layout_columnSpan及layout_rowSpan所指定的宽度,修改后的代码如下所示:
< GridLayout xmlns:android = " http://schemas.android.com/apk/res/android "
android:layout_width = " wrap_content "
android:layout_height = " wrap_content "
android:layout_gravity = " center "
android:columnCount = " 4 "
android:orientation = " horizontal " >
< Button
android:layout_column = " 3 "
android:text = " / " />
< Button android:text = " 1 " />
< Button android:text = " 2 " />
< Button android:text = " 3 " />
< Button android:text = " * " />
< Button android:text = " 4 " />
< Button android:text = " 5 " />
< Button android:text = " 6 " />
< Button android:text = " - " />
< Button android:text = " 7 " />
< Button android:text = " 8 " />
< Button android:text = " 9 " />
< Button
android:layout_gravity = " fill "
android:layout_rowSpan = " 3 "
android:text = " + " />
< Button
android:layout_columnSpan = " 2 "
android:layout_gravity = " fill "
android:text = " 0 " />
< Button android:text = " 00 " />
< Button
android:layout_columnSpan = " 3 "
android:layout_gravity = " fill "
android:text = " = " />
</ GridLayout >
运行后,结果如下图:

定义特殊符号的位置
可以看到,跟草稿的图相比,象除号,等于号等,位置不是很吻合,下面我们作些相应的调整,如下:
1) 除号的大小可以不变,但它应该被放置在第4列出现
2) +号应该放在数字9之后,并且它的高度要占3行之多
3) 数字0应该占据两列的宽度
4) 等于号应该占据三列
为此,修改代码如下:
< GridLayout xmlns:android = " http://schemas.android.com/apk/res/android "
android:layout_width = " wrap_content "
android:layout_height = " wrap_content "
android:layout_gravity = " center "
android:columnCount = " 4 "
android:orientation = " horizontal " >
< Button
android:layout_column = " 3 "
android:text = " / " />
< Button android:text = " 1 " />
< Button android:text = " 9 " />
< Button
android:layout_rowSpan = " 3 "
android:text = " + " />
< Button
android:layout_columnSpan = " 2 "
android:text = " 0 " />
< Button android:text = " 00 " />
< Button
android:layout_columnSpan = " 3 "
android:text = " = " />
</ GridLayout >
在上面的代码中,可以看到,数字键3中,通过使用android:layout_column="3"指定数字从第4列开始(注意列的序号从0开始),而+号是紧跟在数字键9后,并且用android:layout_rowSpan="3"指出位于第4行,符号等于,则是紧跟着在数字“00”后,由于其layout_columnSpan=3,可以看到,占据了3个列的位置,因此另外重新新起一行进行了布局。运行后的结果如下图所示: