GreenDroid(2)ActionBar的实现
本来想自己写的, 怎么都觉得没有这篇写的好, 就贴个链接了:
http://www.samcoles.co.uk/mobile/android-use-greendroid-to-implement-an-actionbar/
This post covers the basics of setting up a project using the GreenDroid library including pulling it from GitHub and how to use the ActionBar it provides. GreenDroid is a useful UI library for Android developed by Cyril Mottier. You can check out all the features it provides by downloading the GDCatalog app from the Android Market.
The action bar:
is located at the top of the screen to support navigation and highlight important functionalities
replaces the title bar (which is often included into it)
is best used for actions across your app, like search, refresh and compose
can provide a quick link to app home by tapping the app logo
is preferably not contextual, but actions can differ from page to page
Android Patterns
If you don’t have EGit in Eclipse. You’ll need to install it. See here. Begin by opening the “Git Repository Exploring” perspective. Window > Open Perspective. Click the button for “Clone a Git Repository and add the clone to this view” and paste in this to the URI field: https://github.com/cyrilmottier/GreenDroid.git – the rest of the details should be filled in automatically, so hit next and follow the wizard through. It’s likely you won’t need to change anything.
You’ll notice the GreenDroid repository is now available to you. Open out the branches GreenDroid > Working directory, right click the folder ‘GreenDroid’ and select ‘Import Projects’. Follow the dialog through and click finish. Switch back to the Java Perspective and you will now have the GreenDroid project imported. You will likely have a problem with the project’s ‘gen’ folder or R.java. If you do (an exclamation mark or cross next to the project name), delete it and then recreate a new folder called gen, if not, create the folder. I also had to right click the project, Android Tools > Fix Project Properties to get it working as it was targeting a different compiler version to mine.
Next up create your new Android Project, the build target will need to be a minimum of 1.6 to use GreenDroid. Right click on your newly created project, select Properties, then select Android on the left hand side of the dialog. At the bottom of the window you can click “Add..” and you should have the option to select GreenDroid as a library. Click OK.
Change your default Activity to extend GDActivity. Wherever you want to use the GreenDroid ActionBar your class will need to extend GDActivity, GDListActivity or GDTabActivity. You will also need to remember to no longer call setContentView() to set your layout and instead use setActionBarContentView(). The former will crash your Activity. Change these and hit ctrl+shift+o to organise your imports.
public class GreenDroidActionBarExampleActivity extends GDActivity {
    /** Called when the activity is first created. */
    @Override
    public void onCreate(Bundle savedInstanceState) {
        super.onCreate(savedInstanceState);
        setActionBarContentView(R.layout.main);
    }
}
Next add a new class to your project that extends GDApplication. Override the getHomeActivityClass() method and the getMainApplicationIntent() methods. The former will need to return your main home/launcher activity and the latter will return an Intent to view the relevant website for your app:
public class GDActionBarExampleApplication extends GDApplication {

    @Override
    public Class<?> getHomeActivityClass() {
        return GreenDroidActionBarExampleActivity.class;
    }

    @Override
    public Intent getMainApplicationIntent() {
        return new Intent(Intent.ACTION_VIEW, Uri.parse(getString(R.string.app_url)));
    }

}
You will also need to add the the app_url string to your res/values/strings.xml file:
<string name="app_url">http://www.samcoles.co.uk</string>
Next update your AndroidManifext.xml to use your new Application class:
<application android:icon="@drawable/icon"
                android:label="@string/app_name"
                android:name=".GDActionBarExampleApplication">
Right click your res/values folder and create a new xml values file, call it themes.xml. In here we will specify some app-wide styles for your ActionBar. Ignore the error on the gdActionBarApplicationDrawable and gdActionBarBackground value for now:
<?xml version="1.0" encoding="utf-8"?>
<resources>
    <style name="Theme.GDActionBarExample" parent="@style/Theme.GreenDroid.NoTitleBar">
        <item name="gdActionBarTitleColor">#FFFDD0</item>
        <item name="gdActionBarBackground">@drawable/action_bar_background</item>
        <item name="gdActionBarDividerWidth">2px</item>
        <item name="gdActionBarApplicationDrawable">@drawable/application_logo</item>
    </style>
</resources>
Again, update the application tag in your AndroidManifest.xml to use this theme:
<application android:icon="@drawable/icon"
                android:label="@string/app_name"
                android:theme="@style/Theme.GDActionBarExample"
                android:name=".GDActionBarExampleApplication">
Back to the error in themes.xml. It is clear that you could just place an image into your drawable folders called application_logo. But we are going to use a StateDrawable xml so that the logo behaves like a button. Create a folder, /res/drawable and within here create two new xml files called application_logo.xml and action_bar_background.xml, the latter will be a ShapeDrawable for our ActionBar’s background. In application_logo.xml place your state drawable code that defines the image to use for pressed, focused and normal states:
<?xml version="1.0" encoding="utf-8"?>
<selector
    xmlns:android="http://schemas.android.com/apk/res/android">

    <item
        android:state_pressed="true"
        android:drawable="@drawable/application_logo_alt" />

    <item
        android:state_focused="true"
        android:drawable="@drawable/application_logo_alt" />

    <item
        android:drawable="@drawable/application_logo_normal" />

</selector>
and in action_bar_background.xml the ShapeDrawable code. This is just a solid block of colour, but you could specify a gradient or even use an image:
<?xml version="1.0" encoding="utf-8"?>

<shape
    xmlns:android="http://schemas.android.com/apk/res/android"
    android:shape="rectangle">

    <solid android:color="#708090" />

</shape>
Next you will need to place the images you’ve specified in the application_logo.xml StateDrawable into your project. The GDCatalog app uses the dimensions of 205×51 pixels for the hdpi versions and 135×34 for the mdpi version. I haven’t yet needed to experiment with different sizes so mine are the same dimensions, and these suit the ActionBar proportions well. Place these into the relevant res/drawable-hdpi and res/drawable-mdpi folders.
You should now be able to run the project and test it out! It won’t look much but you can tap the logo and it should open the URL specified in your app_url string. Notice also that it changes to your application_logo_alt.png image when touched or selected.
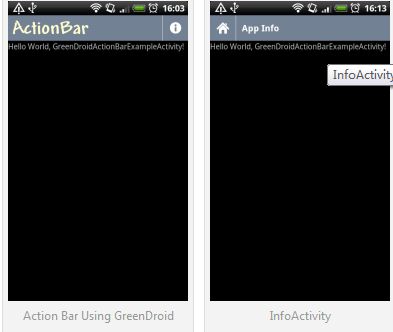
Next we will make the ActionBar a little more useful by adding a button to it that will take us to our application’s info activity. Back in GreenDroidActionBarExampleActivity, simply add an info button by placing this call in your onCreate() method:
addActionBarItem(Type.Info, ACTION_BAR_INFO);
Also add that constant to the top of your class:
private static final int ACTION_BAR_INFO = 0;
Go ahead and run it again. The info button is in! But you’ll notice that nothing happens when you click it.
To enable this button to do something we need to override onHandleActionBarItemClick(). Right click your Activity, source > Override/Implement methods and choose it from the options under GDActivity. You can get the value of the id that was passed in the second parameter of addActionBarItem by calling getItemId() on the item. So create a switch block on this value and start InfoActivity (we’ll create this next) if the info button has been pressed:
@Override
public boolean onHandleActionBarItemClick(ActionBarItem item, int position) {
    switch(item.getItemId()) {
    case ACTION_BAR_INFO:
        startActivity(new Intent(this, InfoActivity.class));
        break;
    default:
        return super.onHandleActionBarItemClick(item, position);
    }
    return true;
}
Create the new class InfoActivity that extends GDActivity, and don’t forget to add it to your manifest.
<activity android:name=".InfoActivity"></activity>
In your onCreate() method of InfoActivity set the title to be displayed in the Action Bar:
@Override
public void onCreate(Bundle savedInstanceState) {
    super.onCreate(savedInstanceState);
    setActionBarContentView(R.layout.main);
    setTitle(R.string.info_activity_title);
}
Remember to add this string to your strings.xml file also:
<string name="info_activity_title">App Info</string>
Now run your app! Notice that the InfoActivity Action Bar has a home button and a title in place of the application logo. Tap the home button to return to the home activity you just came from.
Working Android 1.6 source for this post is available on github. To checkout the other features of GreenDroid you can also import the project for the GDCatalog app from the GreenDroid github repository.