话说我打算一天学完object c语法,系列4--------来自书Objective-c程序设计
文件操作
管理文件(NSFileManager)
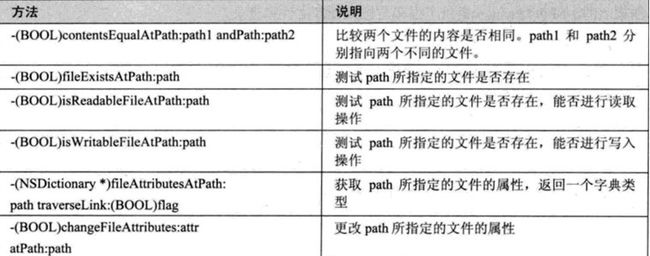
path必须是NSString,可以使用~表示用户的主目录,NSFileManager提供的操作文件的方法有:

P207一个操作文件的例子
//
//  main.m
//  test
//
//  Created by Zeng on 13-5-24.
//  Copyright (c) 2013年 zeng. All rights reserved.
//

#import <Foundation/Foundation.h>


int main(int argc, const char * argv[])
{
    NSAutoreleasePool *pool = [[NSAutoreleasePool alloc] init];

    NSString *fileName = @"file";
    NSFileManager *fm;
    NSDictionary *nsd;
    fm = [NSFileManager defaultManager];

    if ([fm fileExistsAtPath:fileName] == NO) {
        NSLog(@"文件并不存在");
        return 1;
    }else if ([fm copyPath:fileName toPath:@"file1" handler:nil] == NO){
        NSLog(@"文件不能拷贝");
        return 1;
    }else if ([fm contentsEqualAtPath:fileName andPath:@"file1"] == NO){
        NSLog(@"文件不相等");
        return 1;
    }else if ([fm movePath:fileName toPath:@"file2" handler:nil] == NO){
        NSLog(@"文件不能重命名");
        return 1;
    }else if ((nsd = [fm fileAttributesAtPath:@"file2" traverseLink:NO]) == nil){
        NSLog(@"不能得到文件属性");
        return 1;
    }else if (nsd != nil){
        for (NSString *str in nsd) {
            NSLog(@"%@ : %@", str, [nsd objectForKey:str]);
        }
    }else if ([fm removeFileAtPath:fileName handler:nil] == NO){
        NSLog(@"删除文件出错");
        return 1;
    }

    NSLog(@"程序正常运行");

    // 输出文件里面的string
    NSLog(@"%@", [NSString stringWithContentsOfFile:@"file2" encoding:NSUTF8StringEncoding error:nil]);

    [pool release];
    return 0;
}
首先执行这个程序,必须保证生成的程序目录下有file这个文件,可以在xcode选择other创建出来,然后在里边写上:
"hello,www.zengraoli.com"
"hello,www.zeng.com"
"hello,www.zengraoli.com"
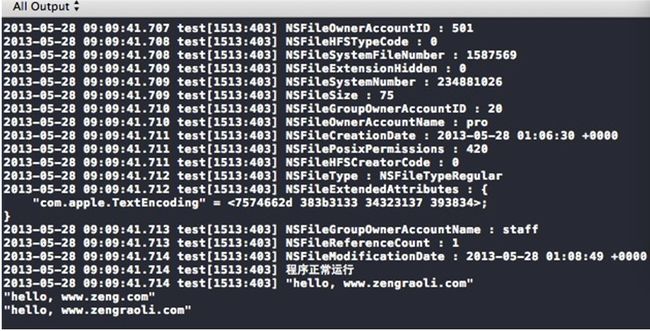
结果可以看到输出:

管理目录
P210一个例子
//
//  main.m
//  test
//
//  Created by Zeng on 13-5-24.
//  Copyright (c) 2013年 zeng. All rights reserved.
//

#import <Foundation/Foundation.h>


int main(int argc, const char * argv[])
{
    NSAutoreleasePool *pool = [[NSAutoreleasePool alloc] init];

    NSString *dirName = @"dir1";
    NSFileManager *fm;
    NSString *path;
    NSDirectoryEnumerator *dirEnum;
    NSArray *dirArray;

    fm = [NSFileManager defaultManager];
    path = [fm currentDirectoryPath];

    NSLog(@"当前的目录是:%@", path);

    if ([fm createDirectoryAtPath:dirName attributes:nil] == NO) {
        NSLog(@"目录创建失败");
        return 1;
    }else if ([fm movePath:dirName toPath:@"dir2" handler:nil] == NO){
        NSLog(@"目录重命名失败");
        return 1;
    }else if ([fm changeCurrentDirectoryPath:@"Lee"] == NO){
        NSLog(@"设置目录失败");
        return 1;
    }

    path = [fm currentDirectoryPath];
    NSLog(@"经过修改之后的目录为:%@", path);
    NSLog(@"使用enumeratorAtPath:方法枚举目录:");

    dirEnum = [fm enumeratorAtPath:path];
    while ((path = [dirEnum nextObject]) != nil) {
        NSLog(@"%@", path);
    }

    NSLog(@"使用directoryContentsAtPath:方法枚举目录");

    dirArray = [fm directoryContentsAtPath:[fm currentDirectoryPath]];
    for (path in dirArray) {
        NSLog(@"%@", path);
    }

    [pool release];
    return 0;
}
需要保证在生成程序的目录底下有Lee的文件夹,里面有几个文件。这是输出:

操作文件数据(NSData)
在基础框架中,可以使用NSData类来设置缓冲区,换句话说,可以把NSData对象当做缓冲区:
P213
//
//  main.m
//  test
//
//  Created by Zeng on 13-5-24.
//  Copyright (c) 2013年 zeng. All rights reserved.
//

#import <Foundation/Foundation.h>


int main(int argc, const char * argv[])
{
    NSAutoreleasePool *pool = [[NSAutoreleasePool alloc] init];

    NSFileManager *fm;
    NSData *data;

    fm = [NSFileManager defaultManager];
    data = [fm contentsAtPath:@"readMe"];

    if (data == nil) {
        NSLog(@"文件不能读取");
        return 1;
    }else if ([fm createFileAtPath:@"readMe1" contents:data attributes:nil] == NO){
        NSLog(@"文件不能创建");
        return 1;
    }

    NSLog(@"拷贝后的文件内容为:");
    NSLog(@"%@", [NSString stringWithContentsOfFile:@"readMe1" encoding:NSUTF8StringEncoding error:nil]);


    [pool release];
    return 0;
}
首先执行这个程序,必须保证生成的程序目录下有readMe这个文件,可以在xcode选择other创建出来,然后在里边写上:
"hello, www.zengraoli.com"
"hello, www.zeng.com"
"hello, www.zengraoli.com"
结果可以看到输出:

操作目录总结
有时需要在程序中获得临时目录来创建一些临时文件,或者从主目录中读取文件。NSTemporaryDirectory方法就是返回临时目录。相关方法:

P215例子
//
//  main.m
//  test
//
//  Created by Zeng on 13-5-24.
//  Copyright (c) 2013年 zeng. All rights reserved.
//

#import <Foundation/Foundation.h>


int main(int argc, const char * argv[])
{
    NSAutoreleasePool *pool = [[NSAutoreleasePool alloc] init];

    NSFileManager *fm;
    NSString *fName = @"readMe.h";
    NSString *path, *tempDir, *extDir, *homeDir, *fullPath;
    NSString *testPath = @"~Lee/sam/lee//../readMe.h";
    NSArray *dirArray;

    fm = [NSFileManager defaultManager];
    tempDir = NSTemporaryDirectory();

    NSLog(@"临时文件的目录为:%@", tempDir);

    path = [fm currentDirectoryPath];
    NSLog(@"当前的文件目录是:%@", [path lastPathComponent]);

    fullPath = [path stringByAppendingPathComponent:fName];
    NSLog(@"添加一个带扩展名的文件%@后的完整路径为:%@", fName, fullPath);

    extDir = [fullPath pathExtension];
    NSLog(@"路径%@的扩展名是%@", fullPath, extDir);

    homeDir = NSHomeDirectory();
    NSLog(@"用户根目录为%@", homeDir);

    dirArray = [homeDir pathComponents];
    for (path in dirArray) {
        NSLog(@"%@", path);
    }

    NSLog(@"%@ ", [testPath stringByStandardizingPath]);

    [pool release];
    return 0;
}
输出为:
文件的读写(NSFileHandle)
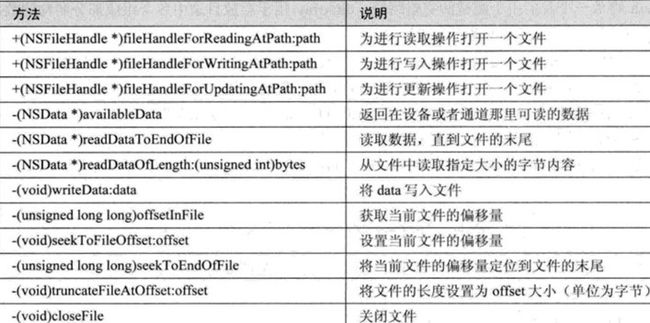
有时需要更精确地处理文件中的内容,比如,每次读写文件中的几个字符。这就需要使用NSFileHandle类。方法有:
P217一个例子
//
//  main.m
//  test
//
//  Created by Zeng on 13-5-24.
//  Copyright (c) 2013年 zeng. All rights reserved.
//

#import <Foundation/Foundation.h>


int main(int argc, const char * argv[])
{
    NSAutoreleasePool *pool = [[NSAutoreleasePool alloc] init];

    NSFileHandle *file1, *file2;
    NSData *fd;

    file1 = [NSFileHandle fileHandleForReadingAtPath:@"readMe"];

    if (file1 == nil) {
        NSLog(@"打开文件进行读取操作失败!");
        return 1;
    }

    [[NSFileManager defaultManager]createFileAtPath:@"readMe1" contents:nil attributes:nil];

    file2 = [NSFileHandle fileHandleForWritingAtPath:@"readMe1"];

    if (file2 == nil) {
        NSLog(@"打开文件进行写入操作失败");
        return 1;
    }

    [file2 truncateFileAtOffset:0];
    fd = [file1 readDataToEndOfFile];
    [file2 writeData:fd];

    NSLog(@"将文件1读取的内容写入文件2以后:");
    NSLog(@"%@", [NSString stringWithContentsOfFile:@"readMe1" encoding:NSUTF8StringEncoding error:nil]);

    [file2 seekToEndOfFile];
    [file2 writeData:fd];

    NSLog(@"将我们的文件1的内容拷贝到文件2的末尾后:");
    NSLog(@"%@", [NSString stringWithContentsOfFile:@"readMe1" encoding:NSUTF8StringEncoding error:nil]);

    [file1 closeFile];
    [file2 closeFile];

    [pool release];
    return 0;
}
必须保证生成的程序目录下有readMe这个文件(否则会出现打开失败),可以在xcode选择other创建出来,然后在里边写上:
"hello, www.zengraoli.com"
"hello, www.zeng.com"
"hello, www.zengraoli.com"
进程信息(NSProcessInfo)
NSProcessInfo类用于获取当前正在执行的进程信息,比如,当前机器的名称、操作系统类型等,常用方法:

P220一个例子
//
//  main.m
//  test
//
//  Created by Zeng on 13-5-24.
//  Copyright (c) 2013年 zeng. All rights reserved.
//

#import <Foundation/Foundation.h>


int main(int argc, const char * argv[])
{
    NSAutoreleasePool *pool = [[NSAutoreleasePool alloc] init];

    NSProcessInfo *proc = [NSProcessInfo processInfo];

    NSArray *args = [proc arguments];
    for (NSString *str1 in args) {
        NSLog(@"当前进程的参数为:%@", str1);
    }

    NSString *pn = [proc processName];
    NSString *hn = [proc hostName];
    NSLog(@"当前进程的进程名为%@,进程的主机名%@", pn, hn);

    NSString *osn = [proc operatingSystemName];
    NSInteger os = [proc operatingSystem];
    NSString *osvs = [proc operatingSystemVersionString];

    NSLog(@"当前系统的名称为:%@操作系统代表数字为:%li 当前系统的版本号为:%@", osn, os, osvs);

    [pool release];
    return 0;
}
综合使用了NSArray、NSProcessInfo、NSCountedSet以及NSEnumerator
P221
//
//  main.m
//  test
//
//  Created by Zeng on 13-5-24.
//  Copyright (c) 2013年 zeng. All rights reserved.
//

#import <Foundation/Foundation.h>


int main(int argc, const char * argv[])
{
    NSAutoreleasePool *pool = [[NSAutoreleasePool alloc] init];

    NSArray *arr = [[NSProcessInfo processInfo]arguments];
    NSCountedSet *cset1 = [[NSCountedSet alloc]initWithArray:arr];
    NSArray *sorted_arr = [[cset1 allObjects]sortedArrayUsingSelector:@selector(compare:)];

    NSEnumerator *enmr = [sorted_arr objectEnumerator];
    id letter;
    while (letter = [enmr nextObject]) {
        printf("%s\n", [letter UTF8String]);
    }

    [cset1 release];

    [pool release];
    return 0;
}
在控制台下执行test程序,输入几个字母,然后回车

程序使用了NSCountedSet的initWithArray方法将保存在数组中的参数,存入NSCountedSet对象中,这样的操作会去除重复的参数:
NSCountedSet *cset1 = [[NSCountedSet alloc]initWithArray:arr];


