socket通信
今天我们介绍android下的socket通信,并编写一个小程序:
android作为客户端,通过socket发送数据到我们的pc机,pc机就是服务器。
分两个实验完成:我们先在模拟器上实现,然后在真实的手机上实现。
1.
设置环境,两个实验均在ubuntu11.04下完成:
第一个实验是android模拟器作为客户端,第二个实验是真实的android手机作为客户端,两个实验的服务器都是我们的pc机,并且服务器端用c++实现,客户端用java实现:
第一个实验的ip配置:
主机eth0:192.168.1.2
pc服务器端口:9400
第二个实验的ip配置:
主机lwan0:192.168.1.100
pc服务器端口:9500
注意,第一个实验是android模拟器作为客户端,因此要设置主机的eth0的ip地址,而第二个实验是真实的android手机作为客户端,它和pc机(服务器)在一个无线路由器局域网里,因此我们要设置主机的lwan的ip地址,不过由于主机和真实手机的ip都是路由器dhcp自动分配的,因此无需额外的配置命令,你可以改成你自己的ip地址。
第一个实验的配置命令很简单:
sudo ifconfig eth0 192.168.1.2
首先介绍第一个实验:
由于模拟器的特殊性,因此我们需要将模拟器的端口映射到主机的某个端口,这样才可以和模拟器相互通信。
1.
端口映射:
在android sdk的platform-tools下有一个adb可执行程序,我的路径是android-sdk-linux_x86/platform-tools/adb,运行如下命令进行端口映射:
上面命令的意思是将模拟器的9400端口映射到主机的9400端口,这样模拟器向192.168.1.2:9400发送的数据就会被映射到主机的9400端口(主机的ip地址是192.168.1.2),而我们的主机只要监听本地的9400端口即可。这里我们使用tcp socket
2.
环境配置完毕并了解了基本原理后,直接上代码,下面是客户端的代码,用java实现:
src/BogoclientActivity.java
不要忘了,在AndroidManifest.xml中添加访问网络权限:
<uses-permission android:name="android.permission.INTERNET" />
把上面的代码编译并下载到模拟器中
服务器端的代码,用c++实现:
server.c
Makefile:
运行结果:
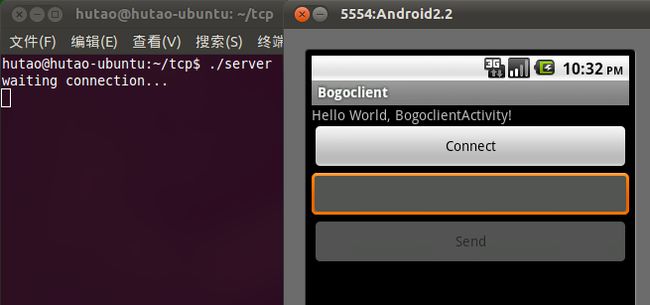
首先运行服务器代码,然后运行模拟器的bogoclient程序,如下图,pc机正等待模拟器连接,并且未连接之前模拟器的文本对话框和send按钮都是不可用的:

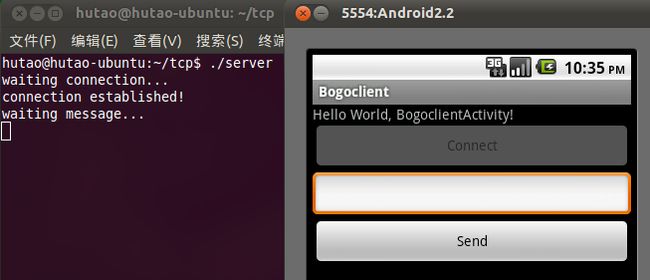
点击connect按钮进行连接,连接成功后我们发现文本框和send按钮可用了,connect按钮不可用了,并且主机从等待连接状态变成了等待数据状态:

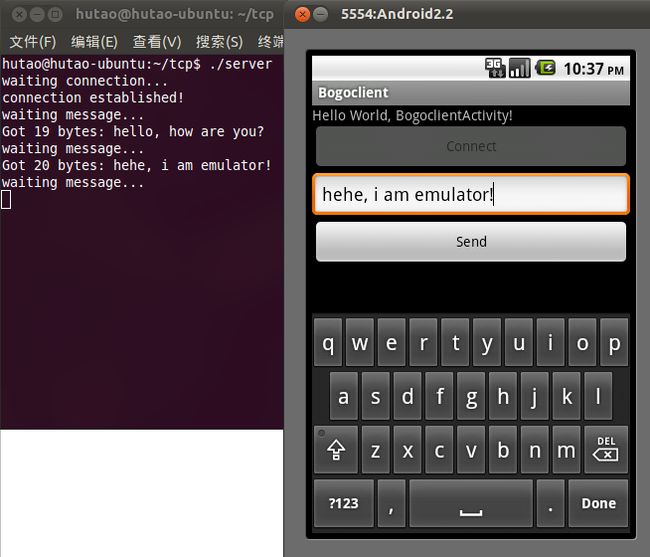
输入一些文本后按send按钮,pc机就会打印出模拟器发来的文本数据:

分两个实验完成:我们先在模拟器上实现,然后在真实的手机上实现。
1.
设置环境,两个实验均在ubuntu11.04下完成:
第一个实验是android模拟器作为客户端,第二个实验是真实的android手机作为客户端,两个实验的服务器都是我们的pc机,并且服务器端用c++实现,客户端用java实现:
第一个实验的ip配置:
主机eth0:192.168.1.2
pc服务器端口:9400
第二个实验的ip配置:
主机lwan0:192.168.1.100
pc服务器端口:9500
注意,第一个实验是android模拟器作为客户端,因此要设置主机的eth0的ip地址,而第二个实验是真实的android手机作为客户端,它和pc机(服务器)在一个无线路由器局域网里,因此我们要设置主机的lwan的ip地址,不过由于主机和真实手机的ip都是路由器dhcp自动分配的,因此无需额外的配置命令,你可以改成你自己的ip地址。
第一个实验的配置命令很简单:
sudo ifconfig eth0 192.168.1.2
首先介绍第一个实验:
由于模拟器的特殊性,因此我们需要将模拟器的端口映射到主机的某个端口,这样才可以和模拟器相互通信。
1.
端口映射:
在android sdk的platform-tools下有一个adb可执行程序,我的路径是android-sdk-linux_x86/platform-tools/adb,运行如下命令进行端口映射:
cd android-sdk-linux_x86/platform-tools
./adb forward tcp:9400 tcp:9400
上面命令的意思是将模拟器的9400端口映射到主机的9400端口,这样模拟器向192.168.1.2:9400发送的数据就会被映射到主机的9400端口(主机的ip地址是192.168.1.2),而我们的主机只要监听本地的9400端口即可。这里我们使用tcp socket
2.
环境配置完毕并了解了基本原理后,直接上代码,下面是客户端的代码,用java实现:
src/BogoclientActivity.java
- package bogo.client.com;
- import java.io.IOException;
- import java.io.PrintStream;
- import java.net.Socket;
- import java.net.UnknownHostException;
- import android.app.Activity;
- import android.os.Bundle;
- import android.view.View;
- import android.widget.Button;
- import android.widget.EditText;
- import android.widget.Toast;
- public class BogoclientActivity extends Activity
- {
- /* 服务器地址 */
- private final String SERVER_HOST_IP = "192.168.1.2";
- /* 服务器端口 */
- private final int SERVER_HOST_PORT = 9400;
- private Button btnConnect;
- private Button btnSend;
- private EditText editSend;
- private Socket socket;
- private PrintStream output;
- public void toastText(String message)
- {
- Toast.makeText(this, message, Toast.LENGTH_LONG).show();
- }
- public void handleException(Exception e, String prefix)
- {
- e.printStackTrace();
- toastText(prefix + e.toString());
- }
- /** Called when the activity is first created. */
- @Override
- public void onCreate(Bundle savedInstanceState)
- {
- super.onCreate(savedInstanceState);
- setContentView(R.layout.main);
- initView();
- btnConnect.setOnClickListener(new Button.OnClickListener()
- {
- @Override
- public void onClick(View v)
- {
- initClientSocket();
- }
- });
- btnSend.setOnClickListener(new Button.OnClickListener()
- {
- @Override
- public void onClick(View v)
- {
- sendMessage(editSend.getText().toString());
- }
- });
- }
- public void initView()
- {
- btnConnect = (Button)findViewById(R.id.btnConnect);
- btnSend = (Button)findViewById(R.id.btnSend);
- editSend = (EditText)findViewById(R.id.sendMsg);
- btnSend.setEnabled(false);
- editSend.setEnabled(false);
- }
- public void closeSocket()
- {
- try
- {
- output.close();
- socket.close();
- }
- catch (IOException e)
- {
- handleException(e, "close exception: ");
- }
- }
- private void initClientSocket()
- {
- try
- {
- /* 连接服务器 */
- socket = new Socket(SERVER_HOST_IP, SERVER_HOST_PORT);
- /* 获取输出流 */
- output = new PrintStream(socket.getOutputStream(), true, "utf-8");
- btnConnect.setEnabled(false);
- editSend.setEnabled(true);
- btnSend.setEnabled(true);
- }
- catch (UnknownHostException e)
- {
- handleException(e, "unknown host exception: " + e.toString());
- }
- catch (IOException e)
- {
- handleException(e, "io exception: " + e.toString());
- }
- }
- private void sendMessage(String msg)
- {
- output.print(msg);
- }
- }
layout/main.xml
- <?xml version="1.0" encoding="utf-8"?>
- <LinearLayout xmlns:android="http://schemas.android.com/apk/res/android"
- android:layout_width="fill_parent"
- android:layout_height="fill_parent"
- android:orientation="vertical" >
- <TextView
- android:layout_width="fill_parent"
- android:layout_height="wrap_content"
- android:text="@string/hello" />
- <Button
- android:id="@+id/btnConnect"
- android:layout_width="fill_parent"
- android:layout_height="wrap_content"
- android:text="@string/connect" />
- <EditText
- android:id="@+id/sendMsg"
- android:layout_width="match_parent"
- android:layout_height="wrap_content"
- android:inputType="text" />
- <Button
- android:id="@+id/btnSend"
- android:layout_width="fill_parent"
- android:layout_height="wrap_content"
- android:text="@string/send" />
- </LinearLayout>
不要忘了,在AndroidManifest.xml中添加访问网络权限:
<uses-permission android:name="android.permission.INTERNET" />
把上面的代码编译并下载到模拟器中
服务器端的代码,用c++实现:
server.c
- #include <sys/types.h>
- #include <sys/socket.h>
- #include <netinet/in.h>
- #include <arpa/inet.h>
- #include <unistd.h>
- #include <stdlib.h>
- #include <stdio.h>
- #define PORT 9400
- #define MAX_BUFFER 1024
- int main()
- {
- /* create a socket */
- int server_sockfd = socket(AF_INET, SOCK_STREAM, 0);
- struct sockaddr_in server_addr;
- server_addr.sin_family = AF_INET;
- server_addr.sin_addr.s_addr = inet_addr("192.168.1.2");
- server_addr.sin_port = htons(PORT);
- /* bind with the local file */
- bind(server_sockfd, (struct sockaddr *)&server_addr, sizeof(server_addr));
- /* listen */
- listen(server_sockfd, 5);
- int size;
- char buffer[MAX_BUFFER + 1];
- int client_sockfd;
- struct sockaddr_in client_addr;
- socklen_t len = sizeof(client_addr);
- /* accept a connection */
- printf("waiting connection...\n");
- client_sockfd = accept(server_sockfd, (struct sockaddr *)&client_addr, &len);
- printf("connection established!\n");
- while(1)
- {
- printf("waiting message...\n");
- /* exchange data */
- size = read(client_sockfd, buffer, MAX_BUFFER);
- buffer[size] = '\0';
- printf("Got %d bytes: %s\n", size, buffer);
- }
- /* close the socket */
- close(client_sockfd);
- return 0;
- }
Makefile:
- all: server.c
- gcc -g -Wall -o server server.c
- clean:
- rm -rf *.o server
运行结果:
首先运行服务器代码,然后运行模拟器的bogoclient程序,如下图,pc机正等待模拟器连接,并且未连接之前模拟器的文本对话框和send按钮都是不可用的:

点击connect按钮进行连接,连接成功后我们发现文本框和send按钮可用了,connect按钮不可用了,并且主机从等待连接状态变成了等待数据状态:

输入一些文本后按send按钮,pc机就会打印出模拟器发来的文本数据:

注意,如果模拟器连接时提示Connect refused,那么把模拟器的bogoclient和pc机上的server都结束掉,然后重新开始。
代码不过多解释了,注释挺详细的,有关pc机上的tcp通信,可以参考:
http://blog.csdn.net/htttw/article/details/7519964
最后,我把这个服务器和客户端两个程序都上传上来,供大家下载:
http://download.csdn.net/detail/htttw/4307606
在下一篇里,我们要把这个程序移植到真实的android手机上了:
http://blog.csdn.net/htttw/article/details/7574409
转自:http://blog.csdn.net/htttw/article/details/7574372