Android Alert Dialog解决点击按钮对话框不关闭的问题
Android alertDialog中左中右三个按钮,点击按钮的时候,即使没调用dismiss方法,系统也会默认的去调用,而把这个对话框被关闭掉,但是我们的一些实际需求,就需要保留这个对话框不动,例如输入校验码,密码之类的校验问题,如果用户输入错误,而关闭后弹出对话框,就很别扭了。这里有个方案可以解决这个问题,使得即使按钮事件发生了,也不会关闭对话框。核心思想是欺骗一下系统,在点击事件里,修改该对话框的显示状态为关闭,则系统就不会去关闭该对话框了。具体实现代码如下:
/** @author sanji* 假设对话框已经关闭,欺骗系统,以保持输入窗口*/
private void setDialogNotShow(){
if(mDialogInterface!=null){
try {
Field field = mDialogInterface.getClass() .getSuperclass().getDeclaredField( "mShowing" );
field.setAccessible( true ); // 将mShowing变量设为false,表示对话框已关闭
field.set(mDialogInterface, false );
} catch (Exception e){
e.printStackTrace();
}
}
}
mDialogInterface是点击对话框按钮事件传进来的DialogInterface dialog参数,如果再需要销毁该对话框的话,则:
private void closeDialogOfPINorPUK(){
if(mDialogInterface!=null){
try {
Field field = mDialogInterface.getClass() .getSuperclass().getDeclaredField( "mShowing" );
field.setAccessible( true );
field.set(mDialogInterface, true );
mDialogInterface.dismiss();
}catch (Exception e){
e.printStackTrace();
}
}
}
1.问题原由和处理方案:开机SIM卡读取太慢,造成PIN码输入弹出界面太慢,为了在弹出之前避免用户操作界面,采用了弹出全屏dialog提示用户的解决方案
解决方案中关于自定义dialog的部分代码:
View layout = inflater.inflate(R.layout.checking_simcard_dialog,null);
AlertDialog.Builder builder = new AlertDialog.Builder(mContext,R.style.DialogFullscreen);
builder.setView(layout);
AlertDialog dialog = builder.create();
dialog.getWindow().setType(WindowManager.LayoutParams.TYPE_KEYGUARD_DIALOG);
dialog.setCancelable(false);
dialog.show();
代码分析:
AlertDialog.Builder builder = new AlertDialog.Builder(mContext,R.style.DialogFullscreen);
通过AlertDialog.Builder方式创建一个自定义全屏的dialog,其中样式DialogFullscreen代码为:
<style name=”DialogFullscreen”>
<item name=”android:windowBackground”>@color/black</item>
<item name=”android:windowFullscreen”>true</item>
</style>
builder.setView(layout); 自定义布局的dialog
dialog.getWindow().setType(WindowManager.LayoutParams.TYPE_KEYGUARD_DIALOG); dialog的级别层为TYPE_KEYGUARD_DIALOG
dialog.setCancelable(false); 不让点击其它dialog其它地方取消当前dialog
延伸知识:
1.dialog的显示层:从解决方案中的WindowManager.LayoutParams.TYPE_KEYGUARD_DIALOG,得 知该dialog显示的层为与锁屏同样的锁屏层,查看对应的WindowManager.LayoutParams中会有很多不同的层,例 如:TYPE_STATUS_BAR状态栏层;TYPE_TOAST toast所在的弹出层;TYPE_PRIORITY_PHONE 来电界面显示层;TYPE_SYSTEM_DIALOG 系统级dialog层;TYPE_SYSTEM_ERROR系统级错误层;TYPE_WALLPAPER 壁纸层 等等。可以根据不同的情况选择不同的层。
2.关于android alertdialog的不同形式:收集了相关资料,了解了alertdialog的不同形式以及详细见下面回复:
在Android开发中,我们经常会需要在Android界面上弹出一些对话框,比如询问用户或者让用户选择。这些功能我们叫它Android Dialog对话框,在我们使用Android的过程中,我归纳了一下,Android Dialog的类型无非也就7种,下面我分别向大家介绍这7种Android Dialog对话框的使用方法,希望对大家能有所帮助。
1.该效果是当按返回按钮时弹出一个提示,来确保无误操作,采用常见的对话框样式。

创建dialog对话框方法代码如下:
01
protected void dialog() {
02
AlertDialog.Builder builder = new Builder(Main.this);
03
builder.setMessage(“确认退出吗?”);
04
builder.setTitle(“提示”);
05
builder.setPositiveButton(“确认”, new OnClickListener() {
06
@Override
07
public void onClick(DialogInterface dialog, int which) {
08
dialog.dismiss();
09
Main.this.finish();
10
}
11
});
12
builder.setNegativeButton(“取消”, new OnClickListener() {
13
@Override
14
public void onClick(DialogInterface dialog, int which) {
15
dialog.dismiss();
16
}
17
});
18
builder.create().show();
19
}
在onKeyDown(int keyCode, KeyEvent event)方法中调用此方法
1
public boolean onKeyDown(int keyCode, KeyEvent event) {
2
if (keyCode == KeyEvent.KEYCODE_BACK && event.getRepeatCount() == 0) {
3
dialog();
4
}
5
return false;
6
}
2.改变了对话框的图表,添加了三个按钮

创建dialog的方法代码如下:
01
Dialog dialog = new AlertDialog.Builder(this).setIcon(
02
android.R.drawable.btn_star).setTitle(“喜好调查”).setMessage(
03
“你喜欢李连杰的电影吗?”).setPositiveButton(“很喜欢”,
04
new OnClickListener() {
05
@Override
06
public void onClick(DialogInterface dialog, int which) {
07
// TODO Auto-generated method stub
08
Toast.makeText(Main.this, “我很喜欢他的电影。”,
09
Toast.LENGTH_LONG).show();
10
}
11
}).setNegativeButton(“不喜欢”, new OnClickListener() {
12
@Override
13
public void onClick(DialogInterface dialog, int which) {
14
// TODO Auto-generated method stub
15
Toast.makeText(Main.this, “我不喜欢他的电影。”, Toast.LENGTH_LONG)
16
.show();
17
}
18
}).setNeutralButton(“一般”, new OnClickListener() {
19
@Override
20
public void onClick(DialogInterface dialog, int which) {
21
// TODO Auto-generated method stub
22
Toast.makeText(Main.this, “谈不上喜欢不喜欢。”, Toast.LENGTH_LONG)
23
.show();
24
}
25
}).create();
26
dialog.show();
3.信息内容是一个简单的View类型

创建dialog方法的代码如下:
1
new AlertDialog.Builder(this).setTitle(“请输入”).setIcon(
2
android.R.drawable.ic_dialog_info).setView(
3
new EditText(this)).setPositiveButton(“确定”, null)
4
.setNegativeButton(“取消”, null).show();
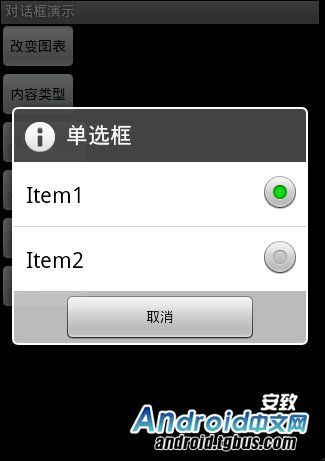
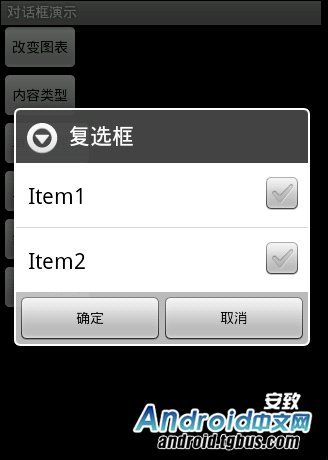
4.信息内容是一组单选框

创建dialog方法的代码如下:
1
new AlertDialog.Builder(this).setTitle(“复选框”).setMultiChoiceItems(
2
new String[] { “Item1″, “Item2″ }, null, null)
3
.setPositiveButton(“确定”, null)
4
.setNegativeButton(“取消”, null).show();
5.信息内容是一组多选框

创建dialog方法的代码如下:
1
new AlertDialog.Builder(this).setTitle(“单选框”).setIcon(
2
android.R.drawable.ic_dialog_info).setSingleChoiceItems(
3
new String[] { “Item1″, “Item2″ }, 0,
4
new DialogInterface.OnClickListener() {
5
public void onClick(DialogInterface dialog, int which) {
6
dialog.dismiss();
7
}
8
}).setNegativeButton(“取消”, null).show();
6.信息内容是一组简单列表项

创建dialog的方法代码如下:
1
new AlertDialog.Builder(this).setTitle(“列表框”).setItems(
2
new String[] { “Item1″, “Item2″ }, null).setNegativeButton(
3
“确定”, null).show();
7.信息内容是一个自定义的布局

dialog布局文件代码如下:
01
<?xml version=”1.0″ encoding=”utf-8″?>
02
03
<LinearLayout xmlns:android=”http://schemas.android.com/apk/res/android”
04
android:layout_height=”wrap_content” android:layout_width=”wrap_content”
05
android:background=”#ffffffff” androidrientation=”horizontal”
06
android:id=”@+id/dialog”>
07
<TextView android:layout_height=”wrap_content”
08
android:layout_width=”wrap_content”
09
android:id=”@+id/tvname” android:text=”姓名:” />
10
<EditText android:layout_height=”wrap_content”
11
android:layout_width=”wrap_content” android:id=”@+id/etname” android:minWidth=”100dip”/>
12
</LinearLayout>
创建dialog方法的代码如下:
1
LayoutInflater inflater = getLayoutInflater();
2
View layout = inflater.inflate(R.layout.dialog,
3
(ViewGroup) findViewById(R.id.dialog));
4
new AlertDialog.Builder(this).setTitle(“自定义布局”).setView(layout)
5
.setPositiveButton(“确定”, null)
6
.setNegativeButton(“取消”, null).show();


