- c/c++导出lua绑定
ajt1472580369
luac/c++python
【转载】https://note.youdao.com/share/?id=0f4132271151c4b62f9afb712e8304d9&type=note#/1、在纯C环境下,把C函数注册进Lua环境,理解Lua和C之间可以互相调用的本质2、在cocos2d-x项目里,把纯C函数注册进Lua环境,理解cocos2d-x是怎样创建Lua环境的、以及怎样得到这个环境并继续自定义它3、了解为什么要
- [源码和文档分享]基于VS2012和Cocos2d-x实现的StickToLast益智小游戏
ggdd5151
第1章问题陈述1.1项目背景手机用户在休闲时倾向于玩一些类似于FlappyBird、2048等游戏,这类游戏用户界面简单,游戏模式单一,单手即可操作,随着游戏地进行,游戏的难度会增加。随着手机用户地爆发式增长,这类游戏的需求量愈发庞大。StickToLast是一款益智类游戏。主角陷于宇宙漩涡之中,被吸入中央的黑洞或者逃离该区域都无法被即将来到的救援部队拯救,只能停留在这一区域,躲避宇宙陨石,坚持的
- 【Cocos2d-x】开发基础-第一个Cocos2d-x游戏
weixin_34239169
游戏python移动开发
本篇博客讲解:1.第一个Cocos2d-x游戏第一个Cocos2d-x游戏创建工程cocos工具:就是这个,看图命令工具cocos实现,cocos工具其实是cocos2d团队自己开发的。是使用Python脚本编写的,cocos工具的运行需要安装Python环境(还会用到ant,eclipse等工具哦,后面介绍)Python下载地址https://www.python.org/需要注意的是它目前有P
- cocos2d-x 4.0 安装教程(Windows + VS) + cocosui入门知识储备
Gosick_Geass_Gate
编程语言cocos2d
(一)前期准备Windows10操作系统VS2019或VS2017Python2.7.18:记得勾选将python添加到环境变量的复选框,不然自己手动添加也行。CMake3.19.0:记得勾选将cmake添加到环境变量的复选框,不然自己手动添加也行。cocos2d-x4.0:手动将cocos2d-x-4.0\tools\cocos2d-console\bin目录添加到环境变量。以上全都下载最新版本
- 使用cocos2d-x的console实现远程调试
CHEN_玦儿
Cocos2d-x
使用Lua开发有一个很爽的地方就是可以从控制台实时输入Lua指令来进行调试,但是之前该方法仅在windows下有效,之前也介绍过,见这里。研究了下发现cocos2d-x是有一个console类来支持远程调试的,哈哈,从此真机调试也可以很方便了。这里先介绍下console的关键API先:listenOnTCP(number)这里参数是监听的端口号addCommand(tb,funciton)这里第一
- 使用cocos2d-console初始化一个项目
sun_weitao
cocos2d游戏引擎
先下载好cocos2d-x的源码包地址https://www.cocos.com/cocos2dx-download这里使用的版本是自己的电脑要先装好python27用python安装cocos2d-console看到项目中有个setup.py的一个文件pythonsetup.py用上面的命令执行一下。如果执行正常的话回出现上面的图然后source一下source/Users/sun-weitao
- 【玩转cocos2d-x之三十六】Flappy Bird大集结
偶尔e网事
cocos2d-xcocos2d-xFlappyBird各版本
前几天看到cocos2d-x官网论坛让各种姿势的flappybird霸占了,矮油真受不鸟,你们够啦!!!今天准备用一个贴来秒杀你们。准备好了么。。。放图镇楼:1.C++版先来个传统版,@OiteBoys童鞋很有爱,将flappybird用cocos2d-xv3.0写了一遍,同时加入了新的3.0物理系统。在这一系列教程中flappybird被大卸八块,剥骨抽筋(好残忍。。。),每一个模块精彩的图文代
- 【Unity】TextMeshPro实现图文混排
张不无
Unity程序设计unity游戏引擎ui
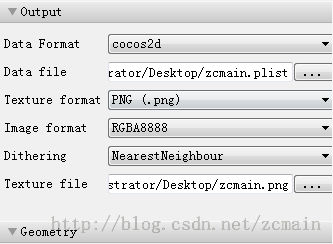
游戏中经常会遇到需要图文混排的情况,比如聊天中插入表情。那么用TextMeshPro怎么实现呢?1.首先需要把所用到的图片打成图集2.这时候需要用到一个打图集的工具TexturePackerGUI附官网地址:https://www.codeandweb.com/texturepacker3.打开TexturePackerGUI,选择添加精灵4.格式设置如图5.选择发布精灵6.发布成功7.工程里会多
- Cocos Creator实现windows窗口全屏
wudics
creaor游戏全屏cocoscreator
发布CocosCreator来发布全屏的windows游戏客户端,默认是窗口模式的。要实现全屏需要改动CocosCreator提供的desktop端构建源码,要修改的文件为:#通过glfw创建全屏窗口C:\CocosCreator\resources\cocos2d-x\cocos\platform\desktop\CCGLView-desktop.cpp以及#通过传递尺寸参数修改视觉窗口,此文件
- Cocos2d-x windows編譯 出現GWL_WNDPROC、GWL_USERDATA未定义
ALoppd
cocos2dwindows游戏引擎
錯誤復現:D:\Software\cocos2d-x\cocos\ui\UIEditBox\UIEditBoxImpl-win32.cpp(64,70):errorC2065:'GWL_WNDPROC':undeclaredidentifier[D:\Projects\CPP\CMake\cocos\Runner\fakebuild\engine\cocos\core\cocos2d.vcxpro
- 在Windows上搭建Cocos2d-x 3.0开发环境
__Ben__
Cocos2dxcocos2d-xwindowsvisualstudio
建议:为了避免安全相关的问题,请以管理员权限执行所有的操作,当运行命令的时候,也要确保之前是以管理员权限打开了命令行窗口.工具准备搭建开发环境需要安装工具包括VisualStudiopython———(本教程以python2.7.3版本为例),下载地址:http://www.python.org/download/releases/2.7.3/。Cocos2d-x———(本教程以cocos2d-x
- windows下开发cocos2dx的环境搭建
ahaitongxue
cocos2d
前面把VisualStudio+Python开发环境配好了,但还没有讲如何在Android中使用创建好的项目,本篇博客介绍如何在win7下进行Android与cocos2d-x的交叉编译,我的电脑是64位,所以下面的配置是基于x86_64下配置的。下载:CygwinCygwin的主要目的是通过重新编译,将POSIX系统(例如Linux、BSD,以及其他Unix系统)上的软件移植到Windows上。
- Visual Studio 和Clion配置Cocos2d-x环境
无相孤君
C/C++日常操作Cocos2d-xvisualstudiococos2didec++游戏引擎c语言
VisualStudio和Clion配置Cocos2d-x环境我就不贴图片的,懒得上传图床。懒。开发环境:系统:Window11编译器:CMake+MSVC开发工具:ClionorVisualStudio请自行配置好,Python2.7,和CmakeCocos2d-x下载首先,我们需要去Github下载(cocos2d-x)的源码,由于源码过于庞大如果clone失败,请自行查找方法。随便找一个目录
- cocos2dx-lua读取json文件
亮亮同学
cocos2d-x技术群新群:117871561c++技术交流群:593010226localstr=cc.FileUtils:getInstance():getStringFromFile("xxxx.json")localok,datatable=pcall(function()returncjson.decode(str)end)iftrue==okandtype(datatable)=="
- 如何制作一个类似Tiny Wings的游戏 Cocos2d-x 2.1.4内含iOS版源代码
杜甲同学
cocos2d-xcocos2d-x
在第一篇《如何使用CCRenderTexture创建动态纹理》基础上,增加创建动态山丘,原文《HowToCreateAGameLikeTinyWingswithCocos2D2.XPart1》,在这里继续以Cocos2d-x进行实现。有关源码、资源等在文章下面给出了地址。步骤如下:1.使用上一篇的工程;2.添加地形类Terrain,派生自CCNode类。文件Terrain.h代码如下:123456
- 如何制作一个简单的游戏 Cocos2d-x 2.1.2
杜甲同学
cocos2d-xcocos2d-x移动开发cocos2d游戏
本文实践自RayWenderlich的文章《HowToMakeASimpleiPhoneGamewithCocos2D2.XTutorial》,文中使用Cocos2D,我在这里使用Cocos2D-x2.1.2进行学习和移植,前者是用Object-C所写,所以移植到Cocos2D-x会有些差异,比如某些函数、某些功能不能跟原文一样直接实现,需另转换方法实现。之前已经对Cocos2D-x的安装以及简单
- Android——Cocosd2d-x手机游戏开发学习思路
霸气的名字
Cocos2d-X游戏开发Cocos2d-xAndroid开发手机游戏android游戏引擎
手机APP应用如雨后春笋般冒了出来,而在众多的APP应用中,游戏占据了半壁江山。它丰富着人们的业余生活,增进了人们之间的沟通交流。也有许多开发的朋友对游戏开发情有独钟,他们不止是享受着有很多的人们去下载的成就感,更多的是享受着自己开发出一款满意游戏的成就感。为此越来越多的开发者们向着游戏应用进军了。可是很多开发者不知道怎么入手游戏开发,不知道游戏开发的路应该怎么走。作为一个仅用Cocos2d-x游
- 在 Cocos Creator 中使用缓动系统(cc.tween)
kzc爱吃梨
缓动系统(cc.tween)介绍CocosCreator在v2.0.9提供了一套新的API——cc.tween。cc.tween能够对对象的任意属性进行缓动,功能类似于cc.Action(动作系统)。但是cc.tween会比cc.Action更加简洁易用,因为cc.tween提供了链式创建的方法,可以对任何对象进行操作,并且可以对对象的任意属性进行缓动。动作系统是从Cocos2d-x迁移到Coco
- 解决Command CodeSign failed with a nonzero exit code
奔五码农
Cocos2d-x项目,报错CodeSign/Users/xxx/Library/Developer/Xcode/DerivedData/xxx-dabhdlnwdwoowjeiqavvwikjihix/Build/Products/Debug-iphonesimulator/xxx.app(intarget'xxx-mobile'fromproject'xxx')cd/Users/xxx/Doc
- cocos2d-x lua 开发环境搭建(让lua具备代码提示等)
WeiQ_
Cocos2d-x
2013年是手游开发井喷的一年,也是手游市场竞争最为激烈的一年,ios市场除了刷榜、刷榜,还是刷榜,而android有点像黑市的感觉,水太深(很多渠道商已经从上游控制了流量的入口)。而cocos2d-x作为国内手游2d游戏中最流行的引擎,也渐渐由c++开发转为lua,究其原因。最主要的是:通过lua写的游戏,可以实现动态更新(你知道苹果每次审核会让人疼蛋差不多一个礼拜或者更久);在很大程度上也避免
- Cocos2d-x Lua中的AssetsManagerEx
JunChow520
Cocos2d-xLua中的热更机制主要是通过AssetsManagerEx来实现的。传统的热更方式传统PC的方式是将差异文件打包成一个压缩包,客户端根据大版本差异,将对应的压缩包下载到本地后解压覆盖。这种做法的好处在于下载一个文件会比较快。缺点在于当客户端版本比较多的时候,升级压缩包会变得很多,进而难以维护。其次是如果压缩包体积过大,解压时间会比较长,而且不容易制作进度条,导致程序感觉被卡住了。
- Sonic云真机直接获取POCO控件实战
ZhouYixun
前言Sonic官网用户交流社区效果展示image.pngimage.pngimage.pngimage.png目前已支持POCO-SDK的所有游戏引擎(Unity3d、Cocos2dx系列、白鹭、UE4),使用前需游戏已接入SDK。v1.4.0-beta更新后就可以使用啦~(预计五一后更新)什么是POCOPoco是一个基于UI控件搜索的跨引擎自动化测试框架。支持主流游戏引擎:Cocos2d-x、U
- TexturePacker破解版教程及下载
工匠良辰
TexturePacker破解版教程及下载https://blog.csdn.net/u013654125/article/details/80676715百度网盘https://pan.baidu.com/s/1xPQEpsg33goeBEF-wXvuog#list/path=%2F密码egyf。
- Cocos2D-X 3.17.2 安装配置
闲人狸猫
Cocos2d-xCocos2d-x配置AndroidstudioCocos2d-x3.17.2
网上关于cocos2d-x的安装教程有很多,但是都是旧版本的,我找了很多资料都无法创建proj.android-studio。后来发现是新版本的软件对安卓平台进行合并,只有proj.android文件,使用Androidstudio编写。一、安装准备:JDK–->>JavaSEDevelopmentKit8u202Androidstudio-->>android-studio-ide-183.56
- html gui的源码,FairyGUI是一款专业的 UI编辑器
我有多作怪
htmlgui的源码
FairyGUIUI编辑器操作简单,使用习惯与Adobe系列软件保持一致,美术设计师可以轻松上手。FairyGUI是一个跨平台的UI解决方案,它提供了一个可以在Windows和Mac上使用的编辑器和可以在多个游戏引擎中使用的SDK(Unity、Flash、Starling、白鹭、LayaAir等,未来还将支持cocos2d-x、UE4、libgdx等)。借助FairyGUI提供的组件、关联、控制器
- cocos2d-lua游戏解决方案
无脑_码农
cocos2d-lua
cocos2d-lua引擎版本cocos2d-x官方版:https://www.cocos.com/cocos2dxQuick-Cocos2dx-Community:http://www.cocos2d-lua.org/Cocos-lua(重写tolua值得借鉴):https://github.com/zhongfq/cocos-luaUI编辑器FairyGUI:https://www.fairy
- cocos2d-x lua ProgressTimer
蚂蚁呀嘿嘿嘿
cocosxcodeiosandroidcocos2dlua
cocos2d-xluaProgressTimer下载进度条使用functiontest()locallayer=cc.Layer:create()localto1=cc.ProgressTo:create(2,100)localto2=cc.ProgressTo:create(2,100)localpath1="Jms_PetSystem/img/passMailIcon.png"--RADIA
- cocos2d-x lua --递归遍历子节点并且变换颜色
蚂蚁呀嘿嘿嘿
cocoscocos2dlua游戏引擎
--递归遍历子节点并且变换颜色给节点置灰functionGD.util_nodeChangeColor(root,_color)if_color==nilthen_color=cc.c3b(192,192,192)endifnotrootthenreturnendroot:setColor(_color)localchild_list=root:getChildren()for_,nodeinpa
- 【四】CocosCreator-修改引擎源码
0zien0
cocoscreator修改引擎修改引擎源码
看源码的过程中,少不了得修修改改源码,做点实验。果断去找找源码在哪里,然后就可以快乐动手改源码了。CocosCreator引擎源码主要就是js和原生C++两类,分别在引擎目录的resources/engine和resources/cocos2d-x下,如图:这次我们主要分析的是web平台相关的JS代码,主要的源码就在engine/cocos2d里面。PS:cocos2d-x的源码我以前也曾经简单看
- 关于Unity使用图片字体示例
梦回大唐敲代码
unity游戏引擎TexturePackerTextmeshpro图片文字unity图集
1.使用TexturePacker打包图集下载地址TexturePacker-CreateSpriteSheetsforyourgame!2.准备好数字图3.导入图片4.打包图集需要的设置将重心点设置为左下方点击回车==>后点击回==>到精灵列表选择导出的格式导出后的内容==>导入unity导入====>并创建一个字体依次点击生成字体Sprite文件可以使用id也可以使用name===>name:
- java工厂模式
3213213333332132
java抽象工厂
工厂模式有
1、工厂方法
2、抽象工厂方法。
下面我的实现是抽象工厂方法,
给所有具体的产品类定一个通用的接口。
package 工厂模式;
/**
* 航天飞行接口
*
* @Description
* @author FuJianyong
* 2015-7-14下午02:42:05
*/
public interface SpaceF
- nginx频率限制+python测试
ronin47
nginx 频率 python
部分内容参考:http://www.abc3210.com/2013/web_04/82.shtml
首先说一下遇到这个问题是因为网站被攻击,阿里云报警,想到要限制一下访问频率,而不是限制ip(限制ip的方案稍后给出)。nginx连接资源被吃空返回状态码是502,添加本方案限制后返回599,与正常状态码区别开。步骤如下:
- java线程和线程池的使用
dyy_gusi
ThreadPoolthreadRunnabletimer
java线程和线程池
一、创建多线程的方式
java多线程很常见,如何使用多线程,如何创建线程,java中有两种方式,第一种是让自己的类实现Runnable接口,第二种是让自己的类继承Thread类。其实Thread类自己也是实现了Runnable接口。具体使用实例如下:
1、通过实现Runnable接口方式 1 2
- Linux
171815164
linux
ubuntu kernel
http://kernel.ubuntu.com/~kernel-ppa/mainline/v4.1.2-unstable/
安卓sdk代理
mirrors.neusoft.edu.cn 80
输入法和jdk
sudo apt-get install fcitx
su
- Tomcat JDBC Connection Pool
g21121
Connection
Tomcat7 抛弃了以往的DBCP 采用了新的Tomcat Jdbc Pool 作为数据库连接组件,事实上DBCP已经被Hibernate 所抛弃,因为他存在很多问题,诸如:更新缓慢,bug较多,编译问题,代码复杂等等。
Tomcat Jdbc P
- 敲代码的一点想法
永夜-极光
java随笔感想
入门学习java编程已经半年了,一路敲代码下来,现在也才1w+行代码量,也就菜鸟水准吧,但是在整个学习过程中,我一直在想,为什么很多培训老师,网上的文章都是要我们背一些代码?比如学习Arraylist的时候,教师就让我们先参考源代码写一遍,然
- jvm指令集
程序员是怎么炼成的
jvm 指令集
转自:http://blog.csdn.net/hudashi/article/details/7062675#comments
将值推送至栈顶时 const ldc push load指令
const系列
该系列命令主要负责把简单的数值类型送到栈顶。(从常量池或者局部变量push到栈顶时均使用)
0x02 &nbs
- Oracle字符集的查看查询和Oracle字符集的设置修改
aijuans
oracle
本文主要讨论以下几个部分:如何查看查询oracle字符集、 修改设置字符集以及常见的oracle utf8字符集和oracle exp 字符集问题。
一、什么是Oracle字符集
Oracle字符集是一个字节数据的解释的符号集合,有大小之分,有相互的包容关系。ORACLE 支持国家语言的体系结构允许你使用本地化语言来存储,处理,检索数据。它使数据库工具,错误消息,排序次序,日期,时间,货
- png在Ie6下透明度处理方法
antonyup_2006
css浏览器FirebugIE
由于之前到深圳现场支撑上线,当时为了解决个控件下载,我机器上的IE8老报个错,不得以把ie8卸载掉,换个Ie6,问题解决了,今天出差回来,用ie6登入另一个正在开发的系统,遇到了Png图片的问题,当然升级到ie8(ie8自带的开发人员工具调试前端页面JS之类的还是比较方便的,和FireBug一样,呵呵),这个问题就解决了,但稍微做了下这个问题的处理。
我们知道PNG是图像文件存储格式,查询资
- 表查询常用命令高级查询方法(二)
百合不是茶
oracle分页查询分组查询联合查询
----------------------------------------------------分组查询 group by having --平均工资和最高工资 select avg(sal)平均工资,max(sal) from emp ; --每个部门的平均工资和最高工资
- uploadify3.1版本参数使用详解
bijian1013
JavaScriptuploadify3.1
使用:
绑定的界面元素<input id='gallery'type='file'/>$("#gallery").uploadify({设置参数,参数如下});
设置的属性:
id: jQuery(this).attr('id'),//绑定的input的ID
langFile: 'http://ww
- 精通Oracle10编程SQL(17)使用ORACLE系统包
bijian1013
oracle数据库plsql
/*
*使用ORACLE系统包
*/
--1.DBMS_OUTPUT
--ENABLE:用于激活过程PUT,PUT_LINE,NEW_LINE,GET_LINE和GET_LINES的调用
--语法:DBMS_OUTPUT.enable(buffer_size in integer default 20000);
--DISABLE:用于禁止对过程PUT,PUT_LINE,NEW
- 【JVM一】JVM垃圾回收日志
bit1129
垃圾回收
将JVM垃圾回收的日志记录下来,对于分析垃圾回收的运行状态,进而调整内存分配(年轻代,老年代,永久代的内存分配)等是很有意义的。JVM与垃圾回收日志相关的参数包括:
-XX:+PrintGC
-XX:+PrintGCDetails
-XX:+PrintGCTimeStamps
-XX:+PrintGCDateStamps
-Xloggc
-XX:+PrintGC
通
- Toast使用
白糖_
toast
Android中的Toast是一种简易的消息提示框,toast提示框不能被用户点击,toast会根据用户设置的显示时间后自动消失。
创建Toast
两个方法创建Toast
makeText(Context context, int resId, int duration)
参数:context是toast显示在
- angular.identity
boyitech
AngularJSAngularJS API
angular.identiy 描述: 返回它第一参数的函数. 此函数多用于函数是编程. 使用方法: angular.identity(value); 参数详解: Param Type Details value
*
to be returned. 返回值: 传入的value 实例代码:
<!DOCTYPE HTML>
- java-两整数相除,求循环节
bylijinnan
java
import java.util.ArrayList;
import java.util.List;
public class CircleDigitsInDivision {
/**
* 题目:求循环节,若整除则返回NULL,否则返回char*指向循环节。先写思路。函数原型:char*get_circle_digits(unsigned k,unsigned j)
- Java 日期 周 年
Chen.H
javaC++cC#
/**
* java日期操作(月末、周末等的日期操作)
*
* @author
*
*/
public class DateUtil {
/** */
/**
* 取得某天相加(减)後的那一天
*
* @param date
* @param num
*
- [高考与专业]欢迎广大高中毕业生加入自动控制与计算机应用专业
comsci
计算机
不知道现在的高校还设置这个宽口径专业没有,自动控制与计算机应用专业,我就是这个专业毕业的,这个专业的课程非常多,既要学习自动控制方面的课程,也要学习计算机专业的课程,对数学也要求比较高.....如果有这个专业,欢迎大家报考...毕业出来之后,就业的途径非常广.....
以后
- 分层查询(Hierarchical Queries)
daizj
oracle递归查询层次查询
Hierarchical Queries
If a table contains hierarchical data, then you can select rows in a hierarchical order using the hierarchical query clause:
hierarchical_query_clause::=
start with condi
- 数据迁移
daysinsun
数据迁移
最近公司在重构一个医疗系统,原来的系统是两个.Net系统,现需要重构到java中。数据库分别为SQL Server和Mysql,现需要将数据库统一为Hana数据库,发现了几个问题,但最后通过努力都解决了。
1、原本通过Hana的数据迁移工具把数据是可以迁移过去的,在MySQl里面的字段为TEXT类型的到Hana里面就存储不了了,最后不得不更改为clob。
2、在数据插入的时候有些字段特别长
- C语言学习二进制的表示示例
dcj3sjt126com
cbasic
进制的表示示例
# include <stdio.h>
int main(void)
{
int i = 0x32C;
printf("i = %d\n", i);
/*
printf的用法
%d表示以十进制输出
%x或%X表示以十六进制的输出
%o表示以八进制输出
*/
return 0;
}
- NsTimer 和 UITableViewCell 之间的控制
dcj3sjt126com
ios
情况是这样的:
一个UITableView, 每个Cell的内容是我自定义的 viewA viewA上面有很多的动画, 我需要添加NSTimer来做动画, 由于TableView的复用机制, 我添加的动画会不断开启, 没有停止, 动画会执行越来越多.
解决办法:
在配置cell的时候开始动画, 然后在cell结束显示的时候停止动画
查找cell结束显示的代理
- MySql中case when then 的使用
fanxiaolong
casewhenthenend
select "主键", "项目编号", "项目名称","项目创建时间", "项目状态","部门名称","创建人"
union
(select
pp.id as "主键",
pp.project_number as &
- Ehcache(01)——简介、基本操作
234390216
cacheehcache简介CacheManagercrud
Ehcache简介
目录
1 CacheManager
1.1 构造方法构建
1.2 静态方法构建
2 Cache
2.1&
- 最容易懂的javascript闭包学习入门
jackyrong
JavaScript
http://www.ruanyifeng.com/blog/2009/08/learning_javascript_closures.html
闭包(closure)是Javascript语言的一个难点,也是它的特色,很多高级应用都要依靠闭包实现。
下面就是我的学习笔记,对于Javascript初学者应该是很有用的。
一、变量的作用域
要理解闭包,首先必须理解Javascript特殊
- 提升网站转化率的四步优化方案
php教程分享
数据结构PHP数据挖掘Google活动
网站开发完成后,我们在进行网站优化最关键的问题就是如何提高整体的转化率,这也是营销策略里最最重要的方面之一,并且也是网站综合运营实例的结果。文中分享了四大优化策略:调查、研究、优化、评估,这四大策略可以很好地帮助用户设计出高效的优化方案。
PHP开发的网站优化一个网站最关键和棘手的是,如何提高整体的转化率,这是任何营销策略里最重要的方面之一,而提升网站转化率是网站综合运营实力的结果。今天,我就分
- web开发里什么是HTML5的WebSocket?
naruto1990
Webhtml5浏览器socket
当前火起来的HTML5语言里面,很多学者们都还没有完全了解这语言的效果情况,我最喜欢的Web开发技术就是正迅速变得流行的 WebSocket API。WebSocket 提供了一个受欢迎的技术,以替代我们过去几年一直在用的Ajax技术。这个新的API提供了一个方法,从客户端使用简单的语法有效地推动消息到服务器。让我们看一看6个HTML5教程介绍里 的 WebSocket API:它可用于客户端、服
- Socket初步编程——简单实现群聊
Everyday都不同
socket网络编程初步认识
初次接触到socket网络编程,也参考了网络上众前辈的文章。尝试自己也写了一下,记录下过程吧:
服务端:(接收客户端消息并把它们打印出来)
public class SocketServer {
private List<Socket> socketList = new ArrayList<Socket>();
public s
- 面试:Hashtable与HashMap的区别(结合线程)
toknowme
昨天去了某钱公司面试,面试过程中被问道
Hashtable与HashMap的区别?当时就是回答了一点,Hashtable是线程安全的,HashMap是线程不安全的,说白了,就是Hashtable是的同步的,HashMap不是同步的,需要额外的处理一下。
今天就动手写了一个例子,直接看代码吧
package com.learn.lesson001;
import java
- MVC设计模式的总结
xp9802
设计模式mvc框架IOC
随着Web应用的商业逻辑包含逐渐复杂的公式分析计算、决策支持等,使客户机越
来越不堪重负,因此将系统的商业分离出来。单独形成一部分,这样三层结构产生了。
其中‘层’是逻辑上的划分。
三层体系结构是将整个系统划分为如图2.1所示的结构[3]
(1)表现层(Presentation layer):包含表示代码、用户交互GUI、数据验证。
该层用于向客户端用户提供GUI交互,它允许用户