C# WPF 相关
还是那句话:学习微软的东西,自学就得了;不过比较费劲而已;
学会:Google 别人的示例、经验;还有:MSDN的文档查阅;
MSDN WPF技术资源库URL:http://msdn.microsoft.com/zh-cn/library/ms754130.aspx
1)、WPF,中如何加载一个.xaml文件,并转为:Window对象实例:
加载、解析XAML
WPF的运行时XMAL解析器公开两个类:
System.Windows.Markup下的:XamlReader、XamlWriter;
XamlReader.Load();
XamlWriter.Save();

Load:
//假设有一文件:MyWindow.xaml
Window window = null;
using (FileStream fs = new FileSteam("MyWindow.xaml", FileMode.Open, FileAccess.Read))
{
	//获得根元素,该元素是一个Window对象
	window = (Window)XmalReader.Load(fs);
}
//根据元素名称来查找元素对象
//如:以上的MyWindow.xaml文件中,有定义一个按钮为:
<Button x:Name="okButton">OK</Button>
//那么就可以通过window的FindName方法来获取元素对象Button okButton = (Button)window.FindName("okButton")
//FindName是继承自FrameworkElement 类的,MSDN文档介绍该类:
//http://msdn.microsoft.com/zh-cn/library/system.windows.frameworkelement.aspx

Save:
string xamlStr = XamlWriter.Save(window);
[继续在写...]
2)、分别需要了解,WPF目前提供的一般常用的布局控件:
都在:System.Windows.Controls命名空间低下的:
Canvas(画布)、DockPanel(停靠布局)、Grid(表格)、StackPanel(堆栈布局)、VirtualizingPanel(虚堆栈布局)、WrapPanel(覆盖布局)
Grid(表格):http://wenku.baidu.com/view/5e483b0dba1aa8114431d99b.html
3)、在学习WPF过程中,发现有个挺好用的工具:Xaml浏览工具:XamlPad
使用效果图:
4)、Grid 布局控件的简单使用
xaml源码:
<UserControl x:Class="TestWpfProject.MyGridControl"
             xmlns="http://schemas.microsoft.com/winfx/2006/xaml/presentation"
             xmlns:x="http://schemas.microsoft.com/winfx/2006/xaml"
             xmlns:mc="http://schemas.openxmlformats.org/markup-compatibility/2006"
             xmlns:d="http://schemas.microsoft.com/expression/blend/2008"
             mc:Ignorable="d" Height="250" Width="800">
    <Grid ShowGridLines="True">
        <Grid.RowDefinitions>
            <RowDefinition Height="25"/>
            <RowDefinition Height="25"/>
            <RowDefinition Height="50"/>
            <RowDefinition Height="25"/>
            <RowDefinition Height="60"/>
            <RowDefinition Height="40"/>
        </Grid.RowDefinitions>
        <Grid.ColumnDefinitions>
            <ColumnDefinition/>
            <ColumnDefinition/>
            <ColumnDefinition/>
            <ColumnDefinition/>
        </Grid.ColumnDefinitions>
        <TextBlock Grid.Row="0" Grid.Column="2" FontSize="14" HorizontalAlignment="Center" VerticalAlignment="Center">VerticalAlignment Sample</TextBlock>
        <Button Grid.Row="1" Grid.Column="1" HorizontalAlignment="Center" VerticalAlignment="Center">Button 1 (Top)</Button>
        <Button Grid.Row="2" Grid.Column="2" HorizontalAlignment="Center">Button 2 (Botton)</Button>
        <Button Grid.Row="3" Grid.Column="3" VerticalAlignment="Center">Button 3 (Center)</Button>
        <Button Grid.Row="4" Grid.Column="0">Button 4 (Stretch)</Button>
        <Button Grid.Row="5" Grid.Column="1">Button 5 (Stretch)</Button>
    </Grid>
</UserControl>
效果图:
5)、DockPanel 的布局:
xaml源码:
<UserControl x:Class="TestWpfProject.MyDockPanelControl"
             xmlns="http://schemas.microsoft.com/winfx/2006/xaml/presentation"
             xmlns:x="http://schemas.microsoft.com/winfx/2006/xaml"
             xmlns:mc="http://schemas.openxmlformats.org/markup-compatibility/2006"
             xmlns:d="http://schemas.microsoft.com/expression/blend/2008"
             mc:Ignorable="d" Width="500">
    <DockPanel>
        <DockPanel DockPanel.Dock="Top" LastChildFill="True" DataContext="SliderBindingData">
            <Label Content="Slider's Value : "/>
            <TextBox Text="This is Text"/>
        </DockPanel>
        <Button DockPanel.Dock="Top" Content="Button"/>
        <Button DockPanel.Dock="Top" Content="Button"/>
        <Slider DockPanel.Dock="Bottom" Maximum="100" Minimum="0" Name="slider1"/>
    </DockPanel>
</UserControl>
效果图:
在选择,DockPanel还是StackPanel的选择,可以看看MSDN的一篇文章:
http://msdn.microsoft.com/zh-cn/library/vstudio/ms754213.aspx
从中,我们可以看到,DockPanel会影响内部子元素的尺寸大小;而StackPanel则不会,而是对子元素的显示进行裁剪;
执行效果图:
6)、Binding(可视元素与数据的绑定):
Binding的介绍,这博客里介绍得还挺详细:
http://blog.csdn.net/iamsupercola/article/details/7041996
xaml源码:
<UserControl x:Class="TestWpfProject.MyDockPanelControl"
             xmlns="http://schemas.microsoft.com/winfx/2006/xaml/presentation"
             xmlns:x="http://schemas.microsoft.com/winfx/2006/xaml"
             xmlns:mc="http://schemas.openxmlformats.org/markup-compatibility/2006"
             xmlns:d="http://schemas.microsoft.com/expression/blend/2008"
             xmlns:data="clr-namespace:TestWpfProject.TestNotificationObject"
             mc:Ignorable="d" Width="500" Name="myControl" >
    <DockPanel>
        <DockPanel DockPanel.Dock="Top" LastChildFill="True">
            <Label Content="Slider's Value : "/>
            <TextBox Text="{Binding ElementName=myControl, Path=SliderBindingData.V1, Mode=TwoWay, UpdateSourceTrigger=PropertyChanged}"/>
        </DockPanel>
        <Button DockPanel.Dock="Top" Content="Button"/>
        <Button DockPanel.Dock="Top" Content="Button"/>
        <Slider DockPanel.Dock="Top" Maximum="100" Minimum="0" Name="slider1" Value="{Binding ElementName=myControl, Path=SliderBindingData.V1, Mode=TwoWay, UpdateSourceTrigger=PropertyChanged}"/>
    </DockPanel>
</UserControl>

<!--以下是第二种方法,把上面的注释掉,把下面的注释去掉,运行即可看到实现-->
<!--<UserControl x:Class="TestWpfProject.MyDockPanelControl"
             xmlns="http://schemas.microsoft.com/winfx/2006/xaml/presentation"
             xmlns:x="http://schemas.microsoft.com/winfx/2006/xaml"
             xmlns:mc="http://schemas.openxmlformats.org/markup-compatibility/2006"
             xmlns:d="http://schemas.microsoft.com/expression/blend/2008"
             xmlns:data="clr-namespace:TestWpfProject.TestNotificationObject"
             mc:Ignorable="d" Width="500" >
    <![CDATA[
    //注意上面的xml命名空间中,声明了一个自定义的:xmlns:data="clr-namespace:TestWpfProject.TestNotificationObject",
    //然后在下面的:DockPanel.DataContext属性中,会使用到
    //属性内容为:<data:NotifierObject>的对象(你可以理解为:一个标签就对应着一个对象实例),而这个实例是:data命名空间低下的:NotificationObject类对象,
    //而data命名空间的内容实际上为:"clr-namespace:TestWpfProject.TestNotificationObject"
    //可理解为:.cs代码中的:using data = TestWpfProject.TestNotificationObject;的意思,就是命名空间的别名
    //注意下面的TextBox中的Text属性Bingding时,没有像上面的,多了一个:ElementName属性,这个是在不使用上下文数据对象(就是在本身DataContext数据对象,或是父级(的父级)的DataContext属性)时而直接与可视元素的属性数据作绑定用的;
    //下面的是直接绑定了,myControl.SliderBindingData.V1属性;
    //ElementName=myControl, Path=ElementName元素对应的属性内容,而myControl(当前控件名称)下我定义了:
    //所以Path=SliderBindingData.V1,其实是:Path=(myControl.)SliderBindingData.V1;(myControl.)是我这边为了大家理解而加上去的
    //至于还面还有:Mode就是数据与可视元素之间的相互更新方式,这里不多说中,直接F1 MSDN查看;
    //过有后面的:UpdateSourceTrigger也是一样
    /*
    public class NotifierObject : NotificationObject//下面的MyDockPanelControl中会使用到的类型
    {
        //add PropertyChanged event to handle, when Raise property changed
        private float v1;
        public float V1
        {
            get { return v1; }
            set
            {
                float v = (float)Math.Round(value, 2);
                //float v = (float)decimal.Round((decimal)value, 2);
                if (v1 != v)
                {
                    v1 = v;
                    RaisePropertyChanged(() => V1);
                }
            }
        }
    }

    public partial class MyDockPanelControl : UserControl
    {
        public NotifierObject SliderBindingData { get; set; }//注意这里

        public MyDockPanelControl()
        {
            SliderBindingData = new NotifierObject();

            InitializeComponent();

            SliderBindingData.PropertyChanged += SliderBindingData_PropertyChanged;
        }

        void SliderBindingData_PropertyChanged(object sender, System.ComponentModel.PropertyChangedEventArgs e)
        {
            //NotifierObject no = sender as NotifierObject;
            //MessageBox.Show("NotifierObject.V1 value had changed, value : " + no.V1);
        }
    }
    */
    ]]>
    <DockPanel>
        <DockPanel.DataContext>
            <data:NotifierObject />
        </DockPanel.DataContext>
        <DockPanel DockPanel.Dock="Top" LastChildFill="True">
            <Label Content="Slider's Value : "/>
            <TextBox Text="{Binding Path=V1, Mode=TwoWay, UpdateSourceTrigger=PropertyChanged}"/>
        </DockPanel>
        <Button DockPanel.Dock="Top" Content="Button"/>
        <Button DockPanel.Dock="Top" Content="Button"/>
        <Slider DockPanel.Dock="Top" Maximum="100" Minimum="0" Name="slider1" Value="{Binding  Path=V1, Mode=TwoWay, UpdateSourceTrigger=PropertyChanged}"/>
    </DockPanel>
</UserControl>-->
效果图:(Slider's Value标签右边的文本框的Text属性值,与最下面的Slider控件的Value属性值都分别Binding了数据)
7)、不规则窗体
需要用到:Microsoft Expression Studio
可以在这里找到破解版的来使用:Expression Studio 4 破解
http://www.silverlightchina.net/html/study/WPF/2012/0624/16902.html
http://www.cnblogs.com/SkyD/archive/2008/07/13/1242044.html
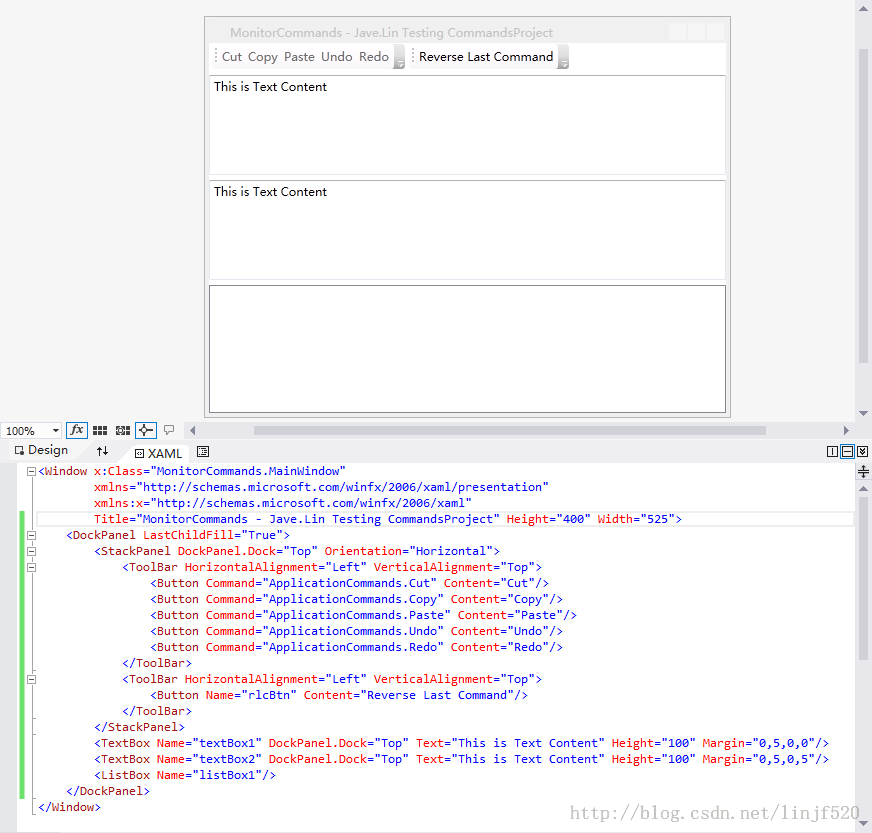
8)、WPF命令:
使用WPF的命令制机,制作一些简单的命令监听,并制作成命令历史记录,并实现,类似:撤消(Undo)的功能;
测试源码项目为:MonitorCommands
9)、WPF 自定义数据转换器,官方的介绍:
http://msdn.microsoft.com/zh-cn/library/aa970913.aspx
10)、WPF 样式、触发器:
StyleTriggersSetterTestingProject
11)、WPF 实现九宫格位置拉伸:
http://www.silverlightchina.net/html/study/WPF/2012/1215/20850.html
12)、Path.Data在xaml中的各种赋值,值写法:
http://www.silverlightchina.net/html/study/WPF/2011/0116/4927.html
也可以在代码这么写成字符串,再使用:GemotryConvertor对象去转换;
13)、WPF中,如何对一个可象对象栅格化:
CodeProject的DEMO,非常有用,我把他下载,保存到网盘,以便哪天,源网站把相关资源删除。
BitmapSample.zip
http://www.codeproject.com/Articles/103184/How-to-Render-Bitmap-or-to-Print-a-Visual-in-WPF#
14)、关于Adorner的一个详细介绍文章:
用于制作,Tips,或是普通元素上层显示的提示信息,挺有用;
http://www.cnblogs.com/loveis715/archive/2012/03/31/2427734.html
15)、Drag and Drog Swap Items(拖动、拖拽,实现,子项之间的效换效果):
我存到网盘了:在CodeProject下你还得注册帐号;下我这个免了这流程,呵呵:
ListViewDragDropManager_src.zip
http://www.codeproject.com/Articles/17266/Drag-and-Drop-Items-in-a-WPF-ListView
16)、CaptureMouse与ReleaseMouseCapture的作用:
http://www.cnblogs.com/xwlyun/archive/2012/09/12/2681585.html
17)、自定义Expander控件:
不多说,CodeProject的总是精品:
http://www.codeproject.com/Articles/248112/Templating-WPF-Expander-Control
18)、国外WPF Mahapps.metro开源项目,很吊的项目:
首页:http://mahapps.com/MahApps.Metro/#
开源Github:https://github.com/MahApps/MahApps.Metro
19)、另一个比较轻量级开源项目的:
首页:http://mui.codeplex.com/
同时提供了一些免费xaml矢量图标(icon)非常赞!
图标提供地址:http://modernuiicons.com/
20)、WPF 国外视频网:Youtube教程:
MVVM_DEMO_PR1
MVVM_DEMO_PR2
其中看了一篇MVVM的教程,我自己重新写了一个DEMO:MVVM_Demo
21)、MSDN、CNBLOG的一些ICommand使用扩展中UI上的DEMO:
MSDN:http://msdn.microsoft.com/zh-cn/library/system.windows.input.icommandsource.command.aspx
CNBLOG:http://www.cnblogs.com/xiwang/archive/2012/07/23/2604924.html
22)、WPF 文本(TextBlock)描边:
1、转为WriteableBitmap再对像素点设置颜色,虽然不是最好的方法,但是思路不错:
http://www.cnblogs.com/webgames/archive/2010/09/18/1829814.html
2、shader 描边,也是非常不错的一个,不过这个是SL的:
http://www.cnblogs.com/ashei/archive/2011/02/12/1952243.html
3、还有另一个,思路非常值得推荐,CodeProject下的,文本描边的各种风格,Cool得要命:
http://www.codeproject.com/Articles/42529/Outline-Text
4、描边的好几种方法:(CSDN的:野比,把第1、2、3点也包括中内,非常不错的总结!)
http://bbs.csdn.net/topics/390070159
23)、WPF 的HLSL(WPF Pixel Shader : PS)学习:
有一个介绍相关的国外网站,有DEMO,与视频介绍,还有:文档:
信息介绍:
http://channel9.msdn.com/shows/Continuum/WPFFXDemo/
视频介绍:
http://channel9.msdn.com/shows/Continuum/WPFFXDemo/
文档:
https://skydrive.live.com/?cid=123ec1ed6c72a14a&id=123EC1ED6C72A14A%21169
还要把相关文档下载下来了:
doc1 doc2
24、如何获取:DataTemplate的指定元素:
如:xaml模板内有这定的定义:
<ListView.View>
	<GridView>
		<GridViewColumn Header="Visible" Width="40">
			<GridViewColumn.CellTemplate>
				<DataTemplate>
					<baseControl:DesignerLayerOptionMenu x:Name="Eyes" Margin="5, 5, 0, 5" Width="16" Height="16"
									SelectedIcon="../Resources/Images/DesignerLayers/Visible.ico"
									UnselectedIcon="../Resources/Images/DesignerLayers/Unvisible.ico"
									ToolTip="隐藏/显示"
									IsSelected="{Binding IsSymbolVisible, Mode=TwoWay, UpdateSourceTrigger=PropertyChanged}"/>
				</DataTemplate>
			</GridViewColumn.CellTemplate>
		</GridViewColumn>
	<GridView>
<ListView.View>
在.cs代码内,如何获取这个x:Name="Eyes"的元素呢:
var listViewItem = (_listView.ItemContainerGenerator.ContainerFromIndex(i)) as ListViewItem; // i 这第i行对应的ListViewItem的索引

DesignerLayerOptionMenu textBox = listViewItem.FindVisualDescendant<DesignerLayerOptionMenu>("Eyes");

//而这个FindVisualDescendant方法是扩展方法:我在stackoverflow社区找到的其一贴子的代码
/// <summary>
/// stackoverflow:
/// http://stackoverflow.com/questions/1298274/c-wpf-get-binding-path-of-an-element-in-a-datatemplate
/// </summary>
public static class ControlAux
{
	static public IEnumerable<T> GetVisualDescendants<T>(this DependencyObject item) where T : DependencyObject
	{
		for (int i = 0; i < VisualTreeHelper.GetChildrenCount(item); ++i)
		{
			DependencyObject child = VisualTreeHelper.GetChild(item, i);
			if (typeof(T) == (child.GetType()))
			{
				yield return (T)child;
			}
			foreach (T descendant in GetVisualDescendants<T>(child))
			{
				yield return descendant;
			}
		}
	}
	static public T FindVisualDescendant<T>(this DependencyObject item, string descendantName) where T : DependencyObject
	{
		return
			GetVisualDescendants<T>(item).Where(
			descendant =>
			{
				var frameworkElement = descendant as FrameworkElement;
				return frameworkElement != null && frameworkElement.Name == descendantName;
			}).
			FirstOrDefault();
	}
}


