MFC(文档和串行化,孙鑫C++第十三讲笔记整理)
1.CArchive在菜单打开保存时的代码
CFile file("1.txt",CFile::modeCreate | CFile::modeWrite);
CArchive ar(&file,CArchive::store);
int i=4;
char ch='a';
float f=1.3f;
CString str("http://www.sunxin.org");
ar<<i<<ch<<f<<str;以上是保存,打开略
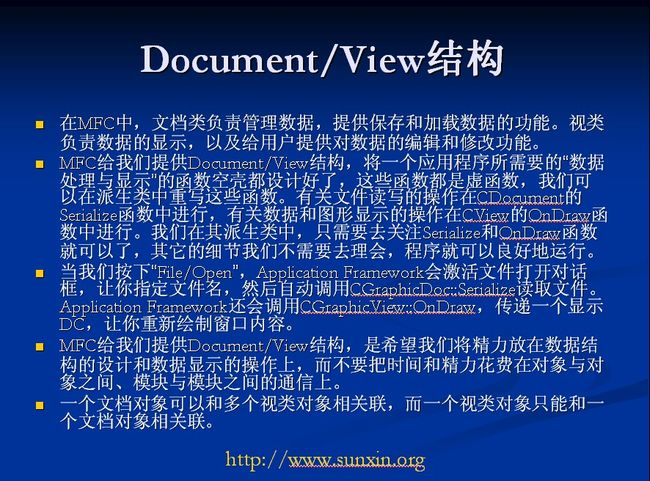
2.文档-视类结构简介
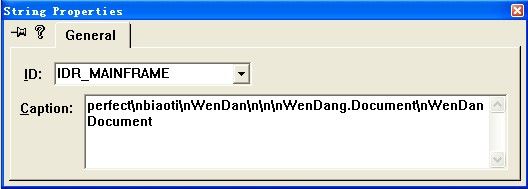
OnNewDocument在程序启动时被调用,此时可设置文档标题,也可以在String Table的IDR_MAINFRAME的第二个"\n"后改变文档的标题。须了解的7个字符串的用途,见PPT。
在WinAPP的InitInstance()中完成DOC,View,MainFrame的归一。
当点击系统的打开和新建菜单时,有一系列的步骤,孙鑫老师给我们跟踪了代码的调用过程,此段跟踪我们略过。但我们要牢记住:CWinAPP负责管理文档管理器,文档管理器有一个指针链表,且来保存文档模板的指针,文档模板指针管理三个类DOC,VIEW,MAINFRAME,使其为某文件对象服务。
3.利用CArchive来保存一个类的对象,此类必须支持串行化,需要5个步骤。
a.让类从CObject派生;
b.覆盖Serialize()函数,在其中完成保存和读取功能;
c.在.h中加入 DECLARE_SERIAL(CGraph);
d.在。cpp中加入IMPLEMENT_SERIAL(CGraph, CObject, 1 );
e.定义一个不带参数的构造函数。
保存绘画数据到文件的简单过程
a.在CGraph中增加一个画图的成员函数,其实不增加也行。可以在View中完成相应功能。
b.增加四个画图菜单,菜单可以从11课的代码中拷贝。
c.在View中增加LButtonDown和UP的响应,在UP中画图,在DOWN中保存点
d.利用CObArray集合类来保存绘画数据
e.在CGraphicDOC::Serialize()中保存和读取数据
f.然后在OnDraw中重绘。
4.新建和打开文档时,要注意销毁原来的数据。在DOC的DeleteContents虚函数中是好时机。代码如下
int nCount;
nCount=m_obArray.GetSize();
/*for(int i=0;i<nCount;i++)
{
delete m_obArray.GetAt(i);//释放指针指向的内存空间
//m_obArray.RemoveAt(i);//移除链表中的元素。嘿嘿,别搞错了。但在此处不能这样用,会导致非法操作。要用下面的方法沙
}
m_obArray.RemoveAll();*/
while(nCount--)
{
delete m_obArray.GetAt(nCount);
m_obArray.RemoveAt(nCount);
}
下面是具体的过程,只有代码喔
下面两点补充12讲的文件操作内容:
void CWenDangView::OnXieru()
{
	// TODO: Add your command handler code here

	CFile file("demo110.txt",CFile::modeCreate|CFile::modeWrite);
	CArchive ar(&file,CArchive::store);
	ar.Write("hello,use CArchive to show",strlen("hello,use CArchive to show"));
	ar.Close();

	//用下面这种方式的话,如果运行程序没有关闭的话,txt文档打不开,会报错说该文件正在使用
	//CFile *file=new CFile("demo111.txt",CFile::modeCreate|CFile::modeWrite);
	//CArchive ar(file,CArchive::store);


}
void CWenDangView::OnDuqu()
{
	// TODO: Add your command handler code here

	/*CFile file("demo110.txt",CFile::modeRead);
	CArchive ar(&file,CArchive::load);
	char ch[100];
	memset(ch,0,100);
	ar.Read(ch,100);
	MessageBox(ch);*/

	//或者使用这种方式:
	CFile file("demo110.txt",CFile::modeRead);
	CArchive ar(&file,CArchive::load);
	int len=file.GetLength();
	char *ch=new char[len+1];
	ar.Read(ch,len);
	ch[len]=0;
	MessageBox(ch);

}
在CDocument.app文件中的OnNewDocument函数中,可以设置document文件属性,如
SetTitle("hello,CDocument");
当然,也可以在String Tablet中去设置:
这些个属性,可以在MSDN中 GetDocString中查到
OnXieRu
CFile file("demo111.txt",CFile::modeCreate|CFile::modeWrite);
	CArchive ar(&file,CArchive::store);
	int a=123;
	char b='H';
	float d=12.354f;
	CString cstring="hello";
	ar<<a<<b<<d<<cstring;
	ar.Close();
OnDuQu
CFile file("demo111.txt",CFile::modeRead);
	CArchive ar(&file,CArchive::load);
	int a;
	char b;
	float d;
	CString cstring;
	CString result;
	ar>>a>>b>>d>>cstring;
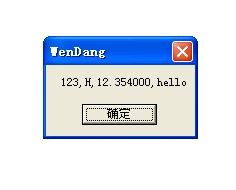
	result.Format("%d,%c,%f,%s",a,b,d,cstring);
	MessageBox(result);
	ar.Close();
实践证明,write()和Read()搭配使用,操作符>>和<<搭配使用。
程序帮我们生成的菜单中,打开和保存,在程序中找不到相应的OnFileOpen和OnFileSave类似的函数,孙鑫老师为我们跟踪了函数的归宿,这几个函数是在CXXAPP文件中被管理的,打开和保存在CDocument中的Serialize函数中类完成的
void CWenDangDoc::Serialize(CArchive& ar)
{
	if (ar.IsStoring())
	{
		// TODO: add storing code here
	}
	else
	{
		// TODO: add loading code here
	}
}
void CWenDangDoc::Serialize(CArchive& ar)
{
	if (ar.IsStoring())
	{
		// TODO: add storing code here

		CFile file("demo112.txt",CFile::modeCreate|CFile::modeWrite);
		CArchive ar(&file,CArchive::store);
		int a=10086;
		CString cstring="hello,VC++";

		ar<<a<<cstring;
		ar.Close();
	}
	else
	{
		// TODO: add loading code here
		CFile file("demo112.txt",CFile::modeRead);
		CArchive ar(&file,CArchive::load);
		int a;
		CString cstring;
		CString result;

		ar>>a>>cstring;
		result.Format("%d,%s",a,cstring);
		AfxMessageBox(result);
		ar.Close();

	}
}
运行程序,先写入,然后读取,却读取不到,这是因为设计的问题,当程序正在当前的文件,再打开当前的文件是没有反应的,就像Word文档,OnDocumentOpen里面会判断是否XXX的。
用CArchive去保存一个对象,这个类要是可Serialize的,要创建这样一个类,必须满足下面五个步骤
下面我们自己去设计一个Serialize的类,取名为HuiTu(绘图)类。
步骤1
class HuiTu  :public CObject
{
public:
	HuiTu();
	virtual ~HuiTu();

public:
	CPoint yuandian;
	CPoint zhondian;
	UINT leixing;

};
步骤2
public:
	HuiTu();
	virtual ~HuiTu();
	void Serialize(CArchive& ar);
void HuiTu::Serialize(CArchive& ar)
{
	if(ar.IsStoring())
	{
		ar<<leixing<<yuandian<<zhondian;
	}
	else
	{
		ar>>leixing>>yuandian>>zhondian;

	}
}
步骤3
class HuiTu  :public CObject
{
	DECLARE_SERIAL(HuiTu)

public:
	HuiTu();
	virtual ~HuiTu();
	void Serialize(CArchive& ar);

public:
	CPoint yuandian;
	CPoint zhondian;
	UINT leixing;

};
步骤4新建一个类的时候,已经有了默认的构造函数,如果没有,自己手动建一个
步骤5
cpp文件中,构造函数之前,加上:
IMPLEMENT_SERIAL( HuiTu, CObject, 1 )
这样 五个条件就完成了
CXXView中,左键down 点坐标赋给m_yuandian,左键up 点坐标赋给m_zhondian
HuiTu类中 添加一个成员函数:
void HuiTu::Draw(CDC *pdc)
{
	CBrush *newbrush=CBrush::FromHandle((HBRUSH)GetStockObject(NULL_BRUSH));
	CBrush *oldbrush=pdc->SelectObject(newbrush);

	switch(leixing)
	{
	case 1:
		pdc->SetPixel(zhondian,RGB(0,0,0));
		break;

	case 2:
		pdc->MoveTo(yuandian);
		pdc->LineTo(zhondian);
		break;
	case 3:
		pdc->Rectangle(&CRect(yuandian,zhondian));
		break;
	case 4:
		pdc->Ellipse(&CRect(yuandian,zhondian));
		break;
	default:
		break;

	}
}
菜单响应函数
void CWenDangView::OnDian()
{
	// TODO: Add your command handler code here
	leixing=1;
}

void CWenDangView::OnXian()
{
	// TODO: Add your command handler code here
	leixing=2;
}

void CWenDangView::OnJuxing()
{
	// TODO: Add your command handler code here
	leixing=3;
}

void CWenDangView::OnTuoyuan()
{
	// TODO: Add your command handler code here
	leixing=4;
}
void CWenDangView::OnLButtonUp(UINT nFlags, CPoint point)
{
	// TODO: Add your message handler code here and/or call default

	m_zhondian=point;

	CClientDC ccdc(this);
	CBrush *newbrush=CBrush::FromHandle((HBRUSH)GetStockObject(NULL_BRUSH));

	switch(m_leixing){
	case 1:
		ccdc.SetPixel(m_yuandian,RGB(0,0,0));
		break;

	case 2:
		ccdc.MoveTo(m_yuandian);
		ccdc.LineTo(point);
		break;
	case 3:
		ccdc.Rectangle(&CRect(m_yuandian,point));
		break;
	case 4:
		ccdc.Ellipse(&CRect(m_yuandian,point));
		break;
	default:
		break;
	}

	HuiTu *huitu;
	huitu=new HuiTu(m_leixing,m_yuandian,point);
	m_obArray.Add(huitu);


	CView::OnLButtonUp(nFlags, point);
}
使用了CObArray集合来保存数据,同样可以使用Vector或者CPtrArray来保存
void CWenDangDoc::Serialize(CArchive& ar)
{

	POSITION position=GetFirstViewPosition();
	CWenDangView *wendangview=(CWenDangView*)GetNextView(position);

	if (ar.IsStoring())
	{
		// TODO: add storing code here

		/*CFile file("demo112.txt",CFile::modeCreate|CFile::modeWrite);
		CArchive ar(&file,CArchive::store);
		int a=10086;
		CString cstring="hello,VC++";

		ar<<a<<cstring;
		ar.Close();*/

		int ncount=wendangview->m_obArray.GetSize();
		ar<<ncount;
		for(int i=0;i<ncount;++i)
		{
			ar<<wendangview->m_obArray.GetAt(i);
		}


	}
	else
	{
		// TODO: add loading code here
		/*CFile file("demo112.txt",CFile::modeRead);
		CArchive ar(&file,CArchive::load);
		int a;
		CString cstring;
		CString result;

		ar>>a>>cstring;
		result.Format("%d,%s",a,cstring);
		AfxMessageBox(result);
		ar.Close();*/

		int ncount;
		ar>>ncount;//先存先取

		HuiTu *huitu;
		for(int i=0;i<ncount;++i)
		{
			ar>>huitu;
			wendangview->m_obArray.Add(huitu);
		}


	}
	//wendangview->m_obArray.Serialize(ar);
}
void CWenDangView::OnDraw(CDC* pDC)
{
	CWenDangDoc* pDoc = GetDocument();
	ASSERT_VALID(pDoc);

	int ncount=m_obArray.GetSize();
	for(int i=0;i<ncount;++i)
	{
		((HuiTu*)m_obArray.GetAt(i))->Draw(pDC);
	}

	// TODO: add draw code for native data here
}
因为CObArray支持Serialize
所以跟下面语句跟上面一长串是等价的:
void CWenDangDoc::Serialize(CArchive& ar)
{

	POSITION position=GetFirstViewPosition();
	CWenDangView *wendangview=(CWenDangView*)GetNextView(position);

	if (ar.IsStoring())
	{
		// TODO: add storing code here

	}
	else
	{

            // TODO: add storing code here
	}
	wendangview->m_obArray.Serialize(ar);//本身支持这个操作
}
最好把数据都放在CXXDOC中去处理,如这个例子可以这样处理:
1把m_obArray定义成CXXDoc类中的成员变量(共有)
2因为CXXView中,系统已经定义好了GetDocument()函数,所以CXXView中的OnLButtonUp中
后改成:CXXDoc *pDoc=GetDocument(); pDoc->m_obArray.add(huitu);
3在CXXDoc中的Serialize函数中
else之后,m_obArray.Serialize(ar);
因为new了,分配了内存,所以要在文档新建或销毁的时候调用delete释放内存
CXXDOC虚函数,文档新建或销毁的时候会调用
void CWenDangDoc::DeleteContents()
{
	// TODO: Add your specialized code here and/or call the base class

	POSITION pos=GetFirstViewPosition();
	CWenDangView *wendangview=(CWenDangView*)GetNextView(pos);

	int ncount=wendangview->m_obArray.GetSize();
	for(int i=0;i<ncount;++i)
	{
		delete wendangview->m_obArray.GetAt(i);
		//wendangview->m_obArray.RemoveAt(i);//这里每删除一次,编号都会跟着改变的,这里会发生内存泄漏
	}
	wendangview->m_obArray.RemoveAll();

	CDocument::DeleteContents();
}
如果把m_obArray设为CXXDOC的成员变量则
int ncount=m_obArray.GetSize();
	for(int i=0;i<ncount;++i)
	{
		delete m_obArray.GetAt(i);

	}
	m_obArray.RemoveAll();
至此,整个笔记完成。谢谢


