JUnit基础及第一个单元测试实例(JUnit3.8)
单元测试
单元测试(unit testing) ,是指对软件中的最小可测试单元进行检查和验证。
单元测试不是为了证明您是对的,而是为了证明您没有错误。
单元测试主要是用来判断程序的执行结果与自己期望的结果是否一致。
关键是在于所用的测试用例(Test Case) 。
JUnit
JUnit是一个Java语言的单元测试框架。
项目主页:http://junit.org/
Java的很多IDE,比如Eclipse集成了JUnit,只需要在build path中添加Library并选择想用的版本即可。
JUnit的两种主要版本是JUnit 3.8和JUnit 4,前者使用反射,后者使用反射和注解。
博文回顾:本博客上次介绍JUnit的时候是在反射和注解之后:
http://www.cnblogs.com/mengdd/archive/2013/02/02/2890204.html
结合实例来说明单元测试的用法:
1.编写目标类源代码
新建一个项目,起名叫JUnitTest,首先编写一个目标类Calculator:
package com.mengdd.junit;

public class Calculator
{
    public int add(int a, int b)
    {
        return a + b;
    }

    public int subtract(int a, int b)
    {
        return a - b;
    }

    public int multiply(int a, int b)
    {
        return a * b;
    }

    public int divide(int a, int b)
    {
        return a / b;
    }
}
2.添加JUnit库
然后为了使用JUnit,需要加入库:
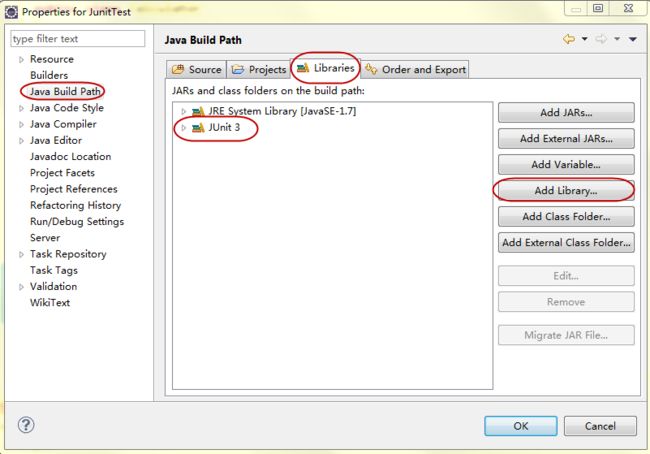
右键选择项目Properties->左侧Java Build Path->标签Libraries->Add Library...
弹出的对话框中选JUnit,然后Next,再选择JUnit 3或者JUnit 4.
本文示例选择JUnit 3。
3.创建测试类
这里需要注意以下几点:
1.使用JUnit的最佳实践:源代码和测试代码需要分开。
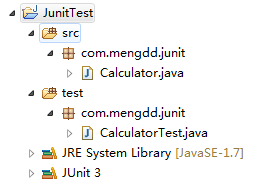
所以可以新建一个名叫test的source folder,用于存放测试类源代码。这样在发布程序的时候测试类的程序就可以丢掉了。
但是这两个文件夹中的类编译出的class文件都会在同一个bin文件夹中。
2.测试类和目标源代码的类应该位于同一个包下面,即它们的包名应该一样。
这样测试类中就不必导入源代码所在的包,因为它们位于同一个包下面。
3.测试类的命名规则:
在要测试的类名之前或之后加上Test。
此步骤完成后项目目录如下:
4.测试类代码编写
测试类必须继承于TestCase类。
TestCase文档说明:
public abstract class TestCase
extends Assert
implements Test
A test case defines the fixture to run multiple tests.
To define a test case
1) implement a subclass of TestCase
2) define instance variables that store the state of the fixture
3) initialize the fixture state by overriding setUp
4) clean-up after a test by overriding tearDown.
Each test runs in its own fixture so there can be no side effects among test runs.
(本文最后参考资料中会给出JUnit文档的网盘链接,有需要可下载)
还有一个很重要的Assert类,参见文档,全是static void方法。
对于测试类中方法的要求:
在JUnit 3.8中,测试方法需要满足如下原则:
1.public的。
2.void的。
3.无方法参数。
4.方法名称必须以test开头。 (它通过反射找出所有方法,然后找出以test开头的方法)。
Test Case之间一定要保持完全的独立性,不允许出现任何的依赖关系。
删除一些方法后不会对其他的方法产生任何的影响。
我们不能依赖于测试方法的执行顺序。
综上,编写代码如下:
package com.mengdd.junit;

import junit.framework.Assert;
import junit.framework.TestCase;

public class CalculatorTest extends TestCase
{
    public void testAdd()
    {
        Calculator calculator = new Calculator();
        int result = calculator.add(1, 2);
        // 判断方法的返回结果
        Assert.assertEquals(3, result);// 第一个参数是期望值,第二个参数是要验证的值
    }

    public void testSubtract()
    {
        Calculator calculator = new Calculator();
        int result = calculator.subtract(1, 2);
        // 判断方法的返回结果
        Assert.assertEquals(-1, result);// 第一个参数是期望值,第二个参数是要验证的值

    }

    public void testMultiply()
    {
        Calculator calculator = new Calculator();
        int result = calculator.multiply(2, 3);
        // 判断方法的返回结果
        Assert.assertEquals(6, result);// 第一个参数是期望值,第二个参数是要验证的值

    }

    public void testDivide()
    {
        Calculator calculator = new Calculator();
        int result = calculator.divide(12, 3);
        // 判断方法的返回结果
        Assert.assertEquals(4, result);// 第一个参数是期望值,第二个参数是要验证的值

    }


}
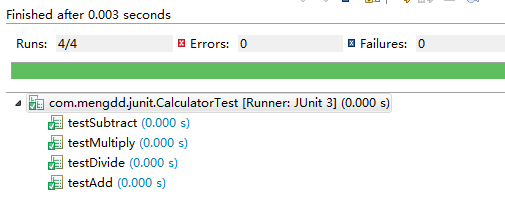
运行一下:右键选择该类,Run As->JUnit Test
(可以在此处右键选择Run重复运行)
JUnit的口号:Keep the bar green to keep the code clean.
5.代码重构:setUp()方法的使用
有一个原则:DRY(Don’t Repeat Yourself)
所以对代码进行重构,将重复的生成对象的部分放在setUp()方法中。
(重写的时候将protected变为public,继承的时候扩大访问范围是没有问题的。)
先进行一个方法的测试测试:
在CalculatorTest类中加入代码如下:
    @Override
    public void setUp() throws Exception
    {
        System.out.println("set up");
    }

    @Override
    public void tearDown() throws Exception
    {
        System.out.println("tear down");
    }
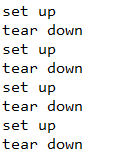
再次运行后发现Console中输出如下:
说明这两个方法执行了多次。
在每个测试用例之前执行setUp(),每个测试用例执行之后,tearDown()会执行。
即对于每个测试用例,执行顺序为:
1.setUp()
2.testXXX()
3.tearDown()
重构:使用成员变量生成对象(为了能在每个方法中都用到),将生成对象的语句放在setUp()中,注意这里为每一个测试用例都会生成新的对象。
重构后代码如下:
package com.mengdd.junit;

import junit.framework.Assert;
import junit.framework.TestCase;

public class CalculatorTest extends TestCase
{

    private Calculator calculator = null;

    @Override
    public void setUp() throws Exception
    {
        System.out.println("set up");
        // 生成成员变量的实例
        calculator = new Calculator();
        System.out.println(calculator);
    }

    @Override
    public void tearDown() throws Exception
    {
        System.out.println("tear down");
    }

    public void testAdd()
    {
        int result = calculator.add(1, 2);
        // 判断方法的返回结果
        Assert.assertEquals(3, result);// 第一个参数是期望值,第二个参数是要验证的值
    }

    public void testSubtract()
    {
        int result = calculator.subtract(1, 2);
        // 判断方法的返回结果
        Assert.assertEquals(-1, result);// 第一个参数是期望值,第二个参数是要验证的值

    }

    public void testMultiply()
    {
        int result = calculator.multiply(2, 3);
        // 判断方法的返回结果
        Assert.assertEquals(6, result);// 第一个参数是期望值,第二个参数是要验证的值

    }

    public void testDivide()
    {
        int result = calculator.divide(12, 3);
        // 判断方法的返回结果
        Assert.assertEquals(4, result);// 第一个参数是期望值,第二个参数是要验证的值

    }


}
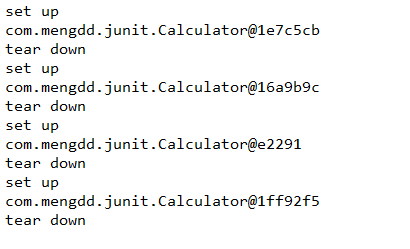
运行后控制台输出:
说明每一个测试的方法前后都会有setUp()和tearDown()方法的调用,所以每次生成的都是一个新的对象,各个方法之间没有干扰。
参考资料
圣思园张龙老师Unit Test系列视频教程。
CHM格式文档网盘链接:
JUnit 3.8.1:http://pan.baidu.com/share/link?shareid=539342&uk=2701745266
JUnit 4.0:http://pan.baidu.com/share/link?shareid=539345&uk=2701745266
