Android-AIDL通信
Remote端
在Android系统中,可以使用AIDL技术实现不同进程间通信。在以下讲解中我们将Service端称为Remote端;本地访问Service称为Client端。首先我们在Remote端建立AIDL文件(QueryBook.aidl):
package com.jony.remote.aidl;

interface QueryBook {
    String getBook(int bookid);
}
建好AIDL文件后,编译器会在项目的gen目录下自动帮我们生成QueryBook.java文件。该文件是编译器自动帮我们生成的,因为我们现在只是讲解使用AIDL进程通信技术,所以明白该文件的同学可以先不用管,实行拿来主义,先会用再说。想深入了解Android的通过可以去研究一下,非常有趣的。
接下来,我们创建Remote端的服务类(MyService.java):
package com.jony.remote;

import com.jony.remote.aidl.QueryBook;

import android.app.Service;
import android.content.Intent;
import android.os.IBinder;
import android.os.RemoteException;

public class MyService extends Service{
    private IBinder binder;
    private String[] books = {"乔布斯传记","随遇而安","Ruby元编程","深入理解Android"};

    @Override
    public void onCreate() {
        super.onCreate();
        binder = new MyQueryBook();// MyQueryBook是一个Binder对象
    }

    @Override
    public IBinder onBind(Intent intent) {
        return binder;// 将Binder对象返回到客户端
    }

    private String queryBook(int bookid){
        if (bookid > 0 && bookid < 5) {
            return books[bookid - 1];
        }
        return null;
    }
    private final class MyQueryBook extends QueryBook.Stub{
        @Override
        public String getBook(int bookid) throws RemoteException {
            return queryBook(bookid);
        }

    }
}
当我们建立好Service类的时候,首先我们应该在Manifest.xml文件中配置我们的service(这是一个良好的习惯,请遵循)具体配置信息如下(AndroidManifest.xml):
<manifest xmlns:android="http://schemas.android.com/apk/res/android"
    package="com.jony.remote"
    android:versionCode="1"
    android:versionName="1.0" >

    <uses-sdk
        android:minSdkVersion="8"
        android:targetSdkVersion="15" />

    <application
        android:icon="@drawable/ic_launcher"
        android:label="@string/app_name"
        android:theme="@style/AppTheme" >
        <!-- 采用隐式方法启动Service,不同进程间的服务一般采用隐式启动方式 -->
        <service android:name=".MyService">
            <intent-filter>
                <action android:name="com.jony.remote.aidl"/>
            </intent-filter>
        </service>
    </application>

</manifest>
至此,我们的Remote端的代码就结束了,Remote端目录结构如图所示:

Client端
接下来,我们创建Client端代码:
首先,我们将Remote端的AIDL文件拷贝的Client端;在Client端创建MainActivity.java文件:
package com.jony.client;

import com.jony.remote.aidl.QueryBook;

import android.os.Bundle;
import android.os.IBinder;
import android.os.RemoteException;
import android.app.Activity;
import android.content.ComponentName;
import android.content.Intent;
import android.content.ServiceConnection;
import android.view.Menu;
import android.view.View;
import android.view.View.OnClickListener;
import android.widget.Button;
import android.widget.EditText;
import android.widget.TextView;

public class MainActivity extends Activity implements OnClickListener{
    private EditText bookid;
    private Button query;
    private TextView result;
    private QueryBook querybook;
    private BookQueryConnection connection = new BookQueryConnection();

    private final class BookQueryConnection implements ServiceConnection{
        @Override
        public void onServiceConnected(ComponentName name, IBinder service) {
            // 将Remote端返回的Binder对象转换成QueryBook对象
            querybook = QueryBook.Stub.asInterface(service);
        }
        @Override
        public void onServiceDisconnected(ComponentName name) {
            querybook = null;
        }

    }

    @Override
    public void onCreate(Bundle savedInstanceState) {
        super.onCreate(savedInstanceState);
        setContentView(R.layout.activity_main);
        bookid = (EditText) findViewById(R.id.bookid);
        query = (Button) findViewById(R.id.query);
        result = (TextView) findViewById(R.id.result);
        query.setOnClickListener(this);
        Intent service = new Intent("com.jony.remote.aidl");
        bindService(service, connection, BIND_AUTO_CREATE);// 绑定Service
    }

    @Override
    public boolean onCreateOptionsMenu(Menu menu) {
        getMenuInflater().inflate(R.menu.activity_main, menu);
        return true;
    }

    @Override
    public void onClick(View v) {
        String string = bookid.getText().toString();
        if (string != null && !string.trim().equals("")) {
            String bookname;
            try {
                bookname = querybook.getBook(Integer.valueOf(string));
                if (bookname != null) {
                    result.setText(bookname);
                }else {
                    result.setText(getResources().getString(R.string.no_book));
                }
            } catch (NumberFormatException e) {
                e.printStackTrace();
            } catch (RemoteException e) {
                e.printStackTrace();
            }

        }

    }

    @Override
    protected void onDestroy() {
        super.onDestroy();
        unbindService(connection);// 解除Service绑定
    }
}
Client端目录结构如图所示:
运行:
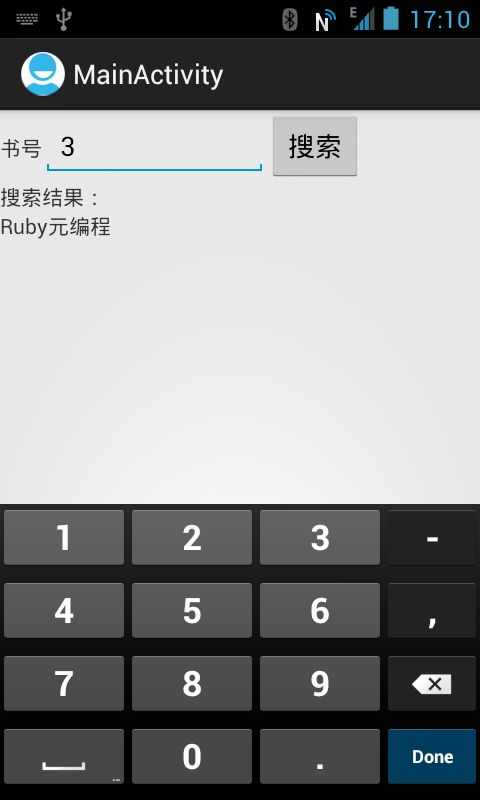
首先运行Remote端,再运行Client端,运行效果如图所示:
源码下载:
http://download.csdn.net/download/weihan1314/4731427
