在VertrigoSev中搭建Testlink全过程
本文是参考虫师前几年写的一篇文章,我根据自己的过程对一些配置信息进行了补充。虫师原文地址:
http://www.cnblogs.com/fnng/archive/2011/11/24/2262357.html
本文分为工具介绍、工具下载、安装配置步骤、遇到的问题及解决、其他补充5个部分。
工具介绍
VertrigoSev是一个免费网络开发环境,它集成了Apache, PHP, MySQL, SQLite, SQLiteManager, PhpMyAdmin, Zend Optimizer等。
VertrigoSev安装后,默认账号密码:
1.MySQL->默认用户名: root,默认密码: vertrigo;
2.SQLiteManager->用户名/密码1 : admin/admin ;用户名/密码2 : data/data;用户名/密码3: guest/guest
Testlink是一个基于web的测试用例管理工具,主要功能是测试用例的创建、管理和执行。
关于两个工具的具体用途,这里不进行赘述,请大家自行百度。
工具下载
要在VertrigoSev配置Testlink,首先要安装VertrigoSev。两个软件的下载地址共享如下:
VertrigoSev:https://sourceforge.net/directory/os:windows/?q=VertrigoServ
TestLink(我安装的是1.9.10版本):https://sourceforge.net/directory/os:windows/?q=Testlink
安装步骤
安装VertrigoServ,并进行必要配置
解压下载的Testlink安装包,放到...\VertrigoServ\www目录下
启动VertrigoServ服务。
打开浏览器,输入http://localhost。如果服务可以正常连接,则说明端口没有冲突。网页访问正常打开VertrigoServ页面
配置Testlink
在浏览器中输入http://localhost/testlink ,进入testlink的安装过程(网站访问,访问的站点名称应与文件夹名称相同。即若要能正常访问Testlink,站点目录名称应...\VertrigoServ\www\testlink)
第一步:点击New installation
第二步:Acceptance of License(接受许可),提示我们是否接受协议。I agree to the terms set out in this license.前面复选框打勾,点击“Continue”按钮。
第三步:Verification of System and configuration requirements(检查系统和配置要求).如果在页面最下方有:Your system is prepared for TestLink configuration (no fatal problem found). 提示,那么点击按钮“Continue”按钮继续(注:安装过程中橙色字体的提示信息可先忽略,此后有需要再设置,不影响安装)
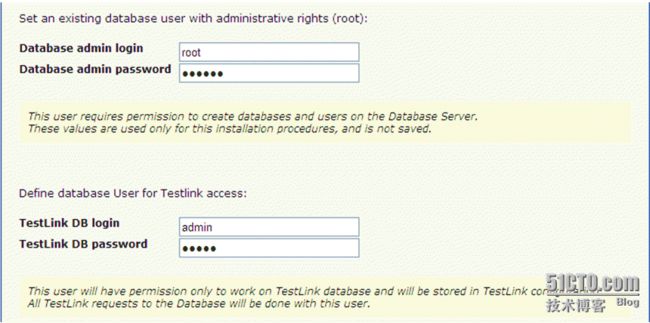
第四步:Definition of DB access (数据库访问的定义)。填写数据库账号密码
Set an existing database user with administrative rights (root):(设置一个数据库管理权限)
填写我们数据库的用户名和密码。
This user requires permission to create databases and users on the Database Server.
These values are used only for this installation procedures, and is not saved
用户需要在数据库服务器上创建数据库和用户的权限。这些值仅用于此安装程序,并且不保存 。
Define database User for Testlink access(定义Testlink访问数据库用户)
This user will have permission only to work on TestLink database and will be stored in TestLink configuration. All TestLink requests to
the Database will be done with this user.
此用户将只允许工作testlink数据库和将存储在testlink配置。所有testlink请求的数据库将完成这个用户。
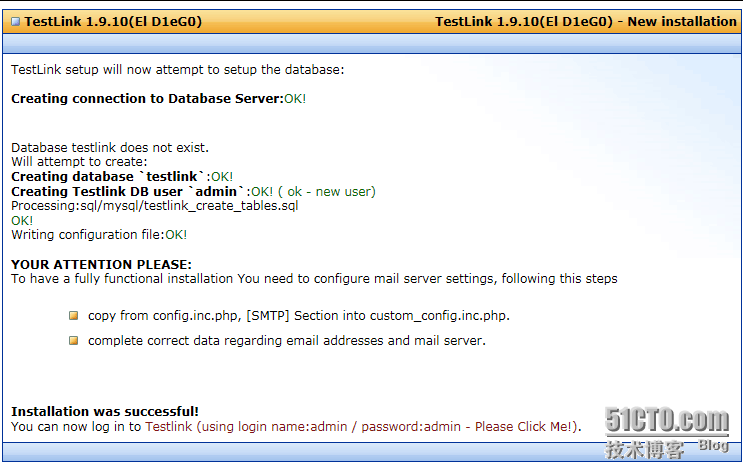
填写完用户信息后,点击页面底部“process TestLink Setup!”按钮。Testlink在VertrigoServ安装成功的提示页面如下:
遇到的问题
VertrigoServ服务器连接失败。原因,端口占用(安装默认的监听端口是80)。确认方法:命令行窗口中使用netstat -ano查看是否有进程使用80端口,且状态为Listening。解决方法:改服务器端口。打开...\VertrigoServ\Apache\conf\http.conf文件,查找Listen 80,将80改为其他可用端口,如8088等。更改后,重启服务,浏览器访问时需要输入端口号http://localhost:8088 ,访问成功即表示端口设置成功。
Testlink安装进行到第三步,出现无法查找Testlink相对路径中的logs和upload_area和文件,提示信息如下:
解决方案:修改...\VertrigoServ\www\Testlink\config.inc.php配置文件
$tlCfg->log_path = '/var/testlink/logs/'; /* unix example和
$g_repositoryPath = '/var/testlink/upload_area/'; /* unix example
将这两行分别注释,使用绝对路径。
$tlCfg->log_path = '...\VertrigoServ\www\testlink\logs'; 和
$g_repositoryPath = '...\VertrigoServ\www\testlink\upload_area';
保存配置,刷新安装页面即可成功
登录Testlink后配置完首个项目,在首页会提示如下信息'There are security warnings for your consideration. See details on file: D:\Program Files\VertrigoServ\www\testlink\logsconfig_check.txt. To disable any reference to these checkings, set $tlCfg->config_check_warning_mode = 'SILENT';'
这是安全提示信息,可以通过修改配置文件忽略。
解决方案:修改...\VertrigoServ\www\Testlink\config.inc.php配置文件,
$tlCfg->config_check_warning_mode = 'FILE';
改为:
$tlCfg->config_check_warning_mode = 'SILENT';
其他补充
1.Testlink安装完成,可使用以下地址访问http://localhost/testlink/ 访问的账号密码为admin/admin
2.若需要管理mysql数据库,访问地址为http://localhost:端口号/phpmyadin 访问的账号密码为root/vertrigo
3.Testlink汉化,这个很简单,不同账号可以单独设置。登录Testlink,mysettings>Personal data>locale>Chinese Simplified,设置后save保存,刷新页面即可。

