如何使用QML动态产生Component来完成我们的气球游戏 (2)
在上一篇文章中,我们已经生成了我们Balloon component了。现在我们来让大家怎么来动态生成很多的气球。
4)更进一步完成我们的Balloon component
为了使得我们的Balloon更加像现实生活中的气球,我们来给Balloon给予更多的属性:
    property int x1
    property int y1
    property int speed
    property bool created: false
这里x1, y1是我们让气球飞到一个目的地时的终点位置。我们可以使用如下的语句使得它具有动画的效果:
   NumberAnimation on y {
        easing.type: Easing.InOutQuad; to: y1; duration: speed
        running: created
    }

    NumberAnimation on x {
        easing.type: Easing.InOutQuad; to: x1; duration: speed
        running: created
    }
无论x, 或是y变化时,我们都做一个动画,用speed定义的时间来完成。这个动画只有在“created"为真时才起作用。这是为了能够保证我们的动画只有在Balloon被动态生成完成后才可以产生动作。“created"在我们的程序设计中,只有被动态生成时才设计为true。为了能够destroy我们动态生成的Ballloon,我们也在Transition中的部分做了如下的修改:
    transitions: [
        Transition {
            to: "exploded"
            SequentialAnimation {
                NumberAnimation { target: balloon; property: "opacity"
                    to: 0; duration: 800 }

                NumberAnimation { target: balloon; property: "scale"
                    to: 0; duration: 800 }

                PropertyAction { target: balloon; property: "source"
                    value:  {
                        if ( surprise )
                            "images/flower.png";
                        else
                            ""
                    }
                }

                NumberAnimation { target: balloon; property: "opacity"
                    to: 1; duration: 300 }
                NumberAnimation { target: balloon; property: "scale"
                    to: 1; duration: 300
                }

                PauseAnimation {
                    duration: {
                        if (surprise)
                            400
                        else
                            200
                    }
                }

                PropertyAction { target: balloon; property: "visible"
                   value: "false"}
            }
        }
    ]
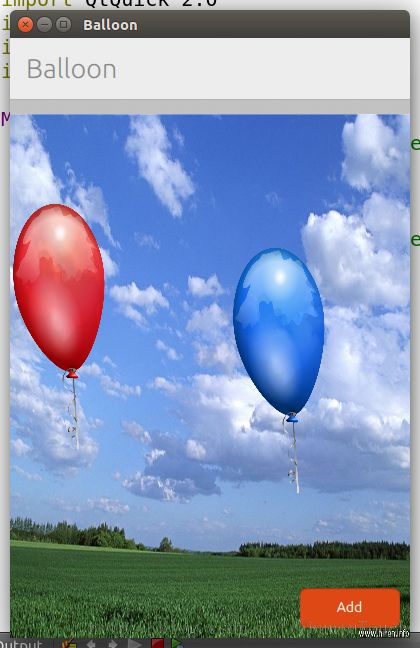
5)动态生成QML Component
为了动态生成Balloon, 我们在主界面里加入一个Button。这个按钮可以帮我们生成所需要的Balloon。我们同时也为我们的主界面加上一个天空的背景:
    Page {
        id:main
        title: i18n.tr("Balloon")
        property int time: 2000
        property int rotateVal: 0

        Image {
            anchors.fill:parent
            source: "images/sky.jpg"
        }

        Balloon {
            id: red
            x: main.width/2
            y: main.height - 60
            rotation: main.rotateVal
            color: "red"
            y1: main.height/6
            x1: 0
            speed: main.time/2
            created: true
            surprise: true
        }

        Balloon {
            id: blue
            x: main.width / 3 - 60
            y: main.height - 60
            color: "blue"
            rotation: main.rotateVal
            y1: main.height/4
            x1: main.width/2 + 20
            speed: main.time/2
            created: true
        }

        Balloon {
            id: green
            x: main.width*2/3
            y: main.height - 10
            rotation: main.rotateVal
            color: "green"
            y1: main.height/5
            x1: main.width/3 + 20
            speed: main.time/3
            created: true
            surprise: true
        }

        Button {
            z: 2
            id: restartButton

            anchors.bottom: parent.bottom
            anchors.right: parent.right
            anchors.bottomMargin: 10
            anchors.rightMargin: 10

            width: 100
            height: 40
            text: "Add"
            onClicked: {
                var x = Math.random() * main.width
                var y = main.height - 60
                var colors = new Array("red","blue","green");

                var date = new Date()
                // Use miliseconds avoids the same random secuece
                // generation among calls
                var mils = date.getMilliseconds()
                var index = Math.floor((Math.random()*mils)%3)

                var obj = Logic.createBalloon( Math.floor(x), Math.floor(y),
                                              colors[index] )
            }
        }
    }
var component;

function addBinding (from, toObj, toProp)
{
    var bindObj = Qt.createQmlObject("import QtQuick 2.0; Binding {value:"+from+"}", main)
    if (bindObj) {
        bindObj.target = toObj
        bindObj.property = toProp
    }
    else {
        console.log("error creating binding object")
        console.log(bindObj.errorString())
        return false
    }
    return true
}


function createBalloon(x, y, color) {
    // console.log( "Color:" + color)
    if (component == null)
        component = Qt.createComponent("Balloon.qml");

    // Note that if Block.qml was not a local file, component.status would be
    // Loading and we should wait for the component's statusChanged() signal to
    // know when the file is downloaded and ready before calling createObject().
    if (component.status === Component.Ready) {
        var dynamicObject = component.createObject(main);
        if (dynamicObject === null) {
            console.log("error creating block");
            console.log(component.errorString());
            return false;
        }

        var xx = main.width*Math.random();
        var xx1 = Math.floor(Math.min(xx, main.width-dynamicObject.width));

        dynamicObject.x = x;
        dynamicObject.y = y;
        dynamicObject.x1 = xx1;
        dynamicObject.y1 = 100 * Math.random();
        dynamicObject.speed = 2000
        dynamicObject.color = color;

        with(Math) {
            var tmp = floor(random() * 10 + 1)
            dynamicObject.surprise = (tmp===10);
        }

        var bindObj = Qt.createQmlObject("import QtQuick 2.0; Binding {value: main.rotateVal}", main);

        if (bindObj) {
            bindObj.target = dynamicObject
            bindObj.property = "rotation"
        }
        else {
            console.log("error creating binding component") ;
            console.log(bindObj.errorString());
            return false;
        }

        // This should be set last
        dynamicObject.created = true;

        // addBinding( "scaleVal", dynamicObject, scale );

    } else {
        console.log("error loading block component");
        console.log(component.errorString());
        dynamicObject = null;
        return null;
    }

    return dynamicObject;
}

function playsound(surprise) {
    if ( surprise ) {
        clapPlayer.play();
    }
    else {
        player.play();
    }
}
这里,我们使用了createBalloon(x, y, color)方法在(x, y)处创建我们所需要颜色的气球。最后为了引用"logic.js",我们必须在main.qml文件的顶头部分使用如下的语句:
import "logic.js" as Logic
这样我们就可以使用这个js文件中的方法了。

至此,我们已经基本完成了如何自动动态地生成QML component。全部的代码在如下的地址可以下载:
bzr branch
lp:~liu-xiao-guo/debiantrial/balloon2
6)加入sensor 到应用中去
接下来,我们想把sensor加入到我们的应用中去。我们想当我们倾斜我们的手机的时候,气球也要随着转动,同时当我们摇动手机的时候,我们希望气球能跟着我们的摇动不断地变大,这样能使得我们的气球直至破裂。为了我们能够使用sensor,我们必须在main.qml中加入如下的库:
import QtSensors 5.0
同时,我们也加入如下的代码:
        Accelerometer {
            id: accel
            active: true
            dataRate: 20

            onReadingChanged: {
                var x = Math.abs(accel.reading.x);
                var y = Math.abs(accel.reading.y);
                var z = Math.abs(accel.reading.z);

                if ( x > main.maxX ) {
                    main.maxX = x;
                }

                if ( y > main.maxY ) {
                    main.maxY = y;
                }

                if ( z > main.maxZ ) {
                    main.maxZ = z;
                }

                if ( x > main.threshold || y > main.threshold || z > main.threshold ) {
                    console.log("x: " + main.maxX + " y: " + main.maxY + " z: " + main.maxZ);
                    var count = main.children.length

                    for(var i=0; i < count; i++) {
                        if ( main.children[i].type !== "balloon" )
                            continue;
                        if ( main.children[i].type === "balloon") {
                            if ( main.children[i].color === "red")
                                main.children[i].scale += 0.1
                            else if ( main.children[i].color === "green" )
                                main.children[i].scale += 0.02
                            else
                                main.children[i].scale += 0.05
                        }

                        if( main.children[i].scale > 2.0 &&
                                main.children[i].state !== "exploded" &&
                                main.children[i].color === "red" &&
                                main.children[i].type === "balloon" ) {
                            main.children[i].state = "exploded"
                        }

                        if( main.children[i].scale > 3.0 &&
                                main.children[i].state !== "exploded" &&
                                main.children[i].color === "green" &&
                                main.children[i].type === "balloon" ) {
                            main.children[i].state = "exploded"
                        }

                        if( main.children[i].scale > 4.0 &&
                                main.children[i].state !== "exploded" &&
                                main.children[i].color === "blue" &&
                                main.children[i].type === "balloon" ) {
                            main.children[i].state = "exploded"
                        }
                    }
                }
            }
        }

        RotationSensor {
            id: rotation
            dataRate: 50
            onReadingChanged: {
                var count = main.children.length

                for ( var i = 0; i < count; i ++ ) {
                    if (main.children[i].type !== "balloon")
                        continue;

                    main.children[i].rotation = -rotation.reading.x;
                    main.children[i].rotation = -rotation.reading.y;
                }

            }
        }
我们使用了加速传感器和旋转传感器。这样在我们摇动的时候,我们就可以使得气球不断地变大。当我们倾斜的时候,气球也可以随着我们的倾斜而倾斜。
最终的代码可以在如下的地址下载:
bzr branch
lp:~liu-xiao-guo/debiantrial/balloonfinal