仿ios列表头可以停靠在列表顶部的列表PinnedHeaderListView
今天分享一个自定义仿ios的列表,主要实现的功能是使列表头可以停靠在列表顶部。代码在github上,链接看下面
StickyHeaderListView github地址
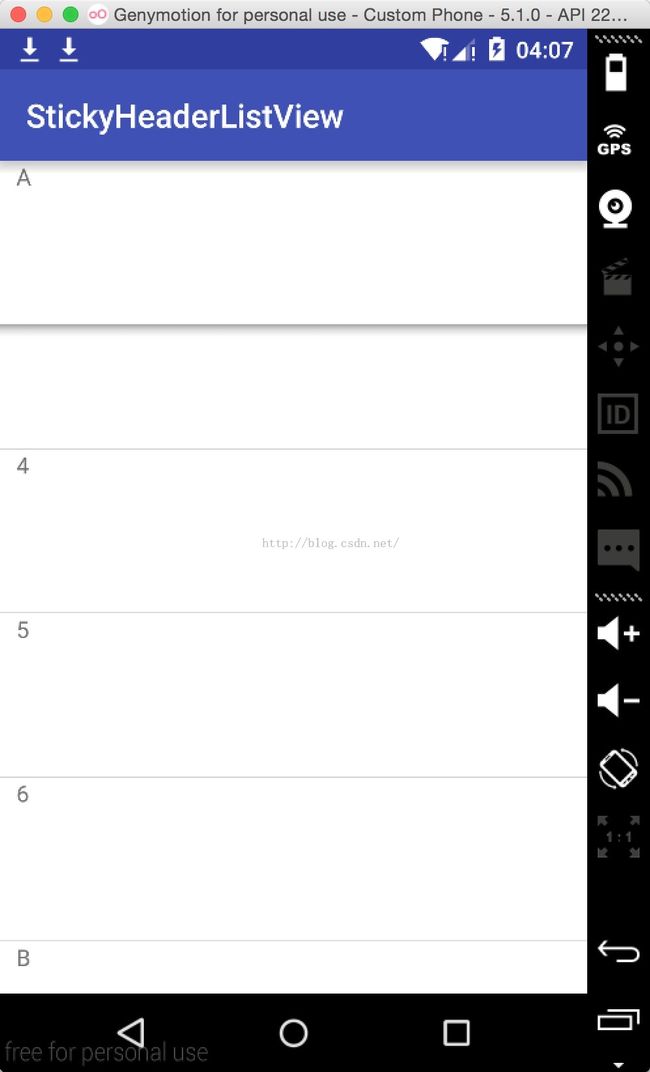
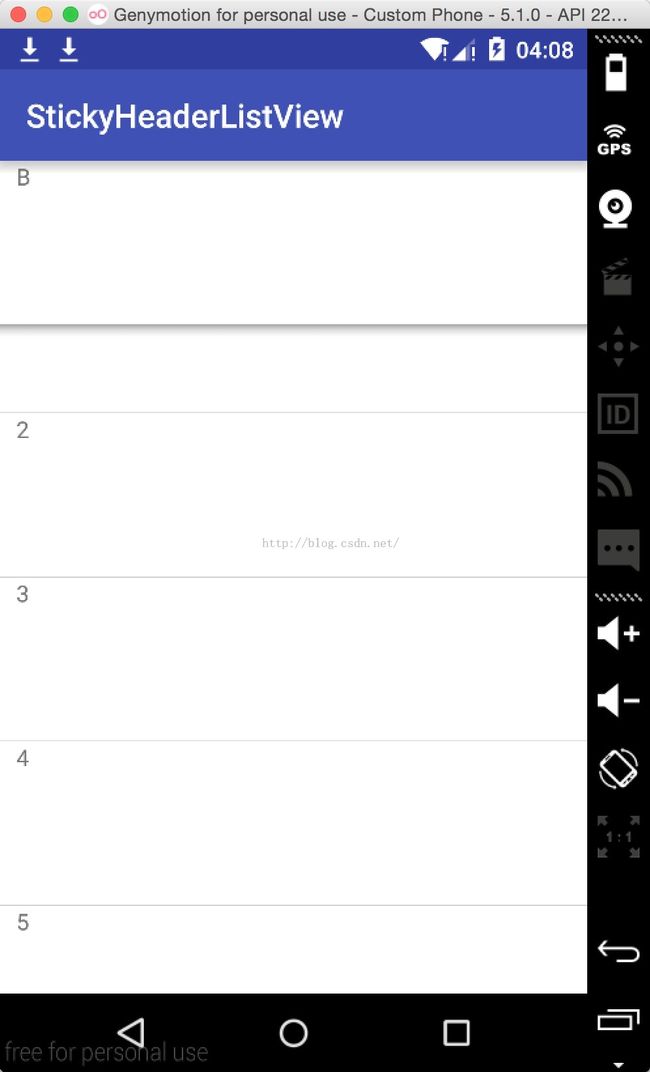
然后我们来看一下具体效果吧。
嗯...效果还是挺不错的。我们先来看看怎么使用。
        final String[] sections = {"A","B","C","D"};
        final String[] contents = {"1","2","3","4","5","6"};

        PinnedHeaderListView listView = (PinnedHeaderListView) findViewById(R.id.listView);
        listView.setAdapter(new PinnedHeaderListAdapter() {
            @Override
            public boolean isSectionView(int positon) {
                if (positon % 7 == 0)   return true;
                return false;
            }

            @Override
            public int sectionOfItem(int position) {
                return position/7*7;
            }

            @Override
            public int getCount() {
                return sections.length + contents.length * sections.length;
            }

            @Override
            public Object getItem(int position) {
                return null;
            }

            @Override
            public long getItemId(int position) {
                return 0;
            }

            @Override
            public View getView(int position, View convertView, ViewGroup parent) {
                TextView tv;
                if (convertView != null) {
                    tv = (TextView) convertView;
                } else {
                    tv = new TextView(MainActivity.this);
                    tv.setHeight(300);
                    tv.setBackgroundColor(Color.WHITE);
                }
                if (position % 7 == 0)  tv.setText("   "+sections[position/7]);
                else                    tv.setText("   "+contents[position%7-1]);
                return tv;
            }
        });
代码如上,我们先定义了两个数组,分别是section列表头数组ABCD,以及其对应的内容数组content。然后就跟一般的listView一样,我们需要给PinnedHeaderListView设置一个adapter,然后实现一系列抽象方法。最基本的getView,getItem,getItemId和getCount方法就不必说了,该怎么用还是怎么用。这里主要讲一下PinnedHeaderListAdapter自定义的两个方法:
public boolean isSectionView(int positon)
public int sectionOfItem(int position)
前者是根据item的position来决定该item是否是一个列表头。举个栗子,在上面的示例中,列表头为ABCD,其分别都有1~6六个内容item,那么A的position就是0,B的position就是7,C和D的position就是14和21,其它则为普通item,反之亦然。于是在isSectionView方法中,如果position为0,7,14,21,则应该返回true,反之为false。
后者是根据item的position来决定其所属的列表头子列表中的position。还是上面那个栗子,position为1的item属于列表头A而A位于列表的第0个位置,于是就应该返回0,而position为11的item属于B则应该返回B的position7。
嗯...我承认这样的设计确实使用起来确实不怎么方便,拗口而且难以理解...好吧,后期再改善呗,现在主要是先把功能实现了。
1. 列表头停靠的原理——canvas的变换和子view的绘制
先来介绍几个api:
/**
     * Draw one child of this View Group. This method is responsible for getting
     * the canvas in the right state. This includes clipping, translating so
     * that the child's scrolled origin is at 0, 0, and applying any animation
     * transformations.
     *
     * @param canvas The canvas on which to draw the child
     * @param child Who to draw
     * @param drawingTime The time at which draw is occurring
     * @return True if an invalidate() was issued
     */
    protected boolean drawChild(Canvas canvas, View child, long drawingTime) {
        return child.draw(canvas, this, drawingTime);
    }
这个方法来自于ViewGroup,其可以在指定的canvas上绘制指定的childView,实际上,这里的PinnedHeaderListView停靠在顶部的效果就是用这个方法实现的。但是有一点我们需要注意的是(看注释),该方法只能在canvas的(0,0)处开始绘制view,因此我们需要将canvas进行平移,旋转,裁剪等操作,以使要绘制的view位于变换后的canvas的(0,0)处。其实,在这里,对于一般的需求来说,这也够了,因为列表头本来就只是停靠在顶部,其一定是位于(0,0)处的。但是,如果我们还想要实现一种效果,就必须对canvas进行平移。这种效果可以描述成:当列表头B碰到正在停靠在顶部的列表头A时,要随着滑动将A“顶”出去,然后取而代之。
/**
     * Preconcat the current matrix with the specified translation
     *
     * @param dx The distance to translate in X
     * @param dy The distance to translate in Y
    */
    public void translate(float dx, float dy) {
        native_translate(mNativeCanvasWrapper, dx, dy);
    }
这是对canvas进行平移操作的接口方法。涉及到canvas的变换操作的话,我们还需要介绍两个方法:
/**
     * Saves the current matrix and clip onto a private stack.
     * <p>
     * Subsequent calls to translate,scale,rotate,skew,concat or clipRect,
     * clipPath will all operate as usual, but when the balancing call to
     * restore() is made, those calls will be forgotten, and the settings that
     * existed before the save() will be reinstated.
     *
     * @return The value to pass to restoreToCount() to balance this save()
     */
    public int save() {
        return native_save(mNativeCanvasWrapper, MATRIX_SAVE_FLAG | CLIP_SAVE_FLAG);
    }
/**
     * This call balances a previous call to save(), and is used to remove all
     * modifications to the matrix/clip state since the last save call. It is
     * an error to call restore() more times than save() was called.
     */
    public void restore() {
        boolean throwOnUnderflow = !sCompatibilityRestore || !isHardwareAccelerated();
        native_restore(mNativeCanvasWrapper, throwOnUnderflow);
    }
看注释我们可以知道,save方法是将canvas的当前状态保存到一个private stack中,然后在对canvas的变换操作完成之后,调用restore方法可以将canvas恢复到上一次save的状态。这两个方法分别在变换的前后调用,必须成对出现。
嗯...说到这里,我们可以直接上绘制停靠在顶部的列表头的关键代码了。
@Override
    protected void dispatchDraw(Canvas canvas) {
        super.dispatchDraw(canvas);
        if (pinnedHeaderListAdapter == null || sectionView == null) {
            return;
        }
        int pLeft = getListPaddingLeft();
        int pTop = getListPaddingTop();
        View view  = sectionView.view;
        canvas.save();
        // 为重画子view变换画布
        canvas.clipRect(pLeft, pTop, pLeft + view.getWidth(), pTop + view.getHeight() + shadowHeight);
        canvas.translate(getPaddingLeft(), distanceY+getPaddingTop());
        // 重画section view
        drawChild(canvas, view, getDrawingTime());
        // 画section阴影
        if (sectionViewShadow != null && distanceY >= 0) {
            sectionViewShadow.setBounds(view.getLeft(),
                                        view.getBottom(),
                                        view.getRight(),
                                        view.getBottom() + shadowHeight);
            sectionViewShadow.draw(canvas);
        }
        canvas.restore();
    }
嗯...绘制的主要流程大概是:
canvas.save -> canvas变换 -> drawChild -> canvas.restore
在平移的时候,我们看到有一个变量distanceY,它是用来记录要对canvas进行平移的距离的。那么,distanceY又是怎么计算的呢?
        setOnScrollListener(new OnScrollListener() {
            @Override
            public void onScrollStateChanged(AbsListView view, int scrollState) {
                if (onScrollListener != null) {
                    onScrollListener.onScrollStateChanged(view, scrollState);
                }
            }

            @Override
            public void onScroll(AbsListView view, int firstVisibleItem, int visibleItemCount, int totalItemCount) {
                if (onScrollListener != null) {
                    onScrollListener.onScroll(view, firstVisibleItem, visibleItemCount, totalItemCount);
                }

                if (pinnedHeaderListAdapter == null || pinnedHeaderListAdapter.getCount() == 0) {
                    return;
                }
                createPinnedSection(firstVisibleItem);
                if (sectionView == null) {
                    return;
                }
                int nextSectionViewTop = findNextSectionViewTop(firstVisibleItem, firstVisibleItem + 1, firstVisibleItem + visibleItemCount);
                if (nextSectionViewTop != -1) {
                    int currentSectionViewBottom = sectionView.view.getBottom();
                    distanceY = nextSectionViewTop - currentSectionViewBottom;
                    if (distanceY > 0) {
                        distanceY = 0;
                    }
                } else {
                    distanceY = 0;
                }
            }
        });
我们在PinnedHeaderListView的内部实现中,给它设置了一个OnScrollListener回调,并在其OnScroll方法中实现了对distanceY的计算。其实际上就是在计算当前停靠在顶部的item(A)的地步和下一个列表头(B)的顶部的距离(差值)distanceY,如果该值为负数,那么就说明B的顶部已经超过了A的底部了。那么这时候,我们就需要实现这样一种效果:A被B“顶”出列表。翻译成代码实现就是,我们不能直接将停靠的列表头绘制在canvas的(0,0)处,而是(0,-distanceY)处,也就是列表头位置不变,canvas向下平移distanceY距离。
2. canvas绘制childView前的准备——measure和layout
drawChild可以在指定的canvas的(0,0)处绘制childView,但是有一个问题,它怎么知道childView多大。有人会说,View本来就提供了访问其大小的接口啊。没错,但是,childView又怎么知道自己有多大呢?它不知道!drawChild方法没有实现对child的measure过程,因此,在绘制之前,我们必须先手动给它进行measure使其“知道”自己有多大,然后惊醒layout使其“知道”自己该怎么布局。
我们看代码:
        View firstVisibleView = pinnedHeaderListAdapter.getView(firstViewSection,sectionView.view,PinnedHeaderListView.this);
        LayoutParams layoutParams = (LayoutParams) firstVisibleView.getLayoutParams();
        if (layoutParams == null) {
            layoutParams = (LayoutParams) generateDefaultLayoutParams();
            firstVisibleView.setLayoutParams(layoutParams);
        }

        int heightMode = MeasureSpec.getMode(layoutParams.height);
        int heightSize = MeasureSpec.getSize(layoutParams.height);

        if (heightMode == MeasureSpec.UNSPECIFIED) heightMode = MeasureSpec.EXACTLY;

        int maxHeight = getHeight() - getListPaddingTop() - getListPaddingBottom();
        if (heightSize > maxHeight) heightSize = maxHeight;

        // measure & layout
        int ws = MeasureSpec.makeMeasureSpec(getWidth() - getListPaddingLeft() - getListPaddingRight(), MeasureSpec.EXACTLY);
        int hs = MeasureSpec.makeMeasureSpec(heightSize, heightMode);
        firstVisibleView.measure(ws, hs);
        firstVisibleView.layout(0, 0, firstVisibleView.getMeasuredWidth(), firstVisibleView.getMeasuredHeight());

        sectionView.view = firstVisibleView;
        sectionView.section = firstViewSection;
这是对要停靠在顶部的view的measure和layout的代码。其实这种代码具有一般性,一般就是这样写的。大概就是,我们调用MeasureSpec的接口根据吃定的宽高值来计算View的宽高,然后调用View的measure方法来使其“知道”自己有多大,最后再调用layout方法使其“知道”自己改怎么布局。这里这个东西不是重点,就不详细说了。
3. finally
嗯,说到这里,PinnedHeaderListView的实现原理和要注意的东西都说了,最开始的时候也已经奉上了源码链接。下面也给出github上的一些实现了类似效果的源码链接吧。
https://github.com/JimiSmith/PinnedHeaderListView
https://github.com/itlonewolf/PinnedHeaderListViewDemo
https://github.com/Ivanzgj/StickyHeaderListView
哈哈哈...最后一个其实就是我的那个啦( ̄┰ ̄*)
嗯...大家有兴趣的话可以看看,也可以到github上clone下来完善然后自己使用O(∩_∩)O~~
finally,代码多有纰漏,烦请多多指教,谢谢~~~

