DrawLayout结合materialmenu实现带动画的ToolBar
一.概述
为了搞出这个效果来我整整搞了大半天的时间,因为在这个过程中确实出现了很多问题,今天特此记录下来,先看效果图:

接下来说说整个实现过程
二.实现
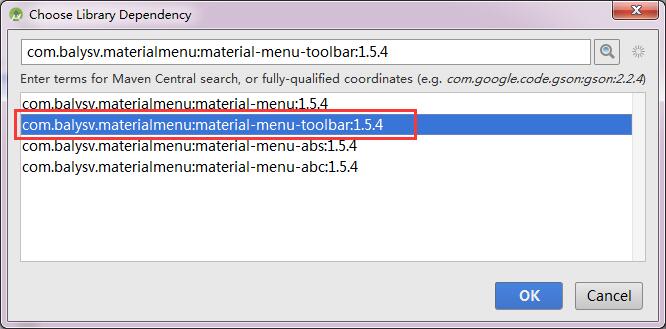
首先我们要引入大神写的materialmenu动画库

注意,因为项目中用到的是ToolBar,所以在此导入的是第二个框架,如果你使用的是ActionBar,那可能就要导入其他的库了。
接下来我们看看主页面的布局文件
<android.support.v4.widget.DrawerLayout
    android:id="@+id/layout"
    xmlns:android="http://schemas.android.com/apk/res/android"
    xmlns:tools="http://schemas.android.com/tools"
    android:layout_width="match_parent"
    android:layout_height="match_parent"
    android:fitsSystemWindows="true"
    tools:context="com.example.drawlayoutdemo.MainActivity">
    <FrameLayout
        android:id="@+id/fl_main"
        android:layout_width="match_parent"
        android:layout_height="match_parent"/>
        <ListView
            android:id="@+id/listview"
            android:layout_width="100dp"
            android:divider="@null"
            android:background="#9e9e9e"
            android:choiceMode="singleChoice"
            android:layout_gravity = "start"
            android:layout_height="match_parent">
        </ListView>
        <RelativeLayout
            android:id="@+id/right_draw"
            android:layout_width="80dp"
            android:layout_height="match_parent"
            android:layout_gravity = "end"
            android:background="#000000"
            >
            <TextView
                android:textSize="20sp"
                android:textColor="#ffffff"
                android:layout_width="wrap_content"
                android:text="右边栏"
                android:layout_centerInParent="true"
                android:layout_height="wrap_content" />
        </RelativeLayout>
</android.support.v4.widget.DrawerLayout>
最外层是v4包下的DrawerLayout,接下来是填充主页面的FrameLayout,注意,这里的FrameLayout要写在抽屉布局的上面,否则抽屉布局就无法响应点击时间,因为我们是需要抽屉布局覆盖在主页面上面的,然后就是抽屉的左右布局,左边是一个listview,右边是一个相对布局 ,我们通过android:layout_gravity 控制布局是左边还是右边。
接下来看代码,由于注释比较详细了,我就不拆开讲解了:
public class MainActivity extends ToolBarActivity implements AdapterView.OnItemClickListener{
    //左边布局
    private ListView listView;
    private String[] mString = {"菜单一","菜单二","菜单三"};
    private DrawerLayout drawerLayout;
    //左边是否打开
    private boolean is_Direction_left = false;
    //右边是否打开
    private boolean is_Direction_right = false;
    //当前显示的内容
    private View showView;
    //右边菜单布局
    private RelativeLayout right_draw;
    private MaterialMenuIconToolbar iconToolbar;
    @Override
    protected void onCreate(Bundle savedInstanceState) {
        super.onCreate(savedInstanceState);
        setContentView(R.layout.activity_main);
        drawerLayout = (DrawerLayout) findViewById(R.id.layout);
        listView = (ListView) findViewById(R.id.listview);
        right_draw = (RelativeLayout) findViewById(R.id.right_draw);
        this.showView = listView;
        listView.setAdapter(new ArrayAdapter<>(this,android.R.layout.simple_list_item_1,mString));
        listView.setOnItemClickListener(this);
        //设置抽屉打开时,主要内容被自定义阴影覆盖
        drawerLayout.setDrawerShadow(R.drawable.drawer_shadow, GravityCompat.START);
        //给抽屉添加监听
        drawerLayout.addDrawerListener(new MenuDrawListener());
        if(savedInstanceState == null){
            setSelectedItem(0);//默认选中第一个菜单
        }
        //初始化MaterialMenuIconToolbar,第一个参数为上下文,第二个参数为颜色,第三个参数为样式
      iconToolbar = new MaterialMenuIconToolbar(this, Color.WHITE, MaterialMenuDrawable.Stroke.REGULAR) {
          @Override
          public int getToolbarViewId() {
              //所关联的toolbar的id
              return R.id.id_tool_bar;
          }
      };
    }
    @Override
    public void onItemClick(AdapterView<?> parent, View view, int position, long id) {
        setSelectedItem(position);
    }
    public void setSelectedItem(int position){
        //给ContentFragment传递参数,改变显示内容
        Fragment fragment = ContentFragment.newInstance(mString[position]);
        getSupportFragmentManager().beginTransaction().replace(R.id.fl_main,fragment).commit();
        listView.setItemChecked(position,true);
        setTitle(mString[position]);//当前显示的标题
        drawerLayout.closeDrawer(listView);//关闭抽屉
    }
    @Override
    public boolean onCreateOptionsMenu(Menu menu) {
        getMenuInflater().inflate(R.menu.menu_main,menu);
        return true;
    }
    class MenuDrawListener extends DrawerLayout.SimpleDrawerListener {
        /** * 抽屉滑动时回调 * @param drawerView * @param slideOffset 从0到1 */
        @Override
        public void onDrawerSlide(View drawerView, float slideOffset) {
            showView = drawerView;
            if(drawerView == listView){
                //设置动画
                iconToolbar.setTransformationOffset(MaterialMenuDrawable.AnimationState.BURGER_ARROW,
                        is_Direction_left?2-slideOffset:slideOffset);
            }else if(drawerView == right_draw){
                iconToolbar.setTransformationOffset(MaterialMenuDrawable.AnimationState.BURGER_ARROW,
                            is_Direction_right?2-slideOffset:slideOffset);
            }
        }
        /** * 抽屉打开时回调 * @param drawerView */
        @Override
        public void onDrawerOpened(View drawerView) {
            if(drawerView == listView){
                is_Direction_left = true;
            }else if(drawerView == right_draw){
                is_Direction_right = true;
            }
        }
        /** * 抽屉关闭时回调 * @param drawerView */
        @Override
        public void onDrawerClosed(View drawerView) {
            if(drawerView == listView){
                is_Direction_left = false;
            }else if(drawerView == right_draw){
                is_Direction_right = false;
                showView = listView;
            }
        }
    }
    /** * 根据onPostCreate回调的状态,还原对应的icon state */
    @Override
    protected void onPostCreate(@Nullable Bundle savedInstanceState) {
        super.onPostCreate(savedInstanceState);
        iconToolbar.syncState(savedInstanceState);
    }
    /** * 根据onSaveInstanceState回调的状态,保存当前icon state */
    @Override
    protected void onSaveInstanceState(Bundle outState) {
        iconToolbar.onSaveInstanceState(outState);
        super.onSaveInstanceState(outState);
    }
    /** * 菜单点击事件 * @param item * @return */
    /** * ToolBar条目点击事件 * @param item * @return */
    @Override
    public boolean onOptionsItemSelected(MenuItem item) {
        int id = item.getItemId();
        switch (id){
            case android.R.id.home:
                if(showView == listView){
                    if(is_Direction_left){
                        drawerLayout.closeDrawer(listView);
                    }else{
                        drawerLayout.openDrawer(listView);
                    }
                }else if(showView == right_draw){
                    if(!is_Direction_right){
                        drawerLayout.closeDrawer(right_draw);
                    }else{
                        drawerLayout.openDrawer(right_draw);
                    }
                }
                break;
            case R.id.action_personal:
                if (!is_Direction_right) {// 右边栏关闭时,打开
                    if (showView == listView) {
                        drawerLayout.closeDrawer(listView);
                    }
                    drawerLayout.openDrawer(right_draw);
                } else {// 右边栏打开时,关闭
                    drawerLayout.closeDrawer(right_draw);
                }
                break;
        }
        return super.onOptionsItemSelected(item);
    }
}
public class ContentFragment extends Fragment {
    private TextView textView;
    @Nullable
    @Override
    public View onCreateView(LayoutInflater inflater, @Nullable ViewGroup container, @Nullable Bundle savedInstanceState) {
        View view = inflater.inflate(R.layout.fragment_content_view,null);
        textView = (TextView) view.findViewById(R.id.tv_content);
        Bundle bundle = getArguments();
        if(bundle!=null){
            //根据当前点击的条目,设置内容
            textView.setText(bundle.getString("key"));
        }
        return view;
    }
    public static ContentFragment newInstance(String value){
        ContentFragment contentFragment = new ContentFragment();
        Bundle bundle = new Bundle();
        bundle.putString("key",value);
        //将参数保存到bundle对象中
        contentFragment.setArguments(bundle);
        return contentFragment;
    }
}
我们可以看到MainActivity继承了ToolBarActivity,接下来我们看看ToolBarActivity是如何定义的,
public abstract class ToolBarActivity extends AppCompatActivity {
    private ToolBarHelper mToolBarHelper;
    private Toolbar toolbar;
    @Override
    protected void onCreate(Bundle savedInstanceState) {
        super.onCreate(savedInstanceState);
    }
    @Override
    public void setContentView(int layoutResID) {
        mToolBarHelper = new ToolBarHelper(this, layoutResID);
        toolbar = mToolBarHelper.getToolBar();
        setContentView(mToolBarHelper.getContentView());
        /*把 toolbar 设置到Activity 中*/
        setSupportActionBar(toolbar);
        /*自定义的一些操作*/
        onCreateCustomToolBar(toolbar);
    }
    public void onCreateCustomToolBar(Toolbar toolbar) {
        toolbar.setContentInsetsRelative(0, 0);
    }
}
其中又用到了ToolBarHelper
public class ToolBarHelper {
    private Context mContext;
    private FrameLayout mContentView;
    /*用户定义的view*/
    private View mUserView;
    /*toolbar*/ private Toolbar mToolBar;
    /*视图构造器*/ private LayoutInflater mInflater; /* * 两个属性 * 1、toolbar是否悬浮在窗口之上 * 2、toolbar的高度获取 * */
    private static int[] ATTRS = {
            R.attr.windowActionBarOverlay,
            R.attr.actionBarSize
    };
    public ToolBarHelper(Context context, int layoutId) {
        this.mContext = context;
        mInflater = LayoutInflater.from(mContext);
        /*初始化整个内容*/
        initContentView();
        /*初始化用户定义的布局*/
        initUserView(layoutId);
        /*初始化toolbar*/
        initToolBar();
    }
    private void initContentView() {
        /*直接创建一个帧布局,作为视图容器的父容器*/
        mContentView = new FrameLayout(mContext);
        ViewGroup.LayoutParams params = new ViewGroup.LayoutParams(ViewGroup.LayoutParams.MATCH_PARENT,
                ViewGroup.LayoutParams.MATCH_PARENT);
        mContentView.setLayoutParams(params);
    }
    private void initToolBar() {
        /*通过inflater获取toolbar的布局文件*/
        View toolbar = mInflater.inflate(R.layout.toolbar, mContentView);
        mToolBar = (Toolbar) toolbar.findViewById(R.id.id_tool_bar);
    }
    private void initUserView(int id) {
        mUserView = mInflater.inflate(id, null);
        FrameLayout.LayoutParams params = new FrameLayout.LayoutParams(ViewGroup.LayoutParams.MATCH_PARENT, ViewGroup.LayoutParams.MATCH_PARENT);
        TypedArray typedArray = mContext.getTheme().obtainStyledAttributes(ATTRS);
        /*获取主题中定义的悬浮标志*/
        boolean overly = typedArray.getBoolean(0, false);
        /*获取主题中定义的toolbar的高度*/
        int toolBarSize = (int) typedArray.getDimension(1, (int) mContext.getResources().getDimension(R.dimen.abc_action_bar_default_height_material));
        typedArray.recycle();
        /*如果是悬浮状态,则不需要设置间距*/
        params.topMargin = overly ? 0 : toolBarSize;
        /* 将布局添加到容器*/
        mContentView.addView(mUserView, params);
    }
    public FrameLayout getContentView() {
        return mContentView;
    }
    public Toolbar getToolBar() {
        return mToolBar;
    }
}
最后我们看看ToolBar的样式文件
<FrameLayout xmlns:android="http://schemas.android.com/apk/res/android"
    xmlns:app="http://schemas.android.com/apk/res-auto"
    android:layout_width="match_parent"
    android:layout_height="match_parent">

    <android.support.v7.widget.Toolbar
        android:id="@+id/id_tool_bar"
        android:layout_width="match_parent"
        android:layout_height="?attr/actionBarSize"
        android:background="#4400ff00"
        app:navigationIcon="?attr/homeAsUpIndicator"
        app:titleTextColor="#ff0000"
        />
</FrameLayout>
这里我们设置了ToolBar的高度为默认高度,然后设置了背景颜色,图标,以及标题的文字颜色。
源码下载