Android中Action Bar的使用
内容概要
示例演示和基本介绍
启用Action Bar
在Action Bar上添加按钮
自定义Action Bar样式
自动隐藏Action Bar
Action Provider的使用
ActionBarSherlock的使用
示例演示和基本介绍
如果使用ActionBar则分为两种情况
1、Action Bar on devices BEFORE Android 3.0(API 11)
1)、ActionBarSherlock开源库
2)、ActionBarCompat library from the Android support library v7
2、Action Bar on devices AFTER Android 3.0(API 11)
在android3.0之前要使用Action Bar有如上两种方式,第一种使用ActionBarSherlock开源库(是android兼容开发包的一个扩展)当使用该开源库是如果应用程序运行在Android3.0以上的设备则默认使用原生的Action Bar否则使用该开源库提供的Action Bar。第二种方式就是使用google官方提供的support v7这个开源库。
在android3.0之后的设备上可以使用原生的Action Bar
启用Action Bar
1、Action Bar on devices AFTER Android 3.0(API 11)
从Android 3.0开始Action bar被包含在了所使用所使用了Theme.Holo这个主题的Activity中(或Theme.Holo的子类)Theme.Holo是默认的主题,当minSdkVersion和targetSdkVersion都在11或以上时。
2、Action Bar on devices BEFORE Android 3.0(API 11)
必须是2.1以上的设备,需要在应用中包含Support Library(android-support-v7-appcompat)操作步骤:
1)、将该android-sdk-windows\extras\android\support\v7\appcompat库导入并拷贝到工作空间中最后引入到你的项目中
2)、将activity继承自ActivityBarActivity
3)、将AndroidManifest.xml文件中的主题更改为
android:theme=”@style/Theme.AppCompat.Light.DarkActionBar”
在Action Bar上添加按钮
1、For Android 3.0 and higher only
添加按钮也分为两个部分,第一个部分在xml指定这些按钮(在menu中加入不同的item项)
<item
        android:id="@+id/action_search"
        android:icon="@drawable/ic_action_search"
        android:showAsAction="ifRoom"
        android:title="@string/serch"/>
属性介绍
1)、android:showAsAction=“always“
一直显示在Action Bar上
2)、android:showAsAction=“ifRoom“
如果Action Bar空间足够,则显示
3)、android:showAsAction=“never“
不显示在Action Bar中,折叠在OverFlow里
4)、android:showAsAction=“withText“
菜单项和它的图标,菜单文本一起显示
2、For Android 2.1 and higher
1)、在menu.xml中加入自定义命名空间
xmlns:yourapp=”http://schemas.android.com/apk/res-auto”
2)、在showAsAction属性前指定命名空间
    yourapp:showAsAction="ifRoom"
Action Bar上的按钮添加点击事件
@Override
    public boolean onCreateOptionsMenu(Menu menu) {
        // Inflate the menu; this adds items to the action bar if it is present.
        getMenuInflater().inflate(R.menu.main, menu);
        return true;
    }

    // 给按钮添加点击事件
    @Override
    public boolean onOptionsItemSelected(MenuItem item) {

        switch (item.getItemId()) {
        case R.id.action_search:
            Toast.makeText(this, "Action_Search", 0).show();
            break;
        case R.id.action_settings:
            Toast.makeText(this, "Action_Settings", 0).show();
            break;
        }

        return super.onOptionsItemSelected(item);
}给ActionBar左上角图标添加向上或返回按钮(查看google的官方文档)具体添加什么样的按钮根据需要设定。
//启用左上角的向上按钮
getSupportActionBar().setDisplayHomeAsUpEnabled(true);
//getActionBar().setDisplayHomeAsUpEnabled(true);//3.0以上
<!--A child of the main activity-->
<activity android:name=".MainActivity" android:label="@string/app_name" android:parentActivityName="com.example.actionbarsupportusing.ParentActivity">
<!--Parent activity meta-data to support 4.0 and lover-->
<meta-data android:name="android.support.PARENT_ACTIVITY" android:value="com.example.actionbarsupportusing.ParentActivity" />
<intent-filter>
<action android:name="android.intent.action.MAIN" />
<category android:name="android.intent.category.LAUNCHER" />
</intent-filter>
</activity>
<activity android:name="com.example.actionbarsupportusing.ParentActivity" >注:parentActivityName属性为3.0以上使用,3.0以下要用“meta-data”
自定义Action Bar样式
使用android提供好的主题
- Theme.Holo for “dark” theme
- Theme.Holo.Light for a “light” theme
For example
<application android:theme="@android:Theme.Holo.Light" ... />
<application android:theme="@android:Theme.Holo" ... />
<!--API要在14以上才能使用-->
<application android:theme="@android:Theme.Holo.Light.DarkActionBar" ... />
以上是在3.0以上使用Android自带的主题,如果是android 2.1以上的设备使用如下方式:
For example
<application android:theme="@style/Theme.AppCompat.Light" ... />
<application android:theme="@style/Theme.AppCompat" ... />
<!--API要在14以上才能使用-->
<application android:theme="@style/Theme.AppCompat.Light.DarkActionBar" ... />
Customize the Background(自定义Action Bar的背景颜色)
For Android 3.0 and higher only
1、在themes.xml中新建自定义Style,使其继承已有的Action Bar Style(如:Theme.Holo)
2、覆写其actionBarStyle属性
3、actionBarStyle属性值指向另一个已被覆写了background属性的Style
4、指定该background的属性值
themes.xml
<?xml version="1.0" encoding="utf-8"?>
<resources>
    <style name="CustomActionBarTheme" parent="@android:style/Theme.Holo.Light.DarkActionBar"> <item name="android:actionBarStyle">@style/CustomBackground</item> </style>

    <style name="CustomBackground" parent="@android:style/Widget.Holo.Light.ActionBar.Solid.Inverse"> <item name="android:background">@drawable/actionbar_background</item> </style>
</resources>
在AndroidManifest.xml中引用自定义主题
android:theme="@style/CustomActionBarTheme"For Android 2.1 and higher
themes.xml
<?xml version="1.0" encoding="utf-8"?>
<resources>
    <style name="CustomActionBarTheme" parent="@style/Theme.AppCompat.Light.DarkActionBar"> <item name="actionBarStyle">@style/CustomBackground</item> </style>

    <style name="CustomBackground" parent="@style/Widget.AppCompat.Light.ActionBar.Solid.Inverse"> <item name="background">@drawable/actionbar_background</item> </style>
</resources>
最后同样在清单文件中引入自定义主题
Customize the Color 参考官方文档
Customize the Tab Indicator
ActionBar actionBar = getActionBar(); // for < 3.0 getSupportActionBar();
        actionBar.setNavigationMode(ActionBar.NAVIGATION_MODE_TABS);//设置导航方式,ActionBar.NAVIGATION_MODE_LIST

        ActionBar.TabListener tabLiatener = new ActionBar.TabListener() {

            @Override
            // 未选中时
            public void onTabUnselected(Tab tab, FragmentTransaction ft) {
                // TODO Auto-generated method stub

            }

            @Override
            // 选中时
            public void onTabSelected(Tab tab, FragmentTransaction ft) {
                // TODO Auto-generated method stub
                Toast.makeText(MainActivity.this,
                        "TabSelected" + tab.getPosition(), 0).show();
            }

            @Override
            // 重复选中时
            public void onTabReselected(Tab tab, FragmentTransaction ft) {
                // TODO Auto-generated method stub

            }
        };

        //添加三个标签
        for (int i = 0; i < 3; i++) {
            Tab tab = actionBar.newTab();
            tab.setText("Tab" + i);
            tab.setTabListener(tabLiatener);
            actionBar.addTab(tab);//添加到actionbar中
}自定义Tab标签的样式(参照官方文档)另外还有一种方法可以一键生成Action Bar Tab的样式,设置好后直接下载并解压将res目录中的文件全部拷贝到项目中,最后在清单文件中使用一键工程生成的样式。(可以到谷歌的官方文档学习更多自定义样式的使用)
自动隐藏Action Bar(Overlaying the Action Bar)
默认情况下,Action Bar出现在当前的activity的顶部,减少了Activity布局当中剩下的可以用的空间,在这种情况下可以调用hide() and show()方法来使Action Bar隐藏或显示,但是通过这种方式的话会使你的Activity根据新的大小从新计算并且重新绘制这个layout,为了避免重绘现象你可以开启action bar 的overlay mode模式,当处于overlay模式下activity可以使用剩下可利用的空间并且见这个Action bar绘制到当前layout的前面而不是上面提到的顶部,利用该方式当action bar隐藏或显示就不会从前计算layout的大小
Enable Overlay Mode(开启overlay模式)
需要创建自定义主题,这个主题要扩展一个已经存在的Action bar主题并且设置android:windowActionBarOverly属性为true,(这里同样分为两部分3.0以上的设备和2.1以上设备)
1、For Android 3.0 and higher only
<style name="CustomActionBarTheme"
            parent="@android:style/Theme.Holo">
           <item name="android:windowActionBarOverlay">true</item>
         </style>
2、For Android 2.1 and higher
<style name="CustomActionBarTheme"
           parent="@style/Theme.AppCompat">
          <item name="windowActionBarOverlay">true</item>
        </style>
Specify Layout Top-margin(指定布局的margintop)
为什么要知道marginTop,当Action Bar处于overlay模式
时他占据了一些可见的布局,为了确保这些布局保留在Action bar的下部就可以为其加入marginTop或paddingTop属性并且属性的值指定为 actionBarSize
For example
1、For Android 3.0 and higher only
<LinearLayout xmlns:android="http://schemas.android.com/apk/res/android"
    android:layout_width="match_parent"
    android:layout_height="match_parent"
    android:layout_marginTop="?android:attr/actionBarSize">
    ...
</LinearLayout>
2、For Android 2.1 and higher
<LinearLayout xmlns:android="http://schemas.android.com/apk/res/android"
    android:layout_width="match_parent"
    android:layout_height="match_parent"
    android:layout_marginTop="?attr/actionBarSize">
    ...
</LinearLayout>
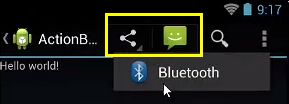
Action Provider的使用
知识点(XML)
1、For Android 3.0 and higher only
<item …… android:actionProviderClass="android.widget.ShareActionProvider" />2、For Android 2.1 and highers
<item …… yourapp:actionProviderClass="android.support.v7.widget.ShareActionProvider" />3.0 For example
<item
    android:id="@+id/action_share"
    android:actionProviderClass="android.widget.ShareActionProvider"
    android:showAsAction="ifRoom"
    android:title="Share"/>
知识点(JAVA)
1、For Android 3.0 and higher only
     shareItem = menu.findItem(R.id.action_share);
     shareItem.getActionProvider();
2、For Android 2.1 and higher
     shareItem = menu.findItem(R.id.action_share);
     MenuItemCompat.getActionProvider(shareItem);
ActionBarSherlock的使用
ActionBarSherlock 是兼容开发包的一个扩展
开源库地址
https://github.com/JakeWharton/ActionBarSherlock
官网地址
http://actionbarsherlock.com/
把他下载下来,把actionabarabsherlock拷贝到工作空间中并引入到项目中
导入之后可能会出现的问题:
android-support-v4.jar包版本不一致导致出错等…
知识点
1、 android:Theme.Holo —-> Theme.Sherlock
android:Theme.Holo.Light —–> Theme.Sherlock.Light
android:Theme.Holo.Light.DarkActionBar —-> Theme.Sherlock.Light.DarkActionBar
…….
2、 Activity —-> SherlockActivity
ListActivity —-> SherlockListActivity
Fragment —-> SherlockFragment
…….
3、 getActivity() —-> getSherlockActivity()
getActionBar() —-> getSupportActionBar();
…….
示例代码
import com.actionbarsherlock.app.ActionBar;
import com.actionbarsherlock.app.ActionBar.OnNavigationListener;
import com.actionbarsherlock.app.SherlockActivity;


public class MainActivity extends SherlockActivity {

    @Override
    protected void onCreate(Bundle savedInstanceState) {
        super.onCreate(savedInstanceState);
        setContentView(R.layout.activity_main);

        ActionBar actinBar = getSupportActionBar();
        actinBar.setNavigationMode(ActionBar.NAVIGATION_MODE_LIST);//设置为列表项的导航模式
        //为列表项添加内容
        ArrayAdapter<String> adapter = new ArrayAdapter<String>(this, android.R.layout.simple_list_item_1);
        for(int i=0;i<5;i++){
            adapter.add("列表项"+i);
        }

        actinBar.setListNavigationCallbacks(adapter, new OnNavigationListener() {

            @Override
            public boolean onNavigationItemSelected(int itemPosition, long itemId) {

                Toast.makeText(MainActivity.this, "select"+itemPosition, 0).show();
                return false;
            }
        });

    }

} android:theme="@style/Theme.Sherlock.Light.DarkActionBar" 关于ActionBarSherlock的更多设置请查看官网


