C#探秘系列(四)
WindowsForm窗口与exe文件之间的通信
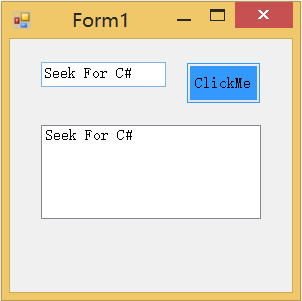
Windows窗体应用程序有时需要调用已编译好的exe文件,但是如何将窗体程序中的数据导入exe文件,并将结果返回到窗体界面上,从而实现窗体与exe文件之间的通信呢?例如,我在窗体中分别添加一个textBox、button和listBox,在textBox中输入某些参数,点击button,将数据传至exe文件中进行处理,并将结果返回至窗体中的listBox以呈现给用户。下面,我先以一个简单的demo为例,来详述通信过程并剖析其中要点。为了简便,我略去了exe文件对数据的处理过程,这个过程要视具体程序而定,而我只是将WindowsForm中输入的数据经exe文件又反馈给了listBox。
一、Demo示例
1.首先,新建一个控制台应用程序(OutPutString):
#region directive
using System;
using System.Collections.Generic;
using System.Linq;
using System.Text;
using System.IO;
using System.Threading.Tasks;
#endregion

namespace OutPutString {
    class Program {
        static void Main(string[] args)
        {
            //Create a String to hold the data of the console
            String strToInput = Console.ReadLine();
            //Print the String to the console
            Console.WriteLine(strToInput);
        }
    }
}
代码异常简单,其实现的功能是从控制台上获取手动输入的字符串,并将其显示于控制台上。按F5将其编译,并生成exe文件。2.第二步,要新建一个Windows窗体程序以实现用户交互。利用工具箱分别将TextBox、Button及ListBox拖至虚拟窗体中,并将其重新命名,单击窗体中的Button生成Click函数,并定义其功能,如下:
1)Program.cs
using System;
using System.Collections.Generic;
using System.Linq;
using System.Threading.Tasks;
using System.Windows.Forms;

namespace OutPutStringForm
{
    static class Program
    {
        /// <summary>
        /// 应用程序的主入口点。
        /// </summary>
        [STAThread]
        static void Main()
        {
            Application.EnableVisualStyles();
            Application.SetCompatibleTextRenderingDefault(false);
            Application.Run(new Form1());
        }
    }
}
2)Form1.Designer.cs
namespace OutPutStringForm
{
    partial class Form1
    {
        /// <summary>
        /// 必需的设计器变量。
        /// </summary>
        private System.ComponentModel.IContainer components = null;

        /// <summary>
        /// 清理所有正在使用的资源。
        /// </summary>
        /// <param name="disposing">如果应释放托管资源,为 true;否则为 false。</param>
        protected override void Dispose(bool disposing)
        {
            if (disposing && (components != null))
            {
                components.Dispose();
            }
            base.Dispose(disposing);
        }

        #region Windows 窗体设计器生成的代码

        /// <summary>
        /// 设计器支持所需的方法 - 不要
        /// 使用代码编辑器修改此方法的内容。
        /// </summary>
        private void InitializeComponent()
        {
            this.button = new System.Windows.Forms.Button();
            this.listBox = new System.Windows.Forms.ListBox();
            this.textBox = new System.Windows.Forms.TextBox();
            this.SuspendLayout();
            //
            // button
            //
            this.button.BackColor = System.Drawing.SystemColors.Highlight;
            this.button.Location = new System.Drawing.Point(176, 23);
            this.button.Name = "button";
            this.button.Size = new System.Drawing.Size(75, 42);
            this.button.TabIndex = 0;
            this.button.Text = "ClickMe";
            this.button.UseVisualStyleBackColor = false;
            this.button.Click += new System.EventHandler(this.button_Click);
            //
            // listBox
            //
            this.listBox.FormattingEnabled = true;
            this.listBox.ItemHeight = 15;
            this.listBox.Location = new System.Drawing.Point(31, 86);
            this.listBox.Name = "listBox";
            this.listBox.Size = new System.Drawing.Size(220, 94);
            this.listBox.TabIndex = 1;
            //
            // textBox
            //
            this.textBox.AllowDrop = true;
            this.textBox.Location = new System.Drawing.Point(31, 23);
            this.textBox.Name = "textBox";
            this.textBox.Size = new System.Drawing.Size(125, 25);
            this.textBox.TabIndex = 2;
            //
            // Form1
            //
            this.AutoScaleDimensions = new System.Drawing.SizeF(8F, 15F);
            this.AutoScaleMode = System.Windows.Forms.AutoScaleMode.Font;
            this.ClientSize = new System.Drawing.Size(282, 253);
            this.Controls.Add(this.textBox);
            this.Controls.Add(this.listBox);
            this.Controls.Add(this.button);
            this.Name = "Form1";
            this.Text = "Form1";
            this.ResumeLayout(false);
            this.PerformLayout();

        }

        #endregion

        private System.Windows.Forms.Button button;
        private System.Windows.Forms.ListBox listBox;
        private System.Windows.Forms.TextBox textBox;
    }
}
using System;
using System.Collections.Generic;
using System.ComponentModel;
using System.Data;
using System.Drawing;
using System.Linq;
using System.Text;
using System.Diagnostics;
using System.IO;
using System.Threading.Tasks;
using System.Windows.Forms;

namespace OutPutStringForm
{
    public partial class Form1 : Form
    {
        public Form1()
        {
            InitializeComponent();
        }

        private void button_Click(object sender, EventArgs e)
        {
            //String to get the text of the textBox
            String strToInput = textBox.Text;

            //Process to start the exe file
            Process myProcess = new Process();
            ProcessStartInfo myProcessStartInfo = new ProcessStartInfo("E:\\CodePackets\\OutPutString\\OutPutString\\bin\\Debug\\OutPutString.exe");
            myProcessStartInfo.UseShellExecute = false;
            myProcessStartInfo.RedirectStandardInput = true;
            myProcessStartInfo.RedirectStandardOutput = true;
            myProcess.StartInfo = myProcessStartInfo;
            myProcess.Start();

            //Stream to put data into the exe file
            StreamWriter myStreamWriter = myProcess.StandardInput;
            myStreamWriter.WriteLine(strToInput);

            //Stream to read the output data of the exe file
            StreamReader myStreamReader = myProcess.StandardOutput;
            // Read the standard output of the spawned process.
            string myString = myStreamReader.ReadLine();
            listBox.Items.Add(myString);
            myProcess.Close();
            listBox.Show();
        }
    }
}
二、利用Process.StartInfo 属性调用exe文件
在Demo中,我们开启了一个进程,并利用Process的StartInfo属性来获取或设置要传递给 Process 的 Start 方法的属性。ProcessStartInfo 表示启动该进程时要使用的数据。 这些参数包括用于启动该进程的可执行文件或文档的名称。
调用 Start 时,StartInfo 用于指定要启动的进程。 唯一必须设置的 StartInfo 成员是 FileName 属性。 通过指定 FileName 属性来启动进程,这样做类似于在 Windows“开始”菜单的“运行”对话框中键入信息。 因此,FileName 属性不需要表示可执行文件。 它可以是其扩展名已经与系统上安装的应用程序关联的任何文件类型。 例如,如果已经将文本文件与某个编辑器(如“记事本”)关联,则 FileName 可以具有 .txt 扩展名;如果已经将 .doc 文件与某个字处理工具(如 Microsoft Word)关联,则它可以具有 .doc 扩展名。 同样,“运行”对话框可以以相同的方式接受带有或不带 .exe 扩展名的可执行文件名,.exe 扩展名在 FileName 成员中是可选的。 例如,可将 FileName 属性设置为“Notepad.exe”或“Notepad”。
如果文件名涉及不可执行文件(如 .doc 文件),则可以包括一个谓词指定要对该文件执行什么操作。 例如,对于以 .doc 扩展名结尾的文件,可以将 Verb 设置为“Print”。 如果您手动为 Verb 属性输入一个值,则在 FileName 属性中指定的文件名不需要具有扩展名。 但是,如果您使用 Verbs 属性来确定哪些谓词可用,则必须包括文件扩展名。
直到在进程上调用 Start 方法时才能更改 StartInfo 属性中指定的参数。 启动该进程之后,更改 StartInfo 值不会影响也不会重新启动关联的进程。 如果在设置了 ProcessStartInfo.UserName 和 ProcessStartInfo.Password 属性后调用 Start(ProcessStartInfo) 方法,则将调用非托管 CreateProcessWithLogonW 函数,这样,即使 CreateNoWindow 属性值为 true 或者 WindowStyle 属性值为 Hidden,也将在新窗口中启动该进程。
如果未使用 Start 方法启动进程,则 StartInfo 属性不会反映启动该进程时使用的参数。 例如,如果使用 GetProcesses 获取计算机上运行的进程的数组,则每个 Process 的 StartInfo 属性将不包含启动进程时使用的原始文件名称或参数。
启动进程后,文件名是填充(只读)MainModule 属性的文件。 如果要在进程启动后检索与进程关联的可执行文件,请使用 MainModule 属性。 如果要设置尚未为其启动关联进程的 Process 实例的可执行文件,请使用 StartInfo 属性的 FileName 成员。 因为 StartInfo 属性的成员是要传递给进程的 Start 方法的参数,所以,启动关联进程后更改 FileName 属性不会重置 MainModule 属性。 这些属性仅用于初始化关联的进程。
下面的例子打开了名为”HelloWorld.exe”的文件:
using System;
using System.Diagnostics;
using System.ComponentModel;

namespace MyProcessSample {
    class MyProcess {
        public static void Main()
        {
            Process myProcess = new Process();

            try
            {
                myProcess.StartInfo.UseShellExecute = false;
                // You can start any process, HelloWorld is a do-nothing example.
                myProcess.StartInfo.FileName = "C:\\HelloWorld.exe";
                myProcess.StartInfo.CreateNoWindow = true;
                myProcess.Start();
                // This code assumes the process you are starting will terminate itself.
                // Given that is is started without a window so you cannot terminate it
                // on the desktop, it must terminate itself or you can do it programmatically
                // from this application using the Kill method.
            }
            catch (Exception e)
            {
                Console.WriteLine(e.Message);
            }
        }
    }
}
这里要注意,指定的文件名中间用双右斜线划分开,路径后一定要记得加exe文件的全称,否则可能会抛出System.ComponentModel.Win32Exception的异常。
三、StreamWriter与StreamReader
C#与Java、C++的读写操作不同,不再区分字符流、字节流,而统一采用Stream方式,然后针对Stream提供Reader与Writer的相关操作。
StreamWriter向流中输入数据,StreamReader用来获取流中的数据。
下面的示例演示如何使用 StreamWriter 对象写入一个列出 C 驱动器上目录的文件,然后使用 StreamReader 对象读取和显示每个目录的名称。 一种好的做法是使用 using 语句中的这些对象以便正确释放非托管资源。 using 语句在使用它的代码完成后,将自动调用对象上的 Dispose。
using System;
using System.Collections.Generic;
using System.Linq;
using System.Text;
using System.IO;

namespace StreamReadWrite
{
    class Program
    {
        static void Main(string[] args)
        {
            // Get the directories currently on the C drive.
            DirectoryInfo[] cDirs = new DirectoryInfo(@"c:\").GetDirectories();

            // Write each directory name to a file.
            using (StreamWriter sw = new StreamWriter("CDriveDirs.txt"))
            {
                foreach (DirectoryInfo dir in cDirs)
                {
                    sw.WriteLine(dir.Name);

                }
            }

            // Read and show each line from the file.
            string line = "";
            using (StreamReader sr = new StreamReader("CDriveDirs.txt"))
            {
                while ((line = sr.ReadLine()) != null)
                {
                    Console.WriteLine(line);
                }
            }
        }
    }
}
