iOS的View之间的数据传递
http://blog.sina.com.cn/s/blog_4431c7610100vgds.html
http://blog.163.com/zhe8stianshi@126/blog/static/17176291920117233111605/
http://blog.csdn.net/riveram/article/details/7263322
一般方法
1)采用代理模式 子viewcontroller设计 代理协议,定义协议接口,父viewcontroller 实现协议接口,实现子viewcontroller 退出时将相关数据更新到父视图。
2)采用ios的消息机制 父viewcontroller注册消息 子viewcontroller 发送消息,触发父viewcontroller的消息处理。
3)采用database做为数据中间的存储媒介,子viewcontroller将状态数据存入DB,父viewcontroller从DB获取数据更新view。
4)采用ios的NSDefault 存储
5)通过AppDelegate 中定义全局变量实现中间数据的存储。
UIViewController和UIViewController之间的交互
UIViewController之间,是否需要交互,怎样交互?这个问题困扰我一段时间了,凭空的去想象,其实很难想明白,尤其是在短时间内。最好的办法,还是在持久的编码/读代码的过程中,根据不同的使用场合及使用需求,来学习体会。
假设使用UINavigationController进行导航,有两层界面结构,都使用自定义UIViewController的子类,分别为level1ViewController和level2ViewController。
1 单向交互。
第一级level1ViewController负责创建第二级level2ViewController,并且设置level2ViewController相关的属性,然后pushlevel2ViewController。伪代码如下:
- [[level2ViewController alloc] init];
- [level2ViewController setProp_1];
- [level2ViewController setProp_2];
- [level2ViewController setProp_3];
- [level1ViewController. navigationController
- pushViewController:level2ViewController];
- [level2ViewController release];
这种情况下,从level1ViewController的角度来看,它只需要初始化level2ViewController,设置它的一些属性,调用push,然后就什么都不用管了。从level2ViewController的角度来看,当它被push后,在它的生命期内,都不会影响level1ViewController,不需要调用level1ViewController的函数,也没有事件需要通知level1ViewController。
这是最简单的使用情形,也是最理想化的。在项目设计阶段,应该尽量把代码设计成这种结构(仅仅是尽量,并不是必须。而且,也并不是所有的使用场景都都可以设计成这样的结构,毕竟这个太理想化了)。
2 双向交互,共享数据
level1ViewController和level2ViewController使用共同的一个数据shareData(一定要理解这里“共同”的含义------两个controller共享同一个数据,并且都有可能进行读写操作,尤其是写操作。如果level2ViewController只对数据进行读操作,那其实就跟前面1中的情形是一致的)。第一级level1ViewController负责创建第二级level2ViewController,并且设置level2ViewController相关的属性,同时还要把shareData传递给level2ViewController,然后pushlevel2ViewController。伪代码如下:
- <span style="font-size:16px;"></span><pre name="code" class="plain">[[shareData alloc] init];
- …
- [[level2ViewController alloc] init];
- [level2ViewController setProp_1];
- [level2ViewController setProp_2];
- [level2ViewController setData: shareData];
- [level1ViewController. navigationController
- pushViewController:level2ViewController];
- [level2ViewController release];
和前一种情形的区别是,在level2ViewController的生命期内,它可能会对shareData进行写操作,当发生这种写操作的时候,需要让level1ViewController知道这种变化,并且作出对应的处理。
这个时候,比较容易想到的一种解决办法是使用Delegate,当level2ViewController写操作shareData时,通过Delegate机制通知level1ViewController,给予level1ViewController一个机会作出正确的响应。
这种办法虽然可行,但并不是首选,在面向对象编程中,经常会提到“解耦”,这里我们就要想办法让这两个controller不要联系的这么紧密。那么怎么办呢?
就是使用MVC模式(UIViewController本身就是MVC中的C)。这个时候,shareData就不应该再是一个普通的数据,而应该封装成model,当model中的数据发生了改变的时候,会发出通知告诉C(和/或V)。这样的话,两个controller之间就比较松散了。引入dataModel后,伪代码如下:
- <span style="font-size:16px;"></span><pre name="code" class="plain">[[shareData alloc] init];
- [dataModel alloc] initWithData: shareData];
- …
- [[level2ViewController alloc] init];
- [level2ViewController setProp_1];
- [level2ViewController setProp_2];
- [level2ViewController setModel: dataModel];
- [level1ViewController. navigationController
- pushViewController:level2ViewController];
- [level2ViewController release];
当level2ViewController修改shareData后,不需要负责通知level1ViewController。shareData会负责通知它的controller。
3 双向交互,逆向消息传递
这时,基本操作都还是前面描述的1或2中的情形,区别点在于,在level2ViewController的生命期内,发生了某个事件,需要让level1ViewController知道这个事件,并且作出对应的处理。
这个时候,就只能用Delegate了。当level2ViewController发生某个事件时,通过Delegate机制通知level1ViewController,给与level1ViewController一个机会作出正确的响应。
但是!一定要谨慎使用这种方案。如果发现代码中需要用到这种结构,首先应该重新审视项目的架构,看能不能用前面两种方案来处理,可能需要做一定的代码重构。当前面的方案实在是无能为力的时候,才考虑使用此方案。而且,尽量让这种逆向的消息传递更简单,消息事件不要太多。
4 双向交互,大量逆向消息传递
这种情形和前面的3是一样的,但是level2ViewController和level1ViewController之间的消息传递更复杂。
这个时候,同样,要审视代码的结构是否合理。而且很大的可能性是设计不合理,应该考虑把level2ViewController中管理的UIView迁移到level1ViewController中,把controller之间的交互,变成controller内部的view之间的交互,让level1ViewController的内部聚合的更紧密一些,对外部,level1ViewController则表现的更松散。例如,UIAlertView或UIActionSheet,都是UIView的子类。(此处并不绝对,在有些sdk中,类似于UIAlertView或UIActionSheet的组件,它的使用情形,是符合前面3中的描述的,因为这两种组件的行为模式,是有规律性的,可以很方便的复用,举个例子,桌面编程环境中,文件选择器这种组件,通常就是一个顶层window)
最后还要补充说明一些内容。
Cocoa是比较严格的执行了MVC设计模式,其中的UIViewController,可以看成是某种使用场合下,一些内在联系很紧密、并且协同工作的UIView的一个顶层管理容器。
在其他的sdk中,不一定有严格的controller,很有可能只有M和V(C的功能在V内实现),甚至只有V(简单的使用场景,就可以不区分M和C,全在V内管理)。这个时候,就有顶层View的概念(有很多种叫法,比如page、window,或者直接使用abstractWidget),这种逻辑概念上的顶层View,在设计的时候,同样需要考虑它们之间的交互,前面描述的这些情形,同样可以套用。
在用户体验的角度来看,controll或者顶层view,通常被成为“场景”,场景之间是否需要交互,前面的描述,也有一定的参考价值。
但是场景的概念并非总和controll或顶层view严格对应,“场景”是更抽象化的内容,更符合人类的直观感觉,而controll/顶层view是更工程化的概念,更精确。在用户体验设计中,有些不同的场景,在逻辑上其实可以属于同一个controll
iphone 使用委托(delegate)在不同的窗口之间传递数据
在IOS里两个UIView窗口之间传递参数方法有很多,比如
1.使用SharedApplication,定义一个变量来传递.
2.使用文件,或者NSUserdefault来传递
3.通过一个单例的class来传递
4.通过Delegate来传递。
前面3种方法,暂且不说,这次主要学习如何使用通过Delegate的方法来在不同的UIView里传递数据 。
比如: 在窗口1中打开窗口2,然后在窗口2中填入一个数字,这个数字又回传给窗口1。
窗口1

窗口2

窗口2的结果传递给窗口1

1.首先定义个一委托UIViewPassValueDelegate用来传递值
- ( void )passValue:(NSString * )value;
@end
这个protocol 就是用来传递值
2.在窗口1的头文件里,声明delegate
#import " UIViewPassValueDelegate.h "
@interface DelegateSampleViewController : UIViewController < UIViewPassValueDelegate >
{
UITextField * _value;
}
@property(nonatomic, retain) IBOutlet UITextField * value;
- (IBAction)buttonClick:(id)sender;
@end
并实现这个委托
{
self.value.text = value;
NSLog( @" the get value is %@ " , value);
}
button的Click方法,打开窗口2,并将窗口2的delegate实现方法指向窗口1。
{
ValueInputView * valueView = [[ValueInputView alloc] initWithNibName: @" ValueInputView " bundle:[NSBundle mainBundle]];
valueView. delegate = self; // 把两个VC关联起来!
[self setModalTransitionStyle:UIModalTransitionStyleCoverVertical];
[self presentModalViewController:valueView animated:YES];
}
第二个窗口的实现
.h 头文件
#import " UIViewPassValueDelegate.h "
@interface ValueInputView : UIViewController {
NSObject < UIViewPassValueDelegate > * delegate ;
UITextField * _value;
}
@property(nonatomic, retain)IBOutlet UITextField * value;
@property(nonatomic, retain) NSObject < UIViewPassValueDelegate > * delegate ;
- (IBAction)buttonClick:(id)sender;
@end
.m实现文件
@implementation ValueInputView
@synthesize delegate ;
@synthesize value = _value;
- ( void )dealloc {
[self.value release];
[super dealloc];
}
- (IBAction)buttonClick:(id)sender
{
[ delegate passValue:self.value.text]; // 具体的实现在第一个VC里。
NSLog( @" self.value.text is%@ " , self.value.text);
[self dismissModalViewControllerAnimated:YES];
}
- ( void )didReceiveMemoryWarning {
// Releases the view if it doesn't have a superview.
[super didReceiveMemoryWarning];
// Release any cached data, images, etc. that aren't in use.
}
- ( void )viewDidUnload {
[super viewDidUnload];
// Release any retained subviews of the main view.
// e.g. self.myOutlet = nil;
}
/*
// Only override drawRect: if you perform custom drawing.
// An empty implementation adversely affects performance during animation.
- (void)drawRect:(CGRect)rect {
// Drawing code.
}
*/
@end
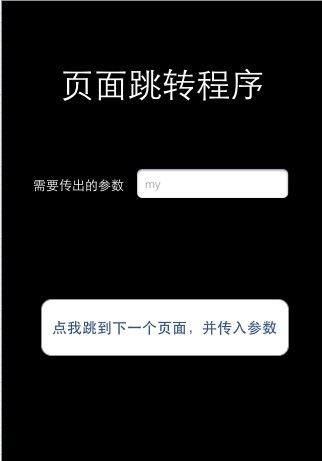
简单实现View直接的数据传递
废话就不说了,直接上步骤和代码:
1 创建一个基于Navigation-based Application的iphone工程,为什么要创建基于Navigation-based Application的工程呢,因为这样系统就会自动将Navigation视图加到我们的窗口视图中,这样我们就不用自己手动去加,并且可以用
[self.navigationControllerpushViewController:otherviewanimated:YES]去跳转页面。当设置每个页面的标题后会在页面左上角自动生成后退导航按钮,多方便呀,当然需要在建立后将xib文件里面的tableview去掉加入view。
2 新建一个页面,我这里是OtherView,让系统自动生成.h,.xib文件。
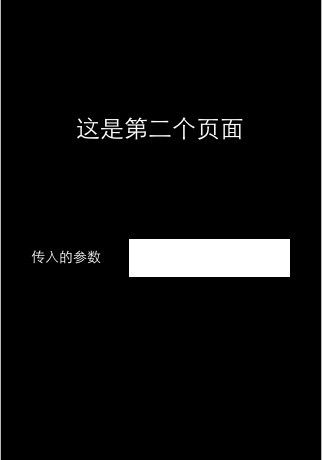
3 第一个页面上面添加一个文本筐和一个按钮,点击按钮后调转到第二个页面并将文本筐里面的数据传入第二个页面。第二个页面用一个label来显示传过来的数据。
4 代码:
首先是自动生成的协议里面的代码,注意看navigationController:
MynavAppDelegate.h代码:
- #import <UIKit/UIKit.h>
- @interface MynavAppDelegate : NSObject <UIApplicationDelegate> {
- }
- @property (nonatomic, retain) IBOutlet UIWindow *window;
- @property (nonatomic, retain) IBOutlet UINavigationController *navigationController;
- @end
MynavAppDelegate.m代码:
- #import "MynavAppDelegate.h"
- @implementation MynavAppDelegate
- @synthesize window=_window;
- @synthesize navigationController=_navigationController;
- - (BOOL)application:(UIApplication *)application didFinishLaunchingWithOptions:(NSDictionary *)launchOptions
- {
- self.window.rootViewController = self.navigationController;
- [self.window makeKeyAndVisible];
- return YES;
- }
- - (void)applicationWillResignActive:(UIApplication *)application
- {
- }
- - (void)applicationDidEnterBackground:(UIApplication *)application
- {
- }
- - (void)applicationWillEnterForeground:(UIApplication *)application
- {
- }
- - (void)applicationDidBecomeActive:(UIApplication *)application
- {
- }
- - (void)applicationWillTerminate:(UIApplication *)application
- {
- }
- - (void)dealloc
- {
- [_window release];
- [_navigationController release];
- [super dealloc];
- }
- @end
第一个页面的代码:
RootViewController.h
- #import <UIKit/UIKit.h>
- #import <Foundation/Foundation.h>
- @interface RootViewController : UIViewController {
- IBOutlet UITextField * message;//需要传出的数据
- }
- @property(nonatomic,retain) UITextField * message;
- -(IBAction) send;//按钮点击方法
- @end
RootViewController.m
- #import "RootViewController.h"
- #import "OtherView.h"
- @implementation RootViewController
- @synthesize message;
- -(IBAction) send{
- OtherView *otherview = [[OtherView alloc] initWithNibName:@"OtherView" bundle:nil];
- otherview.mystring= message.text;
- [self.navigationController pushViewController:otherview animated:YES];
- [otherview release];
- }
- - (void)touchesBegan:(NSSet *)touches withEvent:(UIEvent *)event {
- UITouch *touch = [[event allTouches] anyObject];
- if (touch.tapCount >= 1) {
- [message resignFirstResponder];
- }
- }
- - (void)viewDidLoad
- {
- self.title = @"第一个页面";
- [super viewDidLoad];
- }
- - (void)didReceiveMemoryWarning
- {
- // Releases the view if it doesn't have a superview.
- [super didReceiveMemoryWarning];
- // Relinquish ownership any cached data, images, etc that aren't in use.
- }
- - (void)viewDidUnload
- {
- [super viewDidUnload];
- // Relinquish ownership of anything that can be recreated in viewDidLoad or on demand.
- // For example: self.myOutlet = nil;
- }
- - (void)dealloc
- {
- [message release];
- [super dealloc];
- }
- @end
第二个页面代码:
OtherView.h
- #import <UIKit/UIKit.h>
- @interface OtherView : UIViewController {
- IBOutlet UILabel * mylabel;//用来显示传入的数据
- NSString * mystring;//数据传入用到的属性
- }
- @property(nonatomic,retain) UILabel * mylabel;
- @property(nonatomic,retain) NSString * mystring;
- @end
- #import "OtherView.h"
- @implementation OtherView
- @synthesize mylabel,mystring;
- - (id)initWithNibName:(NSString *)nibNameOrNil bundle:(NSBundle *)nibBundleOrNil
- {
- self = [super initWithNibName:nibNameOrNil bundle:nibBundleOrNil];
- if (self) {
- // Custom initialization
- }
- return self;
- }
- - (void)dealloc
- {
- [mylabel release];
- [mystring release];
- [super dealloc];
- }
- - (void)didReceiveMemoryWarning
- {
- // Releases the view if it doesn't have a superview.
- [super didReceiveMemoryWarning];
- // Release any cached data, images, etc that aren't in use.
- }
- #pragma mark - View lifecycle
- - (void)viewDidLoad
- {
- [super viewDidLoad];
- self.title = @"第二个页面";
- self.mylabel.text=mystring;
- // mylabel.text = mystring;
- // Do any additional setup after loading the view from its nib.
- }
- - (void)viewDidUnload
- {
- [super viewDidUnload];
- // Release any retained subviews of the main view.
- // e.g. self.myOutlet = nil;
- }
- - (BOOL)shouldAutorotateToInterfaceOrientation:(UIInterfaceOrientation)interfaceOrientation
- {
- // Return YES for supported orientations
- return (interfaceOrientation == UIInterfaceOrientationPortrait);
- }
- @end