spring(11)------spring国际化支持
一,关于spring国际化的简介
在java编程中,对于信息的处理一般有两种方式:
(1)将信息存在数据库里,用的时候从数据库里取。(惯用手法数据字典就是)
(2)将信息存放在java常量类中,通过java类调用属性值。
这两种方式对于处理不需要国际化的网站,系统是能实现的,但是,如果需要国际化,
这两种方式就实现国际化非常困难。
而spring对于国际的实现提供了良好的支持,Application通过继承
org.springframework.context.MessageResource接口,通过getMessage()方法获取信息资源,
从而实现国际化的目的。
二,getMessage()三种形式
(1)getMessage(java.lang.String arg0, java.lang.Object[] arg1, java.lang.String arg2, java.util.Locale arg3);
这个是获取信息的基本方法,如果找不到指定信息,也就是java.lang.Object[] arg1传入后没有找到,
就用java.lang.String arg2这个信息作为默认信息。
(2)getMessage(java.lang.String arg0, java.lang.Object[] arg1, java.util.Locale arg2) throws org.springframework.context.NoSuchMessageException;
跟上一个方法同的是没有指定默认值,如果根据传入参数找不到指定信息,就会抛异常NoSuchMessageException。
(3)getMessage(org.springframework.context.MessageSourceResolvable arg0, java.util.Locale arg1) throws org.springframework.context.NoSuchMessageException;
通过MessageSourceResolvable获取传入信息的信号,传入参数跟上面两个方法类型不一样,一般不常用。
三,spring关于国际化的实现思路
当ApplicationContext被加载的时候,会自动从spring配置文件XML中去查找id为messageSource的bean。
spring约定国际化支持的bean为messageSource,通过org.springframework.context.support.ResourceBundleMessageSource
绑定国际化信息的资源文件,获取国际化信息。
四,简单体验下spring国际化,让后再根据实例分析国际化的实现思想
用输出中文做测试
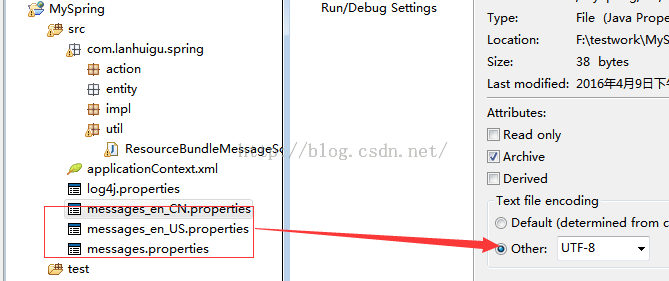
我的项目结构:
messages_en_CN.properties文件内容:
HelloWorld=问候:{0},问候时间:{1} 注意:该文件放在src下
HelloWorld类:
package com.lanhuigu.spring.action;


public class HelloWorld{
	private String msg;
	//private RefTest refTest;
	//有参构造器
	/*public HelloWorld(RefTest refTest){
		this.refTest = refTest;
	}*/
	//通过set方法注入属性值
	public void setMsg(String msg) {
		this.msg = msg;
	}

	public String getMsg() {
		return msg;
	}

	/*public RefTest getRefTest() {
		return refTest;
	}

	public void setRefTest(RefTest refTest) {
		this.refTest = refTest;
	}*/

}
spring配置文件:
<?xml version="1.0" encoding="UTF-8"?>

<!--
  - Application context definition for JPetStore's business layer.
  - Contains bean references to the transaction manager and to the DAOs in
  - dataAccessContext-local/jta.xml (see web.xml's "contextConfigLocation").
  -->
<beans xmlns="http://www.springframework.org/schema/beans"
		xmlns:xsi="http://www.w3.org/2001/XMLSchema-instance"
		xmlns:aop="http://www.springframework.org/schema/aop"
		xmlns:tx="http://www.springframework.org/schema/tx"
		xsi:schemaLocation="
			http://www.springframework.org/schema/beans http://www.springframework.org/schema/beans/spring-beans-2.5.xsd
			http://www.springframework.org/schema/aop http://www.springframework.org/schema/aop/spring-aop-2.5.xsd
			http://www.springframework.org/schema/tx http://www.springframework.org/schema/tx/spring-tx-2.5.xsd">
	<!-- 负责国际化支持 -->
	<bean id="messageSource"
		class="org.springframework.context.support.ResourceBundleMessageSource">
		<!-- property有两个属性名,basename,basenames
		               顾名思义,第一个放一个value,第二个放一个或多个value -->
		<property name="basename">
			<!-- 国际化支持的定义在文件名为message的文件中,
				   也就是这个地方设置什么,src下对应的配置文件为
				 messages.properties或 messages.class,
				 名字是别的也一个含义-->
			<value>messages_en_CN</value>
		</property>
		<!-- <property name="basenames">
			<list>
				<value>messgaes</value>
				<value>error</value>
			</list>
		</property> -->
	</bean>

	<!-- 定义一个id为sayHello的bean,
	通过spring配置文件变换实现类,实现不同的功能,无需修改别的程序 -->
	<bean id="sayHello" class="com.lanhuigu.spring.action.HelloWorld" >
		<!-- 将变量msg值依赖注入 -->
	    <property name="msg">
	    	<value>测试</value>
		</property>
		<!-- refTest为HelloWorld的一个属性,通过ref指定依赖关系,
			也就是说你依赖于哪个类,或者接口,直接把这个类通过set方式注入 ,
			看看HelloWorld的属性定义就明白了-->
		<!-- <property name="refTest">
			<ref bean="refTest"/>
		</property> -->
	</bean>
	<!-- RefTest类 -->
    <!-- <bean id="refTest" class="com.lanhuigu.spring.action.RefTest">
		myRef为RefTest类的一个属性
		<property name="myRef">
			<value>依赖关系测试</value>
		</property>
	</bean> -->
</beans>
测试程序:
package com.lanhuigu.spring.test;

import java.util.Calendar;
import java.util.Locale;

import org.junit.Test;
import org.springframework.context.ApplicationContext;
import org.springframework.context.support.ClassPathXmlApplicationContext;

import com.lanhuigu.spring.action.HelloWorld;

public class TestHelloWorld {
	@Test
	public void testMyHelloWorld(){
		//1 读取spring初始化的配置文件
		ApplicationContext acxt =
				new ClassPathXmlApplicationContext("/applicationContext.xml");
		//2 根据bean获取ISayHello实现类对象
		HelloWorld helloAC = (HelloWorld) acxt.getBean("sayHello");
		//3 调用接口方法
		System.out.println(helloAC.getMsg());
		//4 先获取依赖的类RefTest,在从依赖类中获取依赖类的属性
		//System.out.println(helloAC.getRefTest().getMyRef());
		//5.国际化测试
		//A.对应messages.properties中的两个参数{0},{1}
		Object[] objs = new Object[]{"HelloWorld",Calendar.getInstance().getTime()};
		//B.根据messages.properties中的HelloWorld获取配置,再传入objs数据参数,最后加上国家获取当前时间
		String mytest = acxt.getMessage("HelloWorld", objs, Locale.CHINA);
		System.out.println(mytest);
	}
}
运行结果:
输出结果出现乱码的问题,先不管乱码是怎么回事,先根据代码分析国际化原理。
(1)spring配置文件中,国际化bean的id为messageSource(这个是spring约定的,意思是没事别找事,就用它),
bean的来源为org.springframework.context.support.ResourceBundleMessageSource,设定bean中的property
属性basename或basenames两者是有区别的,可以看spring配置文件中的注释,property下value的值就是src
配置文件的名字。例如,在spring中<value>messages_en_CN</value>,即为src国际化信息的配置文件为
messages_en_CN.propertiest或messages_en_CN.class。
(2)messages_en_CN.properties资源文件中的配置为:HelloWorld=问候:{0},问候时间:{1}
=(等号)前的HelloWorld为acxt.getMessage("HelloWorld", objs, Locale.CHINA)相当于key值,
根据HelloWorld获取信息资源配置文件中的(value)‘问候:{0},问候时间:{1}’,然后objs将传入对应的参数,
根据后面的语言组装返回对应的字符串:é?????:HelloWorld,é????????é??:16-4-9 下午7:18(乱码下面解决)
从上面可以看出,国际化就是通过ResourceBundleMessageSource接口获取资源文件,
传入对应参数,组装成对应字符串,也就是把从数据库或java常量类获取信息的形式转换
为从资源库获取信息,如果我们放入不同的资源配置文件,获取的就是不同语言的信息,
从而实现国际化,每次需要什么语言就放什么语言的配置文件。
五,解决中文乱码的问题
在上面的实例中,可以看到,基本的国际化实现了,明明是中文的,输出后是一堆乱码,这个问题解决办法如下:
(1)转码方式解决,吃力不讨好,不去管它
(2)扩展ResourceBundleMessageSource接口,解决乱码问题
在上面util代码下,新建ResourceBundleMessageSourceExtend类,继承于ResourceBundleMessageSource,
处理乱码问题:
package com.lanhuigu.spring.util;

import java.io.UnsupportedEncodingException;
import java.text.MessageFormat;
import java.util.Locale;
import java.util.Map;
import java.util.concurrent.ConcurrentHashMap;

import org.springframework.context.support.ResourceBundleMessageSource;

public class ResourceBundleMessageSourceExtend extends
ResourceBundleMessageSource {
	//属性文件使用UTF-8编码(你的属性文件messages.properties使用什么进行编码,ENCODING设置成对应的格式)
	private static final String ENCODING = "UTF-8";
	private static final String NULL = "null";

	/** cache the encoding key value * */
	Map<String, String> encodingCache = new ConcurrentHashMap<String, String>(
	    20);

	/**
	* resolve no argus
	*/
	protected String resolveCodeWithoutArguments(String code, Locale locale) {
		String message = super.resolveCodeWithoutArguments(code, locale);
		return decodeString(message, ENCODING);

	}

	/**
	* resolve args
	* @see resolveCode(String code, Locale locale)
	*/
	protected MessageFormat createMessageFormat(String msg, Locale locale) {
		if (logger.isDebugEnabled()) {
		    logger.debug("Creating MessageFormat for pattern [" + msg
		            + "] and locale '" + locale + "'");
		}
		msg = decodeString(msg, ENCODING);
		return new MessageFormat((msg != null ? msg : ""), locale);
	}

	/**
	* 转码
	* @param msg
	* @param encode
	* @return
	*/
	private String decodeString(String message, String encode) {
		String encodMessage = encodingCache.get(message);
		if (encodMessage == null) {
		    try {
		        encodMessage = new String(message.getBytes("ISO8859-1"), encode);
		        if (message != null) {
		            encodingCache.put(message, encodMessage);
		        } else {
		            encodingCache.put(message, NULL);
		            // log the code is not exist in properties
		        }
		    } catch (UnsupportedEncodingException e) {
		        e.printStackTrace();
		    }
		}
		return encodMessage;
	}

}
修改spring配置文件为如下:
<?xml version="1.0" encoding="UTF-8"?>

<!--
  - Application context definition for JPetStore's business layer.
  - Contains bean references to the transaction manager and to the DAOs in
  - dataAccessContext-local/jta.xml (see web.xml's "contextConfigLocation").
  -->
<beans xmlns="http://www.springframework.org/schema/beans"
		xmlns:xsi="http://www.w3.org/2001/XMLSchema-instance"
		xmlns:aop="http://www.springframework.org/schema/aop"
		xmlns:tx="http://www.springframework.org/schema/tx"
		xsi:schemaLocation="
			http://www.springframework.org/schema/beans http://www.springframework.org/schema/beans/spring-beans-2.5.xsd
			http://www.springframework.org/schema/aop http://www.springframework.org/schema/aop/spring-aop-2.5.xsd
			http://www.springframework.org/schema/tx http://www.springframework.org/schema/tx/spring-tx-2.5.xsd">
	<!-- 负责国际化支持 -->
	<bean id="messageSource"
		class="com.lanhuigu.spring.util.ResourceBundleMessageSourceExtend">
		<!-- property有两个属性名,basename,basenames
		               顾名思义,第一个放一个value,第二个放一个或多个value -->
		<property name="basename">
			<!-- 国际化支持的定义在文件名为message的文件中,
				   也就是这个地方设置什么,src下对应的配置文件为
				 messages.properties或 messages.class,
				 名字是别的也一个含义-->
			<value>messages_en_CN</value>
		</property>
		<!-- <property name="basenames">
			<list>
				<value>messgaes</value>
				<value>error</value>
			</list>
		</property> -->
	</bean>

	<!-- 定义一个id为sayHello的bean,
	通过spring配置文件变换实现类,实现不同的功能,无需修改别的程序 -->
	<bean id="sayHello" class="com.lanhuigu.spring.action.HelloWorld" >
		<!-- 将变量msg值依赖注入 -->
	    <property name="msg">
	    	<value>测试</value>
		</property>
		<!-- refTest为HelloWorld的一个属性,通过ref指定依赖关系,
			也就是说你依赖于哪个类,或者接口,直接把这个类通过set方式注入 ,
			看看HelloWorld的属性定义就明白了-->
		<!-- <property name="refTest">
			<ref bean="refTest"/>
		</property> -->
	</bean>
	<!-- RefTest类 -->
    <!-- <bean id="refTest" class="com.lanhuigu.spring.action.RefTest">
		myRef为RefTest类的一个属性
		<property name="myRef">
			<value>依赖关系测试</value>
		</property>
	</bean> -->
</beans>
其他不变,运行结果如下:
乱码好了,这个地方需要注意的就是messages_en_CN.properties编码形式是什么,
扩展接口中得对应了,在propertiest配置文件上右键properties看看编码是啥,然后
设置private static final String ENCODING = "UTF-8";为对应的编码形式,才能避免乱码问题。
我的为UTF-8的形式,所以ENCODING设置成UTF-8,这样做即能支持UTF-8的编码。


