ListView,Checkable与SparseBooleanArray入门
ListView
常用属性
divider="@null",除掉分隔线。也可以用该属性为分隔线添加不同颜色,图片。
footerDividersEnabled="false",headerDividersEnabled="false":除掉顶部、底部分隔线。
scrollbars="none":除掉滚动条
fadingEdge="none":除掉上下边的阴影
cacheColorHint:拖动时的背景颜色
listSelector:条目点击时的背景。
transcriptMode="alwaysScroll":出现新条目时,自动滚动到可见的新条目处。
choiceMode:子item的选择模式。
设置item高度
两种方法:一是用背景图,即设置background属性,此时条目的高度会被背景图给撑大。二是设置minHeight属性。
常用方法
getCount():得到的是总条目的个数,也就是adapter.getCount()的返回值。
getChildCount():可以理解为可见条目的个数.
getChildAt():是从可见条目中获取的。并不是从整体获取。如当前第一个可见条目是21,那么getChildAt(0)得到的便是21号,而getChildAt(21)得到的便不是21号。
getCheckedItemPositions():获取选中的item。返回的是SparseBooleanArray对象。
setSelectionFromTop():类似于setSelection(),但比setSelection()要精确。它会将不可见的部分也保留下来,其中setSelection()内部也是通过该方法实现的。参考。
上拉判断
上拉加载时,需要判断当前是不是已经滑动到最底部。如下:
    private boolean isBottom() {
        boolean result = false;
        int position = getLastVisiblePosition();
        if (position == getCount() - 1) {
            int[] location = new int[2];
            getLocationOnScreen(location);
            int y = location[1];
            View child = getChildAt(visibleItemCount - 1);//为OnScrollListener#onScroll()中的第三个参数
            child.getLocationInWindow(location);
            int childY = location[1];
            result = childY == y + getHeight() - child.getHeight();
        }
        return result;
    }
下拉判断
在listview下拉刷新时,需要判断当前是不是到最顶部。如下:
    /**
     * 是否在最顶部
     */
    private boolean isTop() {
        boolean result = false;
        if (getFirstVisiblePosition() == 0) {
            int[] location = new int[2];
            getLocationOnScreen(location);
            int y = location[1];
            View child = getChildAt(0);
            child.getLocationInWindow(location);
            int childY = location[1];
            result = childY == y;
        }
        return result;
    }
首先判断在最上面的是否是第一个item,其次判断第一个item在屏幕的绝对位置是不是和listview在屏幕的绝对位置相同。
这里不能单独判断第一个item是不是0,因为第一个item只要露出一点,getFirstVisiblePosition就等于0。
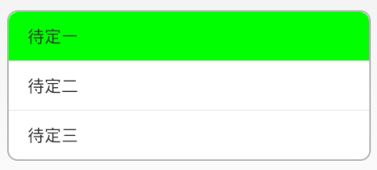
圆角ListView
参考
http://blog.csdn.net/wangkuifeng0118/article/details/7746175
方法一:用图片,图片一共应该有四种:上面两个角为圆角的,下面两个角为圆角的,四个角都为圆角的,四个角都不为圆角的。
方法二:通过shape来自画标签,但ListView的背景用的是四个角都是圆角的图片。
代码:
先自定义一个ListView的子类MyListView,重写onInterceptTouchEvent()方法,并在其中对点击时的不同条目进行设置selector。因此,可以为不同的条目设置不同的选择器。
public boolean onInterceptTouchEvent(MotionEvent ev) {
		switch (ev.getAction()) {
		case MotionEvent.ACTION_DOWN:
			int x = (int) ev.getX();
			int y = (int) ev.getY();
			int itemnum = pointToPosition(x, y);
			if (itemnum == AdapterView.INVALID_POSITION)
				break;
			else {
				if (itemnum == 0) {
					if (itemnum == (getAdapter().getCount() - 1)) {
						setSelector(R.drawable.app_list_corner_round);// 只有一项
					} else {
						setSelector(R.drawable.app_list_corner_round_top);// 第一项
					}
				} else if (itemnum == (getAdapter().getCount() - 1))
					setSelector(R.drawable.app_list_corner_round_bottom);// 最后一项
				else {
					setSelector(R.drawable.app_list_corner_round_center);// 中间项
				}
			}
			break;
		case MotionEvent.ACTION_UP:
			break;
		}
		return super.onInterceptTouchEvent(ev);
	}
其中的四个R.drawable.XXX分别如下:
R.drawable.app_list_corner_round:(四个角都是圆角)
<?xml version="1.0" encoding="utf-8"?>
<selector xmlns:android="http://schemas.android.com/apk/res/android">
    <item android:state_pressed="true"><!-- 点击使显示出shape定义的图形 -->
        <shape xmlns:android="http://schemas.android.com/apk/res/android">
            <corners android:radius="5dp" />
            <solid android:color="#00ff00" />
            <stroke android:width="2dp"
                android:color="#00ffffff" />
        </shape>
    </item>
    <item><!-- 不点击时,显示出透明色,展示出的就是ListView的背景图 -->
        <shape xmlns:android="http://schemas.android.com/apk/res/android">
            <solid android:color="#0000ff00" />
        </shape>
    </item>
</selector>
R.drawable.app_list_corner_round_top(只有上面两个角是圆角)
<?xml version="1.0" encoding="utf-8"?>
<selector xmlns:android="http://schemas.android.com/apk/res/android">
    <item android:state_pressed="true">
        <shape xmlns:android="http://schemas.android.com/apk/res/android">
            <corners android:topLeftRadius="8dp" android:topRightRadius="8dp" />
            <solid android:color="#00ff00" />
        </shape>
    </item>
    <item>
        <shape xmlns:android="http://schemas.android.com/apk/res/android">
            <solid android:color="#0000ff00" />
        </shape>
    </item>
</selector>
R.drawable.app_list_corner_round_bottom(只有底部两个角是圆角)
<?xml version="1.0" encoding="utf-8"?>
<selector xmlns:android="http://schemas.android.com/apk/res/android">
    <item android:state_pressed="true">
        <shape xmlns:android="http://schemas.android.com/apk/res/android">
            <corners android:bottomLeftRadius="8dp" android:bottomRightRadius="8dp" />
            <solid android:color="#00ff00" />
        </shape>
    </item>
    <item>
        <shape xmlns:android="http://schemas.android.com/apk/res/android">
            <solid android:color="#0000ff00" />
        </shape>
    </item>
</selector>
R.drawable.app_list_corner_round_center(四个角都不是圆角)
<?xml version="1.0" encoding="utf-8"?>
<selector xmlns:android="http://schemas.android.com/apk/res/android">

    <item android:state_pressed="true">
        <shape xmlns:android="http://schemas.android.com/apk/res/android">
            <solid android:color="#00ff00" />
        </shape>
   </item>
	<item >
	    <shape xmlns:android="http://schemas.android.com/apk/res/android">
            <solid android:color="#0000ff00" />
        </shape>
	</item>
</selector>
Activity的布局文件为:
   <com.example.smalltool.view.MyListView
        android:paddingLeft="1dp"
        android:paddingRight="1dp"
        android:id="@+id/list_view"
        android:layout_width="match_parent"
        android:layout_height="wrap_content"
        android:layout_marginLeft="10dp"
        android:layout_marginRight="10dp"
        android:layout_marginTop="25dp"
        android:background="@drawable/bind_ic_preference_one_normal_long"
        android:footerDividersEnabled="false"
        android:headerDividersEnabled="false"
        android:scrollbars="none" >
    </com.example.smalltool.view.MyListView>
效果图:
细节
由于shape定义的文件可以理解为一个图形,因此在点击的时候有可能会覆盖住背景图的边框,这时需要在ListView中配置padding属性,根据覆盖的位置的不同选择不同的paddingXX属性。如上面的xml文件中就配置了android:paddingLeft="1dp" android:paddingRight="1dp"同理,如果该值比较大,就可以导致shape图形和边框之间有一段空白。
Checkable与SparseBooleanArray
ListView有一个choiceMode属性,使用该属性可以很方便的实现在listview中单选多选的功能。但这有个前提:listview的每一个条目必须是Checkable的子类。因此,就需要将每一个条目自定义成一个单独的view。
listview:
listview本身没啥说的,只不过配置android:choiceMode="multipleChoice或者singleChoice"
item如下:
public class CopyOfCheckableView extends LinearLayout implements Checkable {

	private TextView mTitleTv;
	private CheckBox mCb;

	//前面省略三个构造方法,每一个都调用了init()
	private void init() {
		View view = LayoutInflater.from(getContext()).inflate(
				R.layout.checkable_main, this, true);
		mTitleTv = (TextView) view.findViewById(R.id.title);
		mCb = (CheckBox) view.findViewById(R.id.cb);
	}

	public void toggle() {
		mCb.toggle();
	}

	public boolean isChecked() {
		return mCb.isChecked();
	}

	public void setChecked(boolean checked) {
		if(checked){//根据选中未选中设置背景
			setBackgroundResource(R.drawable.action_bar_overflow_item_bg_pressed);
		}else{
			setBackgroundResource(R.drawable.action_bar_overflow_item_bg_normal);
		}
		mCb.setChecked(checked);
	}
}
其中的init()中R.layout.checkable_main没啥说的,无非是一个textview与一个checkbox。但要注意两点:
1,根结点需配置android:descendantFocusability="blocksDescendants"
2,checkbox必须不能拥有焦点。需要配置如下属性:
        android:checked="false"
        android:clickable="false"
        android:focusableInTouchMode="false"
获取选中项
/*
			 * 当为单选时,调用getCheckedItemPosition()获取选中的item的position
			 */
			//为多选时方法如下
			SparseBooleanArray array = mLv.getCheckedItemPositions();
			for (int x = 0; x < array.size(); x++) {
				int key = array.keyAt(x);
				boolean b = array.get(key);
				if(b){
					//key指的是该item在listview中的position
					System.out.println(key);
				}
			}
