Android的onLayout、layout方法讲解
onLayout方法是ViewGroup中子View的布局方法,用于放置子View的位置。放置子View很简单,只需在重写onLayout方法,然后获取子View的实例,调用 子View的layout方法实现布局。在实际开发中,一般要配合onMeasure测量方法一起使用。
onLayout方法:
@Override
protected abstract void onLayout(boolean changed,
            int l, int t, int r, int b);
该方法在ViewGroup中定义是抽象函数,继承该类必须实现onLayout方法,而ViewGroup的onMeasure并非必须重写的。View的放置都是根据一个矩形空间放置的,onLayout传下来的l,t,r,b分别是放置父控件的矩形可用空间(除去margin和padding 的空间)的左上角的left、top以及右下角right、bottom值。
layout方法:
public void layout(int l, int t, int r, int b);该方法是View的放置方法,在View类实现。调用该方法需要传入放置View的矩形空间左上角left、top值和右下角right、bottom值。这四个值是相对于父控件而言的(而非绝对高度)。例如传入的是(10, 10, 100, 100),则该View在距离父控件的左上角位置(10, 10)处显示,显示的大小是宽高是90(参数r,b是相对左上角的),这有点 像绝对布局。
平常开发所用到RelativeLayout、LinearLayout、FrameLayout...这些都是继承ViewGroup的布局。这些布局的实现都是通过都实现ViewGroup的onLayout方法,只是实现方法不一样而已。
下面是一个自定义ViewGroup的Demo,用onLayout和layout实现子View的水平放置,间隔是20px
public class MyViewGroup extends ViewGroup {

  // 子View的水平间隔
  private final static int padding = 20;

  public MyViewGroup(Context context, AttributeSet attrs) {
    super(context, attrs);
    // TODO Auto-generated constructor stub
  }

  @Override
  protected void onLayout(boolean changed, int l, int t, int r, int b) {
    // TODO Auto-generated method stub

    // 动态获取子View实例
    for (int i = 0, size = getChildCount(); i < size; i++) {
      View view = getChildAt(i);
      // 放置子View,宽高都是100
      view.layout(l, t, l + 100, t + 100);
      l += 100 + padding;
    }

  }

}
Activity的XML布局:
<RelativeLayout xmlns:android="http://schemas.android.com/apk/res/android"
 xmlns:tools="http://schemas.android.com/tools"
 android:layout_width="match_parent"
 android:layout_height="match_parent"
 android:padding="10dp" >

  <com.example.layout.MyViewGroup   android:layout_width="match_parent"   android:layout_height="100dp"   android:background="#0000ff" >

    <View    android:layout_width="match_parent"    android:layout_height="match_parent"    android:background="#ff0000" />
    <View    android:layout_width="match_parent"    android:layout_height="match_parent"    android:background="#00ff00" />

  </com.example.layout.MyViewGroup>

</RelativeLayout>
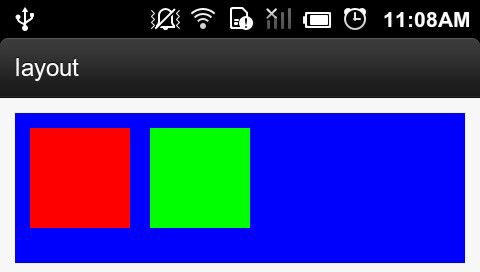
效果如图所示:
上图MyViewGroup是蓝色,两个子View分别为红色和绿色。
在自定义View中,onLayout配合onMeasure方法一起使用,可以实现自定义View的复杂布局。自定义View首先调用onMeasure进行测量,然后调用onLayout方法,动态获取子View和子View的测量大小,然后进行layout布局。
