关于《最简单的基于FFMPEG+SDL的视频播放器》记录二
一、概述
之前写过一篇关于《最简单的基于FFMPEG+SDL的视频播放器》的记录,主要对FFMPEG的解码流程及代码做了比较详细的解释,但是对SDL部分并未做任何的解释,这次记录二将重点放在了SDL部分。由于SDL已经升级到2.0,所以此次将1.x和2.0一起记录下来。
二、SDL工作流程
- SDL 1.x
1.流程图
这里直接借鉴作者的原图,处理流程图贴出来:
这里不对该图作解释,可以参考下面的流程处理代码,里面有比较详细的解释。
2.各个处理流程代码
1、初始化SDL库
	//SDL Begin----------------------------
	//初始化SDL库
	if (SDL_Init(SDL_INIT_VIDEO | SDL_INIT_AUDIO | SDL_INIT_TIMER)) {
		printf("Could not initialize SDL - %s\n", SDL_GetError());
		return -1;
	}
2、创建窗口
//在显示器上创建一个窗口(window),在SDL中显示图像的窗口叫做surface。
	screen_w = pCodecCtx->width;
	screen_h = pCodecCtx->height;
	screen = SDL_SetVideoMode(screen_w, screen_h, 0, 0);//第一个0表示使用和当前屏幕一样的颜色深度,第二个0是标志位,暂时可以忽略

	if (!screen) {
		printf("SDL: could not set video mode - exiting:%s\n", SDL_GetError());
		return -1;
	}
3、创建YUV overlay
//创建一个YUV 覆盖以便于我们输入视频上去
	//bmp = SDL_CreateYUVOverlay(pCodecCtx->width, pCodecCtx->height, SDL_YV12_OVERLAY, screen);//YUV平面模式
	  bmp = SDL_CreateYUVOverlay(pCodecCtx->width, pCodecCtx->height, SDL_IYUV_OVERLAY, screen);//YVU平面模式
	rect.x = 0;
	rect.y = 0;
	rect.w = screen_w;
	rect.h = screen_h;
4、显示YUV overlay
                                 SDL_LockYUVOverlay(bmp); //锁定这个YUV覆盖,因为我们将要去改写它
				//YVU模式
				//pFrameYUV->data[0] = bmp->pixels[0];//将三个通道数据分别指向YUV覆盖的三个平面
				//pFrameYUV->data[1] = bmp->pixels[2];
				//pFrameYUV->data[2] = bmp->pixels[1];
				//pFrameYUV->linesize[0] = bmp->pitches[0];
				//pFrameYUV->linesize[1] = bmp->pitches[2];
				//pFrameYUV->linesize[2] = bmp->pitches[1];
				//YUV模式
				pFrameYUV->data[0] = bmp->pixels[0];//将三个通道数据分别指向YUV覆盖的三个平面
				pFrameYUV->data[1] = bmp->pixels[1];
				pFrameYUV->data[2] = bmp->pixels[2];
				pFrameYUV->linesize[0] = bmp->pitches[0];//设置行大小
				pFrameYUV->linesize[1] = bmp->pitches[1];
				pFrameYUV->linesize[2] = bmp->pitches[2];
				//进行格式转换及缩放(未进行缩放)
				sws_scale(img_convert_ctx, (const uint8_t* const*)pFrame->data, pFrame->linesize, 0,pCodecCtx->height, pFrameYUV->data, pFrameYUV->linesize);

				//解锁YUV覆盖
				SDL_UnlockYUVOverlay(bmp);
				//显示YUV图片
				SDL_DisplayYUVOverlay(bmp, &rect);
				//延迟40ms,否则将解码一帧立即显示一帧,播放速度将取决于解码速度
				SDL_Delay(40);
5、SDL相关变量解释
//SDL
	int screen_w, screen_h;//窗口宽、高
	SDL_Surface *screen;//一个窗口,用于显示YUV覆盖
	SDL_Overlay *bmp;//YUV覆盖,可以理解为一张一张的图片
	SDL_Rect rect;//YUV显示区域,以窗口左上角为(0,0)
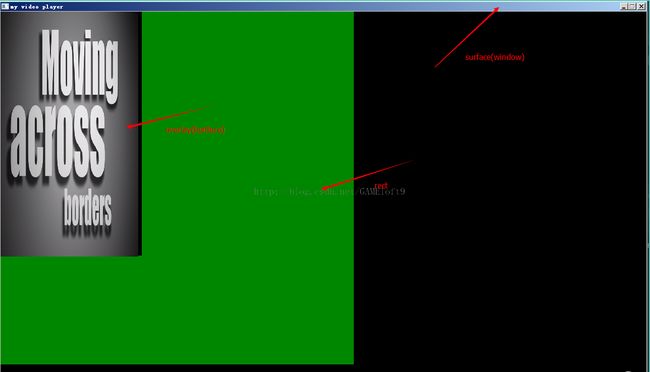
这里的surface、rect、 overlay 理解如下图所示:
其中整个窗口是surface,绿色部分是rect,左上角放映的部分就是overlay。
- SDL 2.0
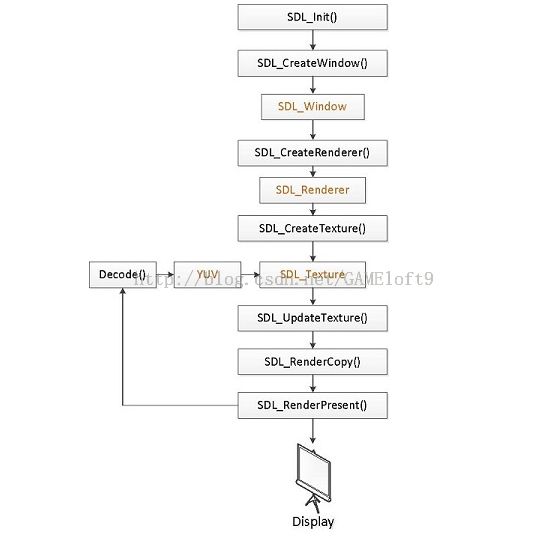
1.流程图
这里直接借鉴作者的原图,处理流程图贴出来:
这里对SDL2.0进行一下说明:
SDL_Window就是使用SDL的时候弹出的那个窗口。在SDL1.x版本中,只可以创建一个一个窗口。在SDL2.0版本中,可以创建多个窗口。
SDL_Texture用于显示YUV数据。一个SDL_Texture对应一帧YUV数据,但不等于YUV数据帧。
SDL_Renderer用于渲染SDL_Texture至SDL_Window。
SDL_Rect用于确定SDL_Texture显示的位置。注意:一个SDL_Texture可以指定多个不同的SDL_Rect,这样就可以在SDL_Window不同位置显示相同的内容(使用SDL_RenderCopy()函数),下面的代码就做了一个二分屏的例子。
关于他们的关系如下图所示:
2、源代码及注释
#include <stdio.h>
#include<stdlib.h>
#include<string.h>
//包含库
extern "C"
{
#include "libavcodec/avcodec.h"
#include "libavformat/avformat.h"
#include "libswscale/swscale.h"
#include "SDL2/SDL.h"
#include "libswresample/swresample.h"
};
int main(int argc, char* argv[])
{
	//FFmpeg相关变量
	AVFormatContext *pFormatCtx;//AVFormatContext主要存储视音频封装格式中包含的信息
	unsigned             i;
	int             videoindex;//视频流所在序号
	AVCodecContext  *pCodecCtx;//AVCodecContext,存储该视频/音频流使用解码方式的相关数据
	AVCodec         *pCodec;//解码器
	AVFrame *pFrame, *pFrameYUV;//解码后数据
	AVPacket packet;//解码前数据
	struct SwsContext *img_convert_ctx;//格式转换器
	//SDL
	SDL_Window *screen;//一个窗口,用于显示YUV覆盖
	SDL_Renderer* sdlRenderer;//渲染器
	SDL_Texture* sdlTexture;//YUV纹理,可以理解为一张一张的图片,但不同于原始图片
	SDL_Rect sdlRect;//YUV显示区域,以窗口左上角为(0,0)
	SDL_Rect sdlRect_2;
	int screen_w = 0, screen_h = 0;//窗口宽、高
	uint8_t * out_buffer;
	int ret, got_picture;
	char* filepath = "1.mp4";//输入文件
	av_register_all();//初始化libformat库和注册编解码器
	avformat_network_init();//初始化网络组件
	pFormatCtx = avformat_alloc_context();
	//打开视频文件然后读取头部信息到pFormatCtx
	if (avformat_open_input(&pFormatCtx, filepath, NULL, NULL) != 0){
		printf("Couldn't open input stream.\n");
		return -1;
	}
	//获取流信息
	if (avformat_find_stream_info(pFormatCtx, NULL) < 0){
		printf("Couldn't find stream information.\n");
		return -1;
	}
	videoindex = -1;//视频流所处的流序号,因为媒体文件还可能包含音频流
	//找到视频流的序号
	for (i = 0; i < pFormatCtx->nb_streams; i++)
		if (pFormatCtx->streams[i]->codec->codec_type == AVMEDIA_TYPE_VIDEO){
			videoindex = i;
			break;
		}
	if (videoindex == -1){
		printf("Didn't find a video stream.\n");
		return -1;
	}
	pCodecCtx = pFormatCtx->streams[videoindex]->codec;//获取解码环境
	pCodec = avcodec_find_decoder(pCodecCtx->codec_id);//获取解码器
	if (pCodec == NULL){
		printf("Codec not found.\n");
		return -1;
	}
	//打开解码器
	if (avcodec_open2(pCodecCtx, pCodec, NULL) < 0){
		printf("Could not open codec.\n");
		return -1;
	}

	pFrame = av_frame_alloc();
	pFrameYUV = av_frame_alloc();

	//为数据帧开辟存储空间
	out_buffer = (uint8_t *)av_malloc(avpicture_get_size(PIX_FMT_YUV420P, pCodecCtx->width, pCodecCtx->height));
	//avpicture_fill是让picture的data[0]、data[1]、data[2]等正确的指向av_frame_alloc()分配空间地址,
	//因为av_frame_alloc()分配的空间是一个线性地址(一个连续的缓冲区),而pFrameYUV的data[]是分别指向
	//不同的平面的,如YUV420P中的Y平面、U平面、V平面,通过avpicture_fill之后,pFrameYUV的data[]就分别指向
	//这个线性地址的不同位置了。完成avpicture_fill后,你对pFrameYUV中的data[]进行操作时,实际是操作avcodec_alloc_frame()
	//分配的空间。
	avpicture_fill((AVPicture *)pFrameYUV, out_buffer, PIX_FMT_YUV420P, pCodecCtx->width, pCodecCtx->height);

	//SDL Begin----------------------------
	//初始化SDL库
	if (SDL_Init(SDL_INIT_VIDEO | SDL_INIT_AUDIO | SDL_INIT_TIMER)) {
		printf("Could not initialize SDL - %s\n", SDL_GetError());
		return -1;
	}
	//在显示器上创建一个原始视频大小的窗口(window)
	screen_w = pCodecCtx->width;
	screen_h = pCodecCtx->height;

	screen = SDL_CreateWindow("my video player", SDL_WINDOWPOS_UNDEFINED, SDL_WINDOWPOS_UNDEFINED,
		screen_w, screen_h,
		SDL_WINDOW_OPENGL);
	if (!screen) {
		printf("SDL: could not create window - exiting:%s\n", SDL_GetError());
		return -1;
	}
	//创建渲染器
	sdlRenderer = SDL_CreateRenderer(screen, -1, 0);
	//创建纹理,可以理解为一帧一帧的图片,但不同于原始的图片
	//SDL_PIXELFORMAT_IYUV: 图像格式为YUV平面模式
	//sdlTexture = SDL_CreateTexture(sdlRenderer, SDL_PIXELFORMAT_IYUV, SDL_TEXTUREACCESS_STREAMING, pCodecCtx->width, pCodecCtx->height);
	//做二分屏
	sdlTexture = SDL_CreateTexture(sdlRenderer, SDL_PIXELFORMAT_IYUV, SDL_TEXTUREACCESS_STREAMING, pCodecCtx->width / 2, pCodecCtx->height);
	//设置显示区域
	//第一个显示区域
	sdlRect.x = 0;
	sdlRect.y = 0;
	sdlRect.w = pCodecCtx->width / 2;
	sdlRect.h = pCodecCtx->height;
	//第二个显示区域
	sdlRect_2.x = pCodecCtx->width / 2 + 20;
	sdlRect_2.y = 0;
	sdlRect_2.w = pCodecCtx->width / 2;
	sdlRect_2.h = pCodecCtx->height;

	//SDL End------------------------
	//设置scale环境,转换像素格式为PIX_FMT_YUV420P,使用SWS_BICUBIC缩放算法
	//img_convert_ctx = sws_getContext(pCodecCtx->width, pCodecCtx->height, pCodecCtx->pix_fmt, pCodecCtx->width, pCodecCtx->height, PIX_FMT_YUV420P, SWS_BICUBIC, NULL, NULL, NULL);
	//将原始图片宽度缩小1/2
	img_convert_ctx = sws_getContext(pCodecCtx->width, pCodecCtx->height, pCodecCtx->pix_fmt, pCodecCtx->width / 2, pCodecCtx->height, PIX_FMT_YUV420P, SWS_BICUBIC, NULL, NULL, NULL);
	//------------------------------

	while (av_read_frame(pFormatCtx, &packet) >= 0){//读取下一帧数据

		if (packet.stream_index == videoindex){//必须是视频流帧
			//Decode
			ret = avcodec_decode_video2(pCodecCtx, pFrame, &got_picture, &packet);//解码数据帧到pFrame
			if (ret < 0){
				printf("Decode Error.\n");
				return -1;
			}
			if (got_picture){
				//进行格式转换及缩放
				sws_scale(img_convert_ctx, (const uint8_t* const*)pFrame->data, pFrame->linesize, 0, pCodecCtx->height, pFrameYUV->data, pFrameYUV->linesize);

				//用新的数据帧更新纹理
				SDL_UpdateYUVTexture(sdlTexture, &sdlRect,
					pFrameYUV->data[0], pFrameYUV->linesize[0],
					pFrameYUV->data[1], pFrameYUV->linesize[1],
					pFrameYUV->data[2], pFrameYUV->linesize[2]);

				//清除当前正在渲染的区域
				SDL_RenderClear(sdlRenderer);
				//将纹理拷贝到待显示的区域
				SDL_RenderCopy(sdlRenderer, sdlTexture, NULL, &sdlRect);
				SDL_RenderCopy(sdlRenderer, sdlTexture, NULL, &sdlRect_2);
				SDL_RenderPresent(sdlRenderer);//进行渲染
				//延迟40ms,否则将解码一帧立即显示一帧,播放速度将取决于解码速度
				SDL_Delay(40);
			}
		}
		av_free_packet(&packet);
	}

	//FIX: Flush Frames remained in Codec
	while (1) {
		ret = avcodec_decode_video2(pCodecCtx, pFrame, &got_picture, &packet);
		if (ret < 0)//出错
			break;
		if (!got_picture)//没有可解码的数据帧
			break;
		sws_scale(img_convert_ctx, (const uint8_t* const*)pFrame->data, pFrame->linesize, 0, pCodecCtx->height, pFrameYUV->data, pFrameYUV->linesize);

		SDL_UpdateTexture(sdlTexture, &sdlRect, pFrameYUV->data[0], pFrameYUV->linesize[0]);
		SDL_RenderClear(sdlRenderer);
		SDL_RenderCopy(sdlRenderer, sdlTexture, NULL, &sdlRect);
		SDL_RenderCopy(sdlRenderer, sdlTexture, NULL, &sdlRect_2);
		SDL_RenderPresent(sdlRenderer);
		//延迟40ms,否则将解码一帧立即显示一帧,播放速度将取决于解码速度
		SDL_Delay(40);
	}
	sws_freeContext(img_convert_ctx);
	SDL_Quit();//退出SDL

	av_free(pFrameYUV);//释放帧数据占用的内存
	avcodec_close(pCodecCtx);//释放解码器环境
	avformat_close_input(&pFormatCtx);//释放输入环境
	return 0;
}
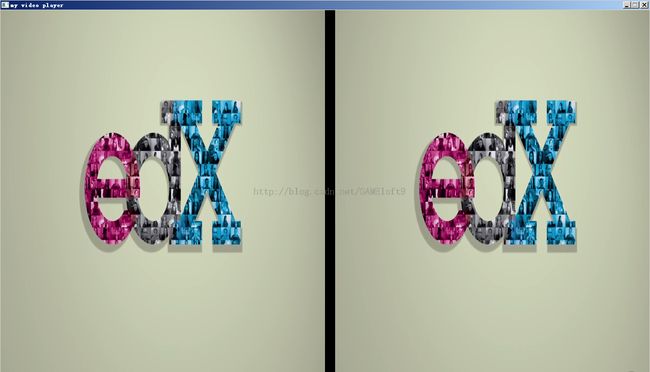
3.二分屏效果图
中间黑色的部分是隔开的20个像素的距离,便于分开两个视频。
注:
在SDL 2.0中要好好理解window,rect,avframe,texture的关系,其中window,rect,texture的关系可以参考上面的surface、rect、 overlay之间的关系,它们一一对应。此外avframe,texture也是一一对应的关系,要做到显示与数据帧大小合适,那么texture和avframe大小必须保持一致。可以将texture的大小设置的和avframe一样,也可以将avframe进行缩放以适合texture的大小。例如上面的例子中,为了做到二分屏,我将原始图像进行了缩小,以适应texture大小。


