【DirectX11-Tutorial】窗口大小和客户端区域大小Window Size and Client Size
这篇文章将了解绘制的实际大小及学习一个可以准确设置它的函数。
Window Size vs. Client Size
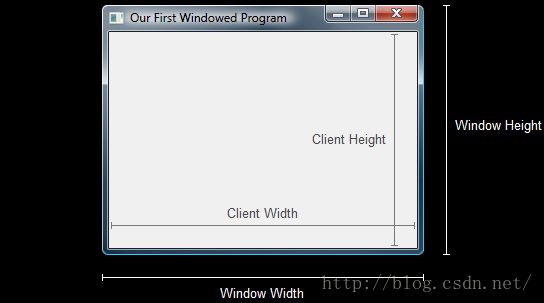
When we called CreateWindowEx(), we used 500 and 400 to set the size of the window. However, this differs from the size of the client. The client area is the portion of the window that does not include its border.
当执行CreateWindowEx()函数 时,用 500 和 400 来设置窗口的大小。然而,这不同于客户端的大小,其工作区是不包括其边框窗口的部分。
Client Size and Window Size
客户端和窗口大小
上图可以看到,窗口大小沿着边缘的边框,而客户端大小边界在窗口内部。当渲染的时候,只需要在窗口的客户端部分进行绘制。因此,了解准确的大小是很重要的。
为什么重要?因为使用 Direct3D绘图时,需要指定生成图像的大小。如果窗口的客户端区域不同于图像的大小,它就需要进行拉伸或收缩操作以适合客户端区域。
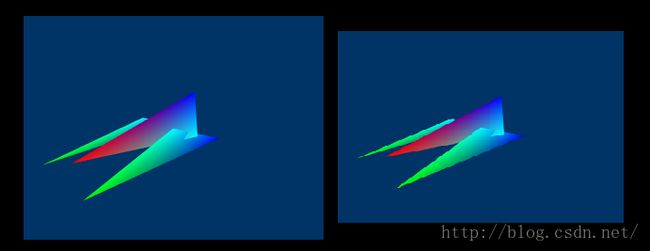
Let's compare two screenshots of an example program in a later lesson. The image on the left was taken normally, while the one on the right was taken without AdjustWIndowRect().
比较两个示例程序的屏幕截图。左边的图像是采取通常设置情况下,而右边的那个没有使用 AdjustWIndowRect()函数。在右边截图有一些明显的扭曲。它们在创建时进行缩小操作以适合客户端区域。
Rendering With and Without AdjustWindowRect()
是否使用AdjustWindowRect()函数进行渲染
The AdjustWindowRect() Function
与设置窗口大小,然后确定客户端的大小相比较而言,更为理想的情况是先确定客户端的大小,然后计算出相应的窗口大小。为此将在创建窗口之前使用 AdjustWindowRect() 函数。
它所做的是选取所需的大小和我们的客户端区域的位置和计算必要窗口的位置和大小,以创建该客户端的大小。
以下是函数原型 ︰
BOOL AdjustWindowRect(LPRECT lpRect,

                      DWORD dwStyle,

                      BOOL bMenu);
第一个参数是一个指针,指向一个 RECT 结构。指矩形包含所需的客户端区域的坐标。当调用该函数时,RECT 被修改为包含窗口区域的坐标。
第二个参数是窗口样式。该函数使用此信息来确定窗口边框的大小。
第三个参数是一个布尔值,告诉该函数是否正在使用的菜单。菜单不是客户端区域技术范围内的操作,所以它必须考虑到。
此功能在真正的代码中什么样子?以下修改后的CreateWindowEx() ︰
RECT wr = {0, 0, 500, 400};    // set the size, but not the position

AdjustWindowRect(&wr, WS_OVERLAPPEDWINDOW, FALSE);    // adjust the size

// create the window and use the result as the handle

hWnd = CreateWindowEx(NULL,

                      L"WindowClass1",

                      L"Our First Windowed Program",

                      WS_OVERLAPPEDWINDOW,

                      300,    // x-position of the window

                      300,    // y-position of the window

                      wr.right - wr.left,    // width of the window

                      wr.bottom - wr.top,    // height of the window

                      NULL,

                      NULL,

                      hInstance,

                      NULL);
有几个新行的代码在这里,让我们看看每一个,他们到底做了什么:
RECT wr = {0, 0, 500, 400};
这是一个简单的语句。创建 rect 并初始化它与所需客户端区域的大小。不需要实放置在 '左' 和 '顶' 值的位置。
AdjustWindowRect(&wr, WS_OVERLAPPEDWINDOW, FALSE);
After the RECT is initialized, we call the AdjustWindowRect() function. We fill it with the address of the RECT, the window style, and FALSE to indicate there is no menu.
RECT 初始化后,调用 AdjustWindowRect() 函数。以不指示菜单的地址作为它的参数之一,两外两个参数是窗口样式和 FALSE 。
wr.right - wr.left,
wr.bottom - wr.top,
当调用 AdjustWindowRect() 时,窗口宽度将不同于右左之间的距离,高度也不同于底部和顶部之间距离。使用这两个语句,会得到正确大小的窗口长宽。
Adding the New Code
这里是我们新的代码,包括 AdjustWindowRect() 函数。
// include the basic windows header file
#include <windows.h>
#include <windowsx.h>

// the WindowProc function prototype
LRESULT CALLBACK WindowProc(HWND hWnd,
                         UINT message,
                         WPARAM wParam,
                         LPARAM lParam);

// the entry point for any Windows program
int WINAPI WinMain(HINSTANCE hInstance,
                   HINSTANCE hPrevInstance,
                   LPSTR lpCmdLine,
                   int nCmdShow)
{
    // the handle for the window, filled by a function
    HWND hWnd;
    // this struct holds information for the window class
    WNDCLASSEX wc;

    // clear out the window class for use
    ZeroMemory(&wc, sizeof(WNDCLASSEX));

    // fill in the struct with the needed information
    wc.cbSize = sizeof(WNDCLASSEX);
    wc.style = CS_HREDRAW | CS_VREDRAW;
    wc.lpfnWndProc = WindowProc;
    wc.hInstance = hInstance;
    wc.hCursor = LoadCursor(NULL, IDC_ARROW);
    wc.hbrBackground = (HBRUSH)COLOR_WINDOW;
    wc.lpszClassName = L"WindowClass1";

    // register the window class
    RegisterClassEx(&wc);

    // calculate the size of the client area
    RECT wr = {0, 0, 500, 400};    // set the size, but not the position
    AdjustWindowRect(&wr, WS_OVERLAPPEDWINDOW, FALSE);    // adjust the size

    // create the window and use the result as the handle
    hWnd = CreateWindowEx(NULL,
                          L"WindowClass1",    // name of the window class
                          L"Our First Windowed Program",   // title of the window
                          WS_OVERLAPPEDWINDOW,    // window style
                          300,    // x-position of the window
                          300,    // y-position of the window
                          wr.right - wr.left,    // width of the window
                          wr.bottom - wr.top,    // height of the window
                          NULL,    // we have no parent window, NULL
                          NULL,    // we aren't using menus, NULL
                          hInstance,    // application handle
                          NULL);    // used with multiple windows, NULL

    // display the window on the screen
    ShowWindow(hWnd, nCmdShow);

    // enter the main loop:

    // this struct holds Windows event messages
    MSG msg;

    // wait for the next message in the queue, store the result in 'msg'
    while(GetMessage(&msg, NULL, 0, 0))
    {
        // translate keystroke messages into the right format
        TranslateMessage(&msg);

        // send the message to the WindowProc function
        DispatchMessage(&msg);
    }

    // return this part of the WM_QUIT message to Windows
    return msg.wParam;
}

// this is the main message handler for the program
LRESULT CALLBACK WindowProc(HWND hWnd, UINT message, WPARAM wParam, LPARAM lParam)
{
    // sort through and find what code to run for the message given
    switch(message)
    {
        // this message is read when the window is closed
        case WM_DESTROY:
            {
                // close the application entirely
                PostQuitMessage(0);
                return 0;
            } break;
    }

    // Handle any messages the switch statement didn't
    return DefWindowProc (hWnd, message, wParam, lParam);
}
当运行这个程序时,会发现其实并无不同的结果。事实是,不会看到的差异,直到在游戏编程中使用 AdjustWindowRect()。

