Spark源码分析(七)存储管理2
上章讲了一些基础概念,本章我们着重从源代码的角度分析存储管理模块
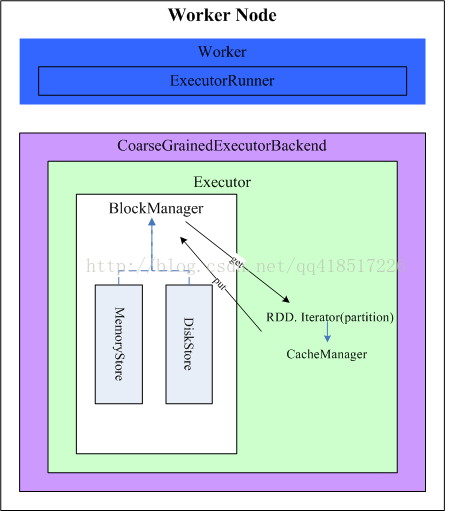
BlockManager最重要的就是存取数据块,也就是get和put这两个方法,而这两个方法都是基于MemoryStore和DiskStore,即内存缓存和磁盘缓存,见下图,首先介绍这两个类
MemoryStore
  case class Entry(value: Any, size: Long, deserialized: Boolean)

  private val entries = new LinkedHashMap[BlockId, Entry](32, 0.75f, true)
其中数据块的内容又被包装成为了结构体Entry。由于所有持久化在内存缓存中的数据块是由背后的Java虚拟机进行管理的,因此内存缓存只需维护一个存储其内存引用的简单的哈希表即可
在内存中有一个重要的问题是,当内存不足或已经到达所设置的阈值时应如何处理?在Spark中对于内存缓存可使用的内存阈值有这样一个配置:spark.storage.memoryFraction。默认情况下是0.6,也就是说JVM heap的60%可被内存缓存用来存储块内容。
  private def ensureFreeSpace(blockIdToAdd: BlockId, space: Long): ResultWithDroppedBlocks = {
    logInfo("ensureFreeSpace(%d) called with curMem=%d, maxMem=%d".format(
      space, currentMemory, maxMemory))

    val droppedBlocks = new ArrayBuffer[(BlockId, BlockStatus)]

    if (space > maxMemory) {//直接返回存不下该block
      logInfo("Will not store " + blockIdToAdd + " as it is larger than our memory limit")
      return ResultWithDroppedBlocks(success = false, droppedBlocks)
    }

    if (maxMemory - currentMemory < space) {//内存空间不够
      val rddToAdd = getRddId(blockIdToAdd)
      val selectedBlocks = new ArrayBuffer[BlockId]()
      var selectedMemory = 0L

      // This is synchronized to ensure that the set of entries is not changed
      // (because of getValue or getBytes) while traversing the iterator, as that
      // can lead to exceptions.
      entries.synchronized {
        val iterator = entries.entrySet().iterator()//因为是LinkHashMap,所以是按最旧的block到最新的block读取
        while (maxMemory - (currentMemory - selectedMemory) < space && iterator.hasNext) {//删除现有的block,直到能放下新的block
          val pair = iterator.next()
          val blockId = pair.getKey
          if (rddToAdd.isEmpty || rddToAdd != getRddId(blockId)) {
            selectedBlocks += blockId
            selectedMemory += pair.getValue.size
          }
        }
      }

      if (maxMemory - (currentMemory - selectedMemory) >= space) {//将删除选中的block
        logInfo(selectedBlocks.size + " blocks selected for dropping")
        for (blockId <- selectedBlocks) {
          val entry = entries.synchronized { entries.get(blockId) }
          // This should never be null as only one thread should be dropping
          // blocks and removing entries. However the check is still here for
          // future safety.
          if (entry != null) {
            val data = if (entry.deserialized) {
              Left(entry.value.asInstanceOf[ArrayBuffer[Any]])
            } else {
              Right(entry.value.asInstanceOf[ByteBuffer].duplicate())
            }
            val droppedBlockStatus = blockManager.dropFromMemory(blockId, data)
            droppedBlockStatus.foreach { status => droppedBlocks += ((blockId, status)) }
          }
        }
        return ResultWithDroppedBlocks(success = true, droppedBlocks)
      } else {
        logInfo(s"Will not store $blockIdToAdd as it would require dropping another block " +
          "from the same RDD")
        return ResultWithDroppedBlocks(success = false, droppedBlocks)//内存为空都存不下该block
      }
    }
    ResultWithDroppedBlocks(success = true, droppedBlocks)//直接返回存的下该block
  }
相对于MemoryStore的存数据,取数据比较简单,就是对哈希表进行操作
DiskStore
数据块会被存放到磁盘中的特定目录下,当我们配置spark.local.dir时,我们就配置了存储管理模块磁盘缓存存放数据的目录。DiskBlockManager初始化时(在BlockManager中)会在这些目录下创建Spark磁盘缓存文件夹,文件夹的命名方法方式是:spark-local-yyyyMMddHHmmss-xxxx,其中xxxx是一随机数。此后这个Spark程序所有的Block都将存储到这些创建的目录中。
首先我们先看DiskStore存数据,DiskStore.putValues会调用DiskBlockManager.getFile得到一个文件,然后再写入数据。在磁盘缓存中,一个数据块对应着一个文件
  def getFile(filename: String): File = {
    // Figure out which local directory it hashes to, and which subdirectory in that
    val hash = Utils.nonNegativeHash(filename)
    val dirId = hash % localDirs.length
    val subDirId = (hash / localDirs.length) % subDirsPerLocalDir


    // Create the subdirectory if it doesn't already exist
    var subDir = subDirs(dirId)(subDirId)
    if (subDir == null) {
      subDir = subDirs(dirId).synchronized {
        val old = subDirs(dirId)(subDirId)
        if (old != null) {
          old
        } else {
          val newDir = new File(localDirs(dirId), "%02x".format(subDirId))
          newDir.mkdir()
          subDirs(dirId)(subDirId) = newDir
          newDir
        }
      }
    }
    new File(subDir, filename)
  }
上述代码中,首先对数据块名称计算出哈希值,并将哈希值取模获得dirId和subDirId,这就获得了该块所需存储的路径了。其次在该路径上若还没有建立相应的文件夹,就先创建文件夹。最后在上述获得的路径以块名称作为文件名,就建立了数据块和相应文件路径及文件名的映射了。总而言之,数据块对应的文件路径为:/dirId/subDirId/BlockId,存取块内容就变成了写入和读取相应的文件了。再看DiskStore取数据,DiskStore.getBytes=>DiskBlockManager.getBlockLocation
  def getBlockLocation(blockId: BlockId): FileSegment = {
    if (blockId.isShuffle && shuffleManager.consolidateShuffleFiles) {//如果是shuffle文件,会调用ShuffleBlockManager的方法
      shuffleManager.getBlockLocation(blockId.asInstanceOf[ShuffleBlockId])
    } else {
      val file = getFile(blockId.name)
      new FileSegment(file, 0, file.length())
    }
  }
BlockManager get and put
上面介绍了MemoryStore和DiskStore对于Block的存取操作,那么我们是要直接与它们交互存取数据吗?还是封装了更抽象的接口使我们无需关心底层?BlockManager为我们提供了put和get函数,用户可以使用这两个函数对block进行存取而无需关心底层实现。
首先我们看下BlockManager.put函数,对于put函数,主要分为3个步骤
1、为block创建BlockInfo对象存储block相关信息
2、根据block的storage level将block存储到memory或disk上
3、根据block的replication数决定是否将该block复制到远端,主要调用BlockManagerWorker.syncPutBlock=>ConnectionManager.sendMessageReliableySync,这是一个异步操作,返回来的应答就在关键字Promise中,那应答在哪会写入呢?看接下去的步骤:
1、ConnectionManager.sendMessageReliableySync会封装一个MessageStatus对象存放应答信息,之后会封装一个SendingConnection对象将block的信息发送到其他的节点的ConnectionManager上
2、ConnectionManagr采用NIO的方式读取发送数据,所以在ConnectionManager初始化时会监听请求,接收到请求后会创建ReceivingConnection对象读取请求,然后接收端调用handleMessage方法执行else后的代码
3、发送端接收到请求也会调用handleMessage方法执行else前的代码,它将应答写入到之前的MessageStatus中,同时调用promise.success(s.ackMessage)返回结果完成通信
  private def handleMessage(
      connectionManagerId: ConnectionManagerId,
      message: Message,
      connection: Connection) {
    logDebug("Handling [" + message + "] from [" + connectionManagerId + "]")
    message match {
      case bufferMessage: BufferMessage => {
        if (authEnabled) {
          val res = handleAuthentication(connection, bufferMessage)
          if (res == true) {
            // message was security negotiation so skip the rest
            logDebug("After handleAuth result was true, returning")
            return
          }
        }
        if (bufferMessage.hasAckId) {
          val sentMessageStatus = messageStatuses.synchronized {
            messageStatuses.get(bufferMessage.ackId) match {
              case Some(status) => {
                messageStatuses -= bufferMessage.ackId
                status
              }
              case None => {
                throw new Exception("Could not find reference for received ack message " +
                  message.id)
                null
              }
            }
          }
          sentMessageStatus.synchronized {
            sentMessageStatus.ackMessage = Some(message)
            sentMessageStatus.attempted = true
            sentMessageStatus.acked = true
            sentMessageStatus.markDone()
          }
        } else {
          val ackMessage = if (onReceiveCallback != null) {
            logDebug("Calling back")
            onReceiveCallback(bufferMessage, connectionManagerId)// 很关键,会调用BlockManagerWorker的blockManager.connectionManager.onReceiveMessage(onBlockMessageReceive)存取block
          } else {
            logDebug("Not calling back as callback is null")
            None
          }
          ......
          sendMessage(connectionManagerId, ackMessage.getOrElse {
            Message.createBufferMessage(bufferMessage.id)
          })
        }
      }
      case _ => throw new Exception("Unknown type message received")
    }
  }
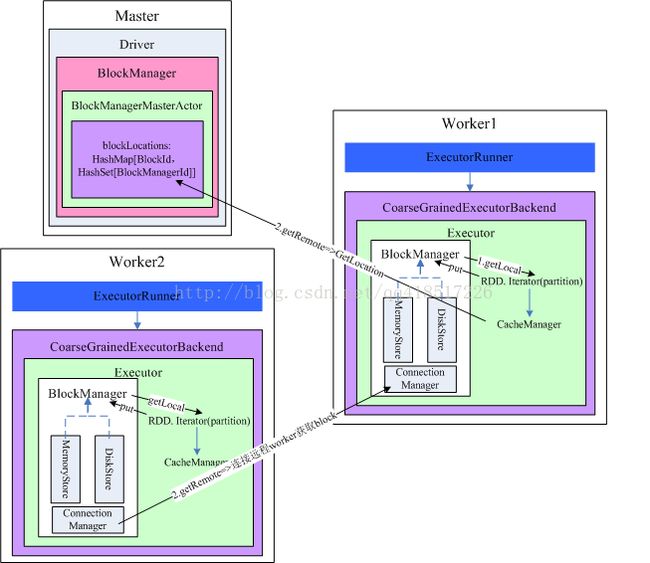
再看下BlockManager.get函数,对于get函数,主要分为本地读取数据块和远程读取数据块
1、本地读取根据
从内存、Tachyon、磁盘都找一遍
2、远程读取数据
调用BlockManagerWorker.syncGetBlock,和BlockManager.put的思路一样
下面用一张图总结一下整个BlockManager读取block的流程
<原创,转载请注明出处http://blog.csdn.net/qq418517226/article/details/42711067>

