CentOS 7下的MariaDB Master-Slave Replication配置
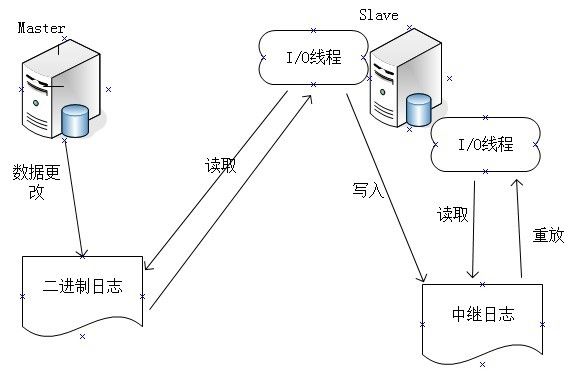
Master-Slave Replication原理图:
主从复制的原理:
分为同步复制和异步复制,实际复制架构中大部分为异步复制。 复制的基本过程如下:
1).Slave上面的IO进程连接上Master,并请求从指定日志文件的指定位置(或者从最开始的日志)之后的日志内容;
2).Master接收到来自Slave的IO进程的请求后,通过负责复制的IO进程根据请求信息读取制定日志指定位置之后的日志信息,返回给Slave 的IO进程。返回信息中除了日志所包含的信息之外,还包括本次返回的信息已经到Master端的bin-log文件的名称以及bin-log的位置;
3).Slave的IO进程接收到信息后,将接收到的日志内容依次添加到Slave端的relay-log文件的最末端,并将读取到的Master端的 bin-log的文件名和位置记录到master-info文件中,以便在下一次读取的时候能够清楚的告诉Master“我需要从某个bin-log的哪个位置开始往后的日志内容,请发给我”;
4).Slave的Sql进程检测到relay-log中新增加了内容后,会马上解析relay-log的内容成为在Master端真实执行时候的那些可执行的内容,并在自身执行。
为什么是MariaDB Replication
As you may know, MariaDB is a drop in replacement for MySQL. It is a robust, scalable and reliable SQL server that comes rich set of enhancements.
MariaDB replication is a method to store multiple copies of data on many systems, and the data will automatically be copied from one database (Master) to another database (Slave). If one server goes down, the clients still can access the data from another (Slave) server database.
In this article, let us see how to configure MariaDB Master-Slave replication in CentOS 7. This method will work on all linux distributions, including RHEL, CentOS, Ubuntu, and openSUSE etc. All you need to know is how to install MariaDB in the specific distribution you use.
环境:
MariaDB Master: CentOS 7 64bit Minimal Server
Master IP Address: 192.168.15.134/24
MariaDB Slave: CentOS 7 64bit Minimal Server
Slave IP Address: 192.168.15.138/24
不同Linux版本,MariaDB安装略有不同(Installing LAMP Stack in Linux)
Master与Slave均操作
安装MariaDB:
yum install mariadb-server mariadb
启动MariaDB并开机启动:
systemctl start mariadb
systemctl enable mariadb
设置MariaDB root密码:
mysql_secure_installation
配置Master MariaDB:
firewall-cmd --permanent --add-port=3306/tcp #放行3306端口
firewall-cmd --reload
vi /etc/my.cnf #添加如下至[mysqld]部分
[mysqld]
server-id=1
log-basename=master
log-bin
binlog-format=row
binlog-do-db=games
#binlog-ignore-db=test
[...]
#binlog-format binlog三种格式:row/statement/mixed
#binlog-do-db 要同步的数据库,同步多个,重复设置即可
#games 为要复制到Slave的数据库名称
systemctl restart mariadb #重启MariaDB
mysql -u root -p #登录Master MariaDB
创建Slave用户并设置密码,获取相应的Binlog及Pos信息供后续使用:
MariaDB [(none)]> STOP SLAVE;
Query OK, 0 rows affected, 1 warning (0.00 sec)
MariaDB [(none)]> GRANT REPLICATION SLAVE ON *.* TO 'sk'@'%' IDENTIFIED BY 'centos';
Query OK, 0 rows affected (0.00 sec)
MariaDB [(none)]> FLUSH PRIVILEGES;
Query OK, 0 rows affected (0.00 sec)
MariaDB [(none)]> FLUSH TABLES WITH READ LOCK;
Query OK, 0 rows affected (0.00 sec)
MariaDB [(none)]> SHOW MASTER STATUS;
+--------------------+----------+--------------+------------------+
| File | Position | Binlog_Do_DB | Binlog_Ignore_DB |
+--------------------+----------+--------------+------------------+
| mariadb-bin.000001 | 460 | games | |
+--------------------+----------+--------------+------------------+
1 row in set (0.00 sec)
MariaDB [(none)]> exit
Bye
备份Master MariaDB,关闭锁表,并上传备份masterdatabase.sql 到Slave
mysqldump --all-databases --user=root --password --master-data > masterdatabase.sql
mysql -u root -p #登录Master MariaDB
MariaDB [(none)]> UNLOCK TABLES;
Query OK, 0 rows affected (0.00 sec)
MariaDB [(none)]> quit
Bye
拷贝masterdatabase.sql至Slave的/home目录。
scp masterdatabase.sql [email protected]:/home
配置Slave MariaDB:
firewall-cmd --permanent --add-port=3306/tcp #放行3306端口
firewall-cmd --reload
vi /etc/my.cnf #添加如下至[mysqld]部分
[mysqld]
server-id = 2
replicate-do-db=games
#replicate-ignore-db=games
[...]
导入Master数据:
mysql -u root -p < /home/masterdatabase.sql
systemctl restart mariadb #重启MariaDB
mysql -u root -p #登录Slave MariaDB
MariaDB [(none)]> STOP SLAVE;
Query OK, 0 rows affected (0.01 sec)
MariaDB [(none)]> CHANGE MASTER TO MASTER_HOST='192.168.15.134', MASTER_USER='sk', MASTER_PASSWORD='centos', MASTER_LOG_FILE='mariadb-bin.000001', MASTER_LOG_POS=460;
Query OK, 0 rows affected (0.03 sec)
MariaDB [(none)]> SLAVE START;
Query OK, 0 rows affected (0.01 sec)
MariaDB [(none)]> show slave status\G;
*************************** 1. row ***************************
Slave_IO_State: Waiting for master to send event
Master_Host: 192.168.15.134
Master_User: sk
Master_Port: 3306
Connect_Retry: 60
Master_Log_File: mariadb-bin.000001
Read_Master_Log_Pos: 460
Relay_Log_File: mariadb-relay-bin.000002
Relay_Log_Pos: 531
Relay_Master_Log_File: mariadb-bin.000001
Slave_IO_Running: Yes
Slave_SQL_Running: Yes
Replicate_Do_DB: games
Replicate_Ignore_DB:
Replicate_Do_Table:
Replicate_Ignore_Table:
Replicate_Wild_Do_Table:
Replicate_Wild_Ignore_Table:
Last_Errno: 0
Last_Error:
Skip_Counter: 0
Exec_Master_Log_Pos: 460
Relay_Log_Space: 827
Until_Condition: None
Until_Log_File:
Until_Log_Pos: 0
Master_SSL_Allowed: No
Master_SSL_CA_File:
Master_SSL_CA_Path:
Master_SSL_Cert:
Master_SSL_Cipher:
Master_SSL_Key:
Seconds_Behind_Master: 0
Master_SSL_Verify_Server_Cert: No
Last_IO_Errno: 0
Last_IO_Error:
Last_SQL_Errno: 0
Last_SQL_Error:
Replicate_Ignore_Server_Ids:
Master_Server_Id: 1
1 row in set (0.00 sec)
注:
Slave_IO_Running: Yes
Slave_SQL_Running: Yes
保证以上两个参数为Yes,否则检查master/slave配置步骤
测试MariaDB复制:
mysql -u root -p
MariaDB [(none)]> create database games;
Query OK, 1 row affected (0.00 sec)
MariaDB [(none)]> use games;
Database changed
MariaDB [games]> create table sample(c int);
Query OK, 0 rows affected (0.01 sec)
MariaDB [games]> insert into sample (c) values (1);
Query OK, 1 row affected (0.01 sec)
MariaDB [games]> select * from sample;
+------+
| c |
+------+
| 1 |
+------+
1 row in set (0.00 sec)
MariaDB [games]>
Slave MariaDB端检测
mysql -u root -p
Then, run the following commands to verify whether the entries have been replicated correctly.
MariaDB [(none)]> show databases;
+--------------------+
| Database |
+--------------------+
| information_schema |
| games |
| mysql |
| performance_schema |
+--------------------+
MariaDB [(none)]> use games;
Reading table information for completion of table and column names
You can turn off this feature to get a quicker startup with -A
Database changed
MariaDB [games]> select * from sample;
+------+
| c |
+------+
| 1 |
+------+
1 row in set (0.00 sec)
MariaDB [games]>
类似article
Setup Master-Slave Replication in MySQL Server
