Android性能优化之布局优化总结
布局优化,就是尽可能的减少布局文件的层级,布局结构层级少,绘制工作量也就少了,那么程序的性能自然就提高了。
如何进行布局优化?
1.首先五大布局中经常使用的RelativeLayout、LinearLayout,其次是FrameLayout,剩下的两种TableLayout一般偶尔使用一下,绝对布局由于屏幕适配的原因几乎没人使用。
1.RelativeLayout和LinearLayout都可以解决的,坚决使用LinearLayout,这是因为RelativeLayout的功能比较复杂,它的布局过程需要花费更多的Cpu时间。
2.LinearLayout需要嵌套多层布局才可实现的布局,可以考虑看看RelativeLayout,TableLayout能不能解决,可以就用RelativeLayout,TableLayout,因为嵌套更耗cpu。
3.同样FrameLayout可以解决的也不要使用RelativeLayout,FrameLayout和LinearLayout都是简单高效的布局。
2.其次使用标签.标签和标签
include主要用于布局的重用。
merge用于减少布局的层级,需要和include配合使用。
1.include 的用法
比如说下面一个布局include_layout,在多个地方使用。
<?xml version="1.0" encoding="utf-8"?>
<LinearLayout xmlns:android="http://schemas.android.com/apk/res/android" android:layout_width="match_parent" android:layout_height="wrap_content" android:orientation="vertical" >

    <Button  android:layout_width="match_parent" android:layout_height="wrap_content" android:text="第一个按钮" android:textColor="@android:color/black" android:textSize="20sp" />

    <Button  android:layout_width="match_parent" android:layout_height="wrap_content" android:text="第二个按钮" android:textColor="@android:color/black" android:textSize="20sp" />

</LinearLayout>
那么在另一个布局中可以这样引用:
<?xml version="1.0" encoding="utf-8"?>
<LinearLayout xmlns:android="http://schemas.android.com/apk/res/android" android:layout_width="match_parent" android:layout_height="match_parent" android:orientation="vertical" >
    <include layout="@layout/include_layout" />
</LinearLayout>
通过这种方式就不用把include_layout这个布局再重复写一遍。
使用include需要注意的地方
1.它只支持android:id和以android:layout_###开头的属性,其他属性不支持
2.include自身指定了id,它所引用的布局也指定了id,那么以include自身的id为准。
3.当使用android:layout_##属性的时候,必须要有android:layout_width和android:layout_height.
否则不会生效,就像下面这样;
<?xml version="1.0" encoding="utf-8"?>
<LinearLayout xmlns:android="http://schemas.android.com/apk/res/android" android:layout_width="match_parent" android:layout_height="match_parent" android:orientation="vertical" >

    <include  android:id="@+id/new_title" android:layout_width="wrap_content" android:layout_height="wrap_content" android:layout_weight="1" layout="@layout/include_layout" />

</LinearLayout>
2.merg的用法
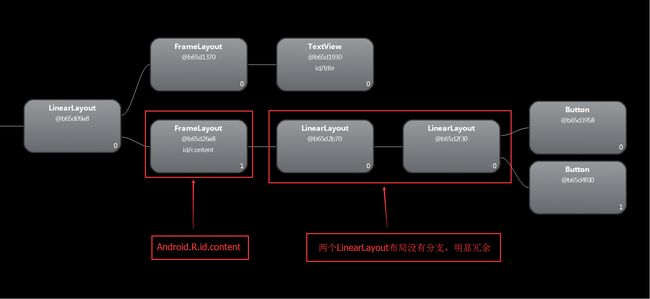
上面布局一眼就能看出来是含有多余的层级,最外层是线性布局,include的布局也还是线性布局,所以说多余了。这里我们采用 Hieracrchy Viewer来看一下布局树信息。这个工具位于sdk\tools\hieracrchyviewer.bat.
可以看到setContentView添加进来的布局分支多余了,这样会降低性能。现在我们使用merge,修改include_layout,只是将LinearLayout替换成了merge,~~~xml片段如下:
<?xml version="1.0" encoding="utf-8"?>
<merge xmlns:android="http://schemas.android.com/apk/res/android" android:id="@+id/include_id" android:layout_width="match_parent" android:layout_height="wrap_content" android:background="#ff0099" android:orientation="vertical" >

    <Button  android:layout_width="match_parent" android:layout_height="wrap_content" android:text="第一个按钮" android:textColor="@android:color/black" android:textSize="20sp" />

    <Button  android:layout_width="match_parent" android:layout_height="wrap_content" android:text="第二个按钮" android:textColor="@android:color/black" android:textSize="20sp" />

</merge>
同样使用include标签引入这个布局之后,运行程序,我们再次使用hierarchyviewer.bat查看,截图如下:
可以看到层次明显少了,这样性能就上来了。merge可以去掉多余的那一层布局。
3 ViewStub的用法
ViewStub继承了View,它非常轻量级,宽高都是0,本身不参与任何的布局和绘制过程,只有在需要加载的时候才会显示出来,一旦加载出来之后ViewStub就不存在了,取而代之的是他所加载的布局。另外,ViewStub不支持merge标签,两者不能共用。
比如我们还是要延迟加载include_layout原来这个布局(里面的merge要改成LinearLayout)xml里面的布局:
<?xml version="1.0" encoding="utf-8"?>
<LinearLayout xmlns:android="http://schemas.android.com/apk/res/android" android:layout_width="match_parent" android:layout_height="match_parent" android:orientation="vertical" >

    <ViewStub  android:id="@+id/stub_import" android:layout_width="wrap_content" android:layout_height="wrap_content" android:layout_weight="1" android:background="#00ff00" android:inflatedId="@+id/inflatedId" android:layout="@layout/include_layout" />

</LinearLayout>
代码里面加载这个布局的方式有两种:
    protected void onCreate(Bundle savedInstanceState) {
        super.onCreate(savedInstanceState);
        setContentView(R.layout.activity_main);
        ViewStub stub = (ViewStub) findViewById(R.id.stub_import);
        // 第一种方式
        // stub.setVisibility(View.VISIBLE);
        // 第二种方式
        View inflateView = stub.inflate();//返回的你要加载的那个布局对象
    }
第二种方式好处可以返回你要加载的布局对象。
使用viewStub需要注意的地方:
1.它只支持android:id和以android:layout_###开头的属性,其他属性不支持
2.当View被加载出来之后,一旦设置android:inflatedId中的id会被设置成view的id(view自身带有的id会 被覆盖,没有设置android:inflateId的话,view还会使用自身的id)
3.当使用android:layout_##属性的时候,必须要有android:layout_width和android:layout_height.
否则不会生效,编译都不会通过。
4.ViewStub一旦加载完了view之后,它就会被从父容器里面移除,所以inflate()只能调用一次,否则会抛异常“ViewStub must have a non-null ViewGroup viewParent”,这一点可以从inflate的源代码中获知。
  public View inflate() {
          //首先获取父容器对象
        final ViewParent viewParent = getParent();
        //第一次肯定不是空,而且属于五大布局,这个条件为true
        if (viewParent != null && viewParent instanceof ViewGroup) {
            if (mLayoutResource != 0) {
                final ViewGroup parent = (ViewGroup) viewParent;
                final LayoutInflater factory;
                if (mInflater != null) {
                    factory = mInflater;
                } else {
                    factory = LayoutInflater.from(mContext);
                }
                //使用布局加载器加载了这个view对象,但没有添加到父容器中
                final View view = factory.inflate(mLayoutResource, parent,
                        false);
             //如果android:inflateId有被赋值的话,这个条件为true
                if (mInflatedId != NO_ID) {
               //重新为为view设置inflatedId的id
                    view.setId(mInflatedId);
                }
                //获取这个viewstub对象在父容器中的位置索引index
                final int index = parent.indexOfChild(this);
               /** *将这个viewstub对象从父容器里面移除,这个viewstub对象不再父容器中, *再次条用inflate()会破异常, *因为方法最开始的 ViewParent viewParent = getParent(),是空值, *破最下面的异常 */
                parent.removeViewInLayout(this);
                //将下载好的view添加到父容器中
                final ViewGroup.LayoutParams layoutParams = getLayoutParams();
                if (layoutParams != null) {
                    parent.addView(view, index, layoutParams);
                } else {
                    parent.addView(view, index);
                }
                mInflatedViewRef = new WeakReference<View>(view);
                if (mInflateListener != null) {
                    mInflateListener.onInflate(this, view);
                }
                return view;
            } else {
                throw new IllegalArgumentException("ViewStub must have a valid layoutResource");
            }
        } else {
            throw new IllegalStateException("ViewStub must have a non-null ViewGroup viewParent");
        }
    }
