龙书D3D11章节习题答案(第七章)
以下答案仅供参考,有错欢迎留言。
Chapter 7 : Lighting
这一章的内容相对来说比较简单,没有什么复杂的步骤,但也需要多尝试得到不同的视觉效果。
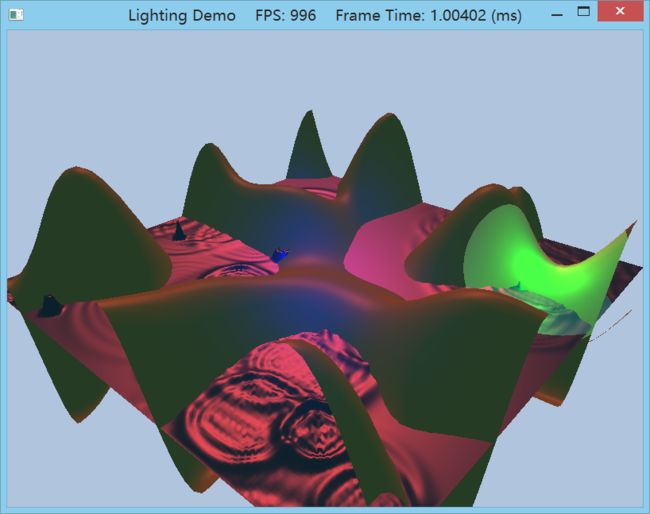
1. Modify the lighting demo of this chapter so that the directional light only emits red light, the point light only emits
green light, and the spotlight only emits blue light. Using colored lights can be useful for different game moods;
for example, a red light might be used to signify emergency situations.
在LightApp::LightApp中按要求修改mDirLight, mPointLight, mSpotLight的值即可,具体改哪些要根据实际情况。
例如,修改方向光为红光,是修改ambient为红光还是修改diffuse为红光,还是specular?
视觉效果上,ambient设为红光,山岭红色要深很多且比较均匀,而且拖动鼠标左键绕y轴旋转场景时,山岭的所有面都是红的(原色为绿色)。
再把ambient改回为原先的值,试试设置diffuse为红光,这时由于漫反射还需要根据郎伯余弦定律来决定每个方向反射回光的强度,所以拖动鼠标左键绕y轴旋转场景时,山背向的一面仍然是绿的,且红光照射到的部分红色显然是扩散开的,非均匀,显然修改diffuse比较有现实感,而diffuse呢则次要一点,你如果想把整个场景调得更红一点就可以改diffuse为淡红色。
而specular的值呢,对山岭这样的粗糙表面没什么影响,但影响到光照射到水面上反射过来的颜色,所以还需要specular模拟光照在水面上的效果。
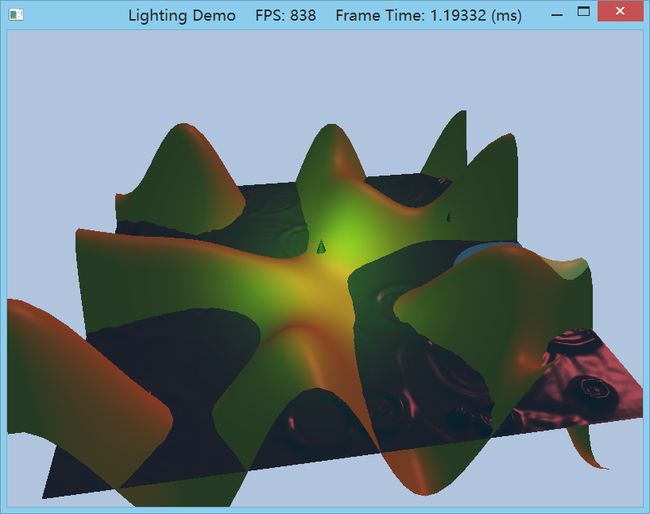
只修改diffuse为红光的效果图如下:
再设置specular为红光,这里我觉得场景有点暗,又调高了一点ambient。
PointLight和SpotLight也同理。
根据自己的喜好即可,重要的是模拟出自己想要的效果。
在参数上我是这样设置的:
......
	// Directional light.
	mDirLight.Ambient  = XMFLOAT4(0.3f, 0.3f, 0.3f, 1.0f);
	mDirLight.Diffuse  = XMFLOAT4(0.8f, 0.0f, 0.0f, 1.0f);
	mDirLight.Specular = XMFLOAT4(1.0f, 0.2f, 0.2f, 1.0f);


	mDirLight.Direction = XMFLOAT3(0.57735f, -0.57735f, 0.57735f);

	// Point light--position is changed every frame to animate in UpdateScene function.
	mPointLight.Ambient  = XMFLOAT4(0.3f, 0.3f, 0.3f, 1.0f);
	mPointLight.Diffuse  = XMFLOAT4(0.0f, 1.0f, 0.0f, 1.0f);
	mPointLight.Specular = XMFLOAT4(0.0f, 1.0f, 0.0f, 1.0f);


	mPointLight.Att      = XMFLOAT3(0.0f, 0.1f, 0.0f);
	mPointLight.Range    = 25.0f;

	// Spot light--position and direction changed every frame to animate in UpdateScene function.
	mSpotLight.Ambient  = XMFLOAT4(0.0f, 0.0f, 0.0f, 1.0f);
	mSpotLight.Diffuse  = XMFLOAT4(0.0f, 0.0f, 1.0f, 1.0f);
	mSpotLight.Specular =  XMFLOAT4(0.0f, 0.0f, 1.0f, 1.0f);
......
2. Modify the lighting demo of this chapter by changing the specular power material component, which controls the
“shininess” of the surface. Try p = 8 p = 32, p = 64, p = 128, p = 256, and p = 512.
比如说修改水面的光泽度,
mWavesMat.Specular = XMFLOAT4(0.8f, 0.8f, 0.8f, 256.0f);把w分量分别设置成8,32,...,512看看效果就会发现p越大则水面看起来越有光泽。
p=16
p=512
重点观察水波的形状(颜色是因为我拖得角度不大对...),显然p=16时水波包括水面看起来要比p=512来得"稠"(或者说粗糙)一点。
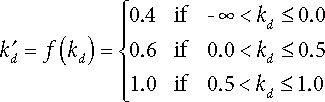
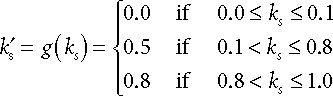
3. One characteristic of toon lighting is the abrupt transition from one color shade to the next (in contrast with a
smooth transition) as shown in Figure 7.23. This can be implemented by computing kd and ks in the usual way,
but then transforming them by discrete functions like the following before using them in the pixel shader:
Modify the lighting demo of this chapter to use this sort of toon shading. (Note: The functions f and g previously are
just sample functions to start with, and can be tweaked until you get the results you want.)
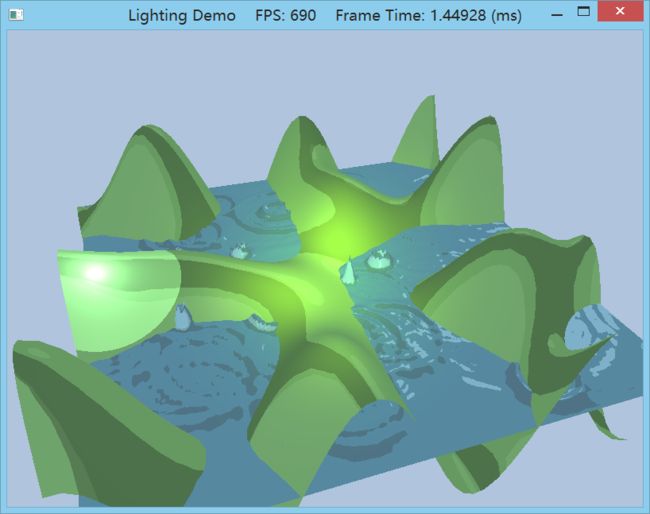
本题模拟卡通着色(toon shading)中的一个特性:颜色突变,就是说把像素点看成一大块一大块的区域,这些区域颜色相同,要做到这个效果,只需要应用题中所给的函数离散处理ks和kd。
这里我在LightHelper.fx中修改了ComputeDirectionalLight:
void ComputeDirectionalLight(Material mat, DirectionalLight L,
                             float3 normal, float3 toEye,
					         out float4 ambient,
						     out float4 diffuse,
						     out float4 spec)
{
	// Initialize outputs.
	ambient = float4(0.0f, 0.0f, 0.0f, 0.0f);
	diffuse = float4(0.0f, 0.0f, 0.0f, 0.0f);
	spec    = float4(0.0f, 0.0f, 0.0f, 0.0f);

	// The light vector aims opposite the direction the light rays travel.
	float3 lightVec = -L.Direction;

	// Add ambient term.
	ambient = mat.Ambient * L.Ambient;

	// Add diffuse and specular term, provided the surface is in
	// the line of site of the light.

	float diffuseFactor = dot(lightVec, normal);
	if(diffuseFactor <= 0.0f)
		diffuseFactor = 0.4f;
	else if(diffuseFactor <= 0.5f)
		diffuseFactor = 0.6f;
	else
		diffuseFactor = 1.0f;

	// Flatten to avoid dynamic branching.
	[flatten]
	if( diffuseFactor > 0.0f )
	{
		float3 v         = reflect(-lightVec, normal);
		float specFactor = pow(max(dot(v, toEye), 0.0f), mat.Specular.w);

		if(specFactor <= 0.1f)
			specFactor = 0.0f;
		else if(specFactor <= 0.8f)
			specFactor = 0.5f;
		else
			specFactor = 0.8f;

		diffuse = diffuseFactor * mat.Diffuse * L.Diffuse;
		spec    = specFactor * mat.Specular * L.Specular;
	}
}
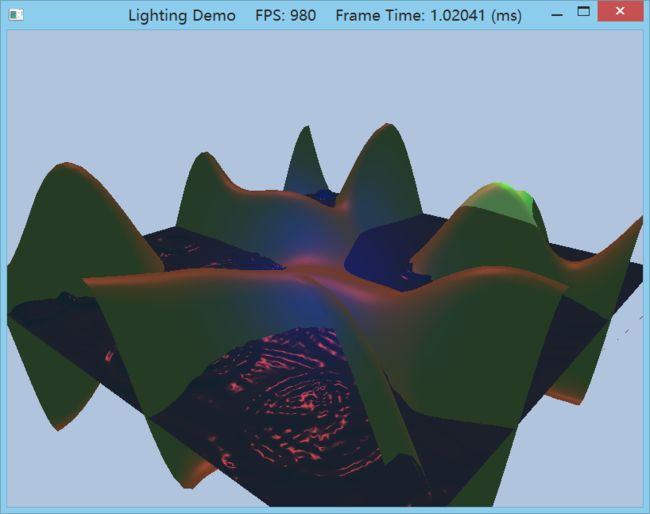
下图供大家与原图对比,看看是否颜色突变比较粗糙了。
4. Modify the lighting demo of this chapter so that the angle of the spotlight’s cone can be increased or decreased
based on user keyboard input.
获取键盘输入我是直接用的windows api:
#define KEYDOWN(vk_code) ((GetAsyncKeyState(vk_code) & 0x8000) ? 1 : 0)0x8000 即 0x1000 0000 0000 0000
自对GetAsyncKeyState函数的上一次调用以来,如键已被按过,则位0设为1;否则设为0。
在UpdateScene里加上两句:
	if(KEYDOWN(VK_UP))
		mSpotLight.Spot -= 1.0f;
	if(KEYDOWN(VK_DOWN))
		mSpotLight.Spot += 1.0f;
就可以使用方向键控制聚光灯的照射范围了~
当然你还可以设置Spot的上限和下限,或者让每次按键Spot增大/减小的速度变慢等等。