OpenCV Using Python——HSV颜色空间和改进的YCbCr颜色空间中的肤色检测
HSV颜色空间中的肤色检测
1. HSV颜色空间的肤色模型简介
Pitas等人提出在HSV空间建立肤色模型。不要求颜色归一化并且对光照鲁棒性很强,条件同时满足才会被分割成皮肤。实现条件如下:
2. 实现代码
import cv2
import numpy as np
from matplotlib import pyplot as plt
################################################################################

print 'Pixel Values Access'

imgFile = 'images/face.jpg'

# load an original image
img = cv2.imread(imgFile)
################################################################################

print 'HSV Skin Model'

rows,cols,channels = img.shape

# convert color space from bgr to rgb
img = cv2.cvtColor(img, cv2.COLOR_BGR2RGB)

# prepare an empty image space
imgSkin = np.zeros(img.shape, np.uint8)
# copy original image
imgSkin = img.copy()

# convert color space from rgb to hsv
imgHsv = cv2.cvtColor(img, cv2.COLOR_RGB2HSV)

for r in range(rows):
    for c in range(cols):

        # get values of hue, saturation and value
        # standard -- h range: [0,360]; s range: [0,1]; v range: [0,255]
        # opencv -- h range: [0,180]; s range: [0,255]; v range: [0,255]
        H = imgHsv.item(r,c,0)
        S = imgHsv.item(r,c,1)
        V = imgHsv.item(r,c,2)

        # non-skin area if skin equals 0, skin area otherwise
        skin = 0

        if ((H >= 0) and (H <= 25 / 2)) or ((H >= 335 / 2) and (H <= 360 / 2)):
            if ((S >= 0.2 * 255) and (S <= 0.6 * 255)) and (V >= 0.4 * 255):
                skin = 1
                # print 'Skin detected!'

        if 0 == skin:
            imgSkin.itemset((r,c,0),0)
            imgSkin.itemset((r,c,1),0)
            imgSkin.itemset((r,c,2),0)

# display original image and skin image
plt.subplot(1,2,1), plt.imshow(img), plt.title('Original Image'), plt.xticks([]), plt.yticks([])
plt.subplot(1,2,2), plt.imshow(imgSkin), plt.title('HSV Skin Image'), plt.xticks([]), plt.yticks([])
plt.show()
################################################################################

print 'Goodbye!'
3. 实验结果
理论上Hue和Value是分开的,即理论上HSV三通道的值确定一定在颜色空间中对应一点。然而,出现的问题是:
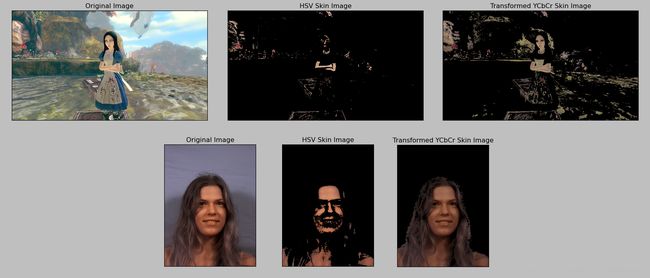
现实中改变光照(Value),色调(Hue)一定改变。无论转换到怎样的颜色空间,肤色检测实际上和颜色空间的鲁棒性关系不大。对光照鲁棒的同时也会引入很多不必要的噪声。所以看实验结果就知道:RGB空间的颜色分割很连续,但对光线敏感;HSV空间的颜色分割得支离破碎,但对光线鲁棒。
改进的YCbCr颜色空间中的肤色检测
1. 改进的YCbCr颜色空间的肤色模型简介
Hsu等人提出在YCbCr空间建立肤色模型。算法步骤如下:
(1)亮度补偿:R、G、B三通道5%非线性Gamma校正;
(2)颜色空间转换:RGB颜色空间转换到YCbCr颜色空间;
(3)使用规则作肤色分割。
2. 实现代码
import cv2
import numpy as np
from matplotlib import pyplot as plt
################################################################################

print 'Pixel Values Access'

imgFile = 'images/face.jpg'

# load an original image
img = cv2.imread(imgFile)
################################################################################

print 'YCbCr Skin Model'

rows,cols,channels = img.shape
################################################################################
# light compensation

gamma = 0.95

for r in range(rows):
    for c in range(cols):

        # get values of blue, green, red
        B = img.item(r,c,0)
        G = img.item(r,c,1)
        R = img.item(r,c,2)

        # gamma correction
        B = int(B ** gamma)
        G = int(G ** gamma)
        R = int(R ** gamma)

        # set values of blue, green, red
        img.itemset((r,c,0), B)
        img.itemset((r,c,1), G)
        img.itemset((r,c,2), R)

################################################################################

# convert color space from rgb to ycbcr
imgYcc = cv2.cvtColor(img, cv2.COLOR_BGR2YCR_CB)

# convert color space from bgr to rgb
img = cv2.cvtColor(img, cv2.COLOR_BGR2RGB)

# prepare an empty image space
imgSkin = np.zeros(img.shape, np.uint8)
# copy original image
imgSkin = img.copy()
################################################################################

# define variables for skin rules

Wcb = 46.97
Wcr = 38.76

WHCb = 14
WHCr = 10
WLCb = 23
WLCr = 20

Ymin = 16
Ymax = 235

Kl = 125
Kh = 188

WCb = 0
WCr = 0

CbCenter = 0
CrCenter = 0
################################################################################

for r in range(rows):
    for c in range(cols):

        # non-skin area if skin equals 0, skin area otherwise
        skin = 0

        ########################################################################

        # color space transformation

        # get values from ycbcr color space
        Y = imgYcc.item(r,c,0)
        Cr = imgYcc.item(r,c,1)
        Cb = imgYcc.item(r,c,2)

        if Y < Kl:
            WCr = WLCr + (Y - Ymin) * (Wcr - WLCr) / (Kl - Ymin)
            WCb = WLCb + (Y - Ymin) * (Wcb - WLCb) / (Kl - Ymin)

            CrCenter = 154 - (Kl - Y) * (154 - 144) / (Kl - Ymin)
            CbCenter = 108 + (Kl - Y) * (118 - 108) / (Kl - Ymin)

        elif Y > Kh:
            WCr = WHCr + (Y - Ymax) * (Wcr - WHCr) / (Ymax - Kh)
            WCb = WHCb + (Y - Ymax) * (Wcb - WHCb) / (Ymax - Kh)

            CrCenter = 154 + (Y - Kh) * (154 - 132) / (Ymax - Kh)
            CbCenter = 108 + (Y - Kh) * (118 - 108) / (Ymax - Kh)

        if Y < Kl or Y > Kh:
            Cr = (Cr - CrCenter) * Wcr / WCr + 154
            Cb = (Cb - CbCenter) * Wcb / WCb + 108
        ########################################################################

        # skin color detection

        if Cb > 77 and Cb < 127 and Cr > 133 and Cr < 173:
            skin = 1
            # print 'Skin detected!'

        if 0 == skin:
            imgSkin.itemset((r,c,0),0)
            imgSkin.itemset((r,c,1),0)
            imgSkin.itemset((r,c,2),0)

# display original image and skin image
plt.subplot(1,2,1), plt.imshow(img), plt.title('Original Image'), plt.xticks([]), plt.yticks([])
plt.subplot(1,2,2), plt.imshow(imgSkin), plt.title('Transformed YCbCr Skin Image'), plt.xticks([]), plt.yticks([])
plt.show()
################################################################################

print 'Goodbye!'
3. 实验结果
HSV颜色空间和改进的YCbCr颜色空间的肤色检测如下图,单一的YCbCr颜色空间未做的原因是和HSV颜色空间差不多,分割后的结果相对支离破碎,YCbCr颜色空间中的像素做一系列的变换后使得在YCbCr空间中的肤色空间更加易于操作。论文作者Hsu等人通过训练数据得到模型中的参数值,笔者这里只是调用了他们的结果数据。如果更换其它图片后效果不好,可以修改转换后Cb和Cr值的判断区间,以及修改光照补偿的gamma值。

