Jenkins服务器安装与配置
Jenkins是一个非常出色的持续集成服务器,本文主要介绍在CentOS系统中Jenkins的基本安装配置方法,供参考。
一. 软件包:
1. 下载apache-maven-2.2.1-bin.tar
http://www.apache.org/dyn/closer.cgi/maven/binaries/apache-maven-2.2.1-bin.tar.gz
2. 下载jenkins: http://mirrors.jenkins-ci.org/war/ 列出了jenkins的所有release版本,请选择下载
二. 安装
本文假设操作用户为gistech。
1. 安装jdk
参考《CentOS系统中安装JDK1.6》。http://www.linuxidc.com/Linux/2013-05/84610.htm
2. 安装tomcat7
参考《CenOS系统中安装Tomcat7》。http://www.linuxidc.com/Linux/2013-05/84612.htm
修改tomcat配置文件
$ vi /home/gistech/tomcat/conf/server.xml
修改8080端口的Connector节点,增加如下配置
URIEncoding="UTF-8"
3. 安装maven
1) 解压$ tar -zvxf apache-maven-2.2.1-bin.tar.gz
2) 移动到其他目录
$ mv apache-maven-2.2.1 /home/gistech/maven
3) 配置环境变量
编辑.bash_profile文件
$ cd /home/gistech
$ vi .bash_profile
添加如下内容
MAVEN_HOME=$HOME/maven
PATH=$PATH:$HOME/bin:$MAVEN_HOME/bin

export MAVEN_HOME
export PATH
使环境变量生效
$ source .bash_profile
4) 验证是否安装成功
$ mvn -v
5) 配置maven
编辑maven的配置文件
$ cd maven/conf
$ vi settings.xml
修改配置文件示例如下:
<?xml version="1.0" encoding="UTF-8"?>
<settings xmlns="http://maven.apache.org/SETTINGS/1.0.0" xmlns:xsi="http://www.w3.org/2001/XMLSchema-instance" xsi:schemaLocation="http://maven.apache.org/SETTINGS/1.0.0 http://maven.apache.org/xsd/settings-1.0.0.xsd">
<localRepository>/home/gistech/~m2</localRepository>
<servers>
<server>
<username>admin</username>
<password>password</password>
</server>
</servers>
<mirrors>
<mirror>
<!-- This sends everything else to /public -->
<id>nexus</id>
<mirrorOf>central</mirrorOf>
<url>http://192.168.120.247:8081/nexus/content/repositories/public</url>
</mirror>
</mirrors>
<profiles>
<profile>
<id>nexus</id>
<!-- Enable snapshots for the built in central repo to direct -->
<!-- all requests to nexus via the mirror -->
<repositories>
<repository>
<id>central</id>
<url>http://192.168.120.247:8081/nexus/content/repositories/public</url>
<releases>
<enabled>true</enabled>
<updatePolicy>always</updatePolicy>
</releases>
<snapshots>
<enabled>true</enabled>
<updatePolicy>always</updatePolicy>
</snapshots>
</repository>
</repositories>
<pluginRepositories>
<pluginRepository>
<id>central</id>
<url>http://192.168.120.247:8081/nexus/content/repositories/public</url>
<releases>
<enabled>true</enabled>
<updatePolicy>always</updatePolicy>
</releases>
<snapshots>
<enabled>true</enabled>
<updatePolicy>always</updatePolicy>
</snapshots>
</pluginRepository>
</pluginRepositories>
</profile>
</profiles>
<activeProfiles>
<!-- make the profile active all the time -->
<activeProfile>nexus</activeProfile>
</activeProfiles>
<pluginGroups>
<!-- define the sonatype plugin group, so the nexus plugins will work without typing the groupId -->
<pluginGroup>org.sonatype.plugins</pluginGroup>
</pluginGroups>
</settings>
其中localRepository节点表示私服中下载的jar包存放路径,根据实际存放的路径修改。
所有url节点中包含的地址:http://192.168.120.247:8081/nexus/content/repositories/public,表示nexus私服的地址,请根据实际的地址修改。
username、password节点表示登录nexus私服的用户名及密码。
4、安装jenkins
1) 复制到tomcat webapps目录$ mv jenkins.war /home/gistech/tomcat/webapps
2) 配置环境变量
编辑.bash_profile文件
添加如下内容
JENKINS_HOME=$HOME/tomcat/webapps/jenkins

export JENKINS_HOME
使环境变量生效
source .bash_profile
3) 启动tomcat,使用http://localhost:8080/jenkins访问jenkins
三、jenkins的基本配置
1、全局配置
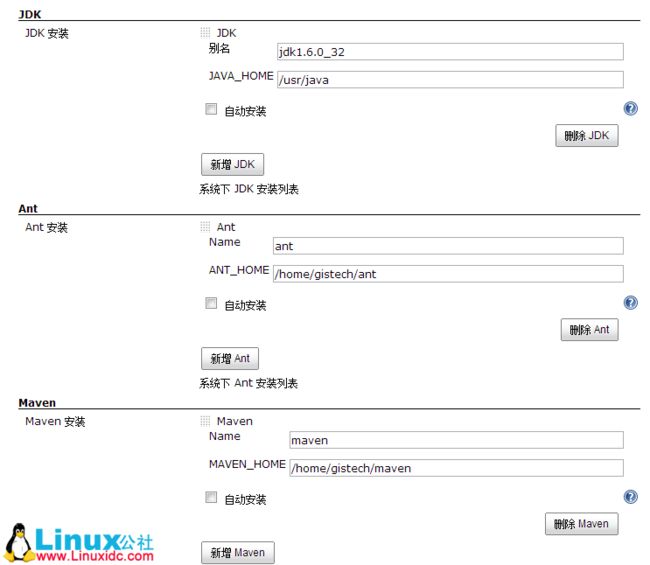
单击首页左边的“系统管理”,进入“系统设置”,在这里对jenkins进行全局设置
1) JDK安装。如果没有读取出系统变量,就手动设置好别名和JAVA_HOME就可以了
2) Maven同理
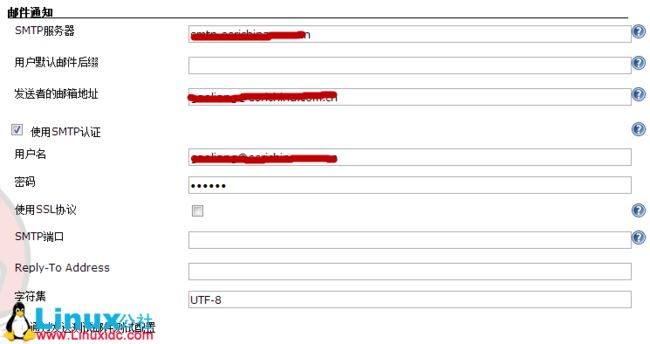
3) 配置管理员邮件通知
配置方式如下图:
配置完成后可以点击"通过发送测试邮件测试配置"按钮进行测试。
2、创建job
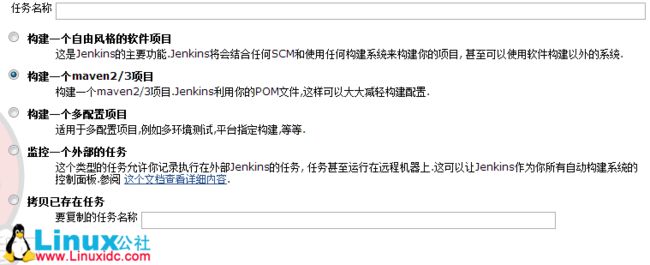
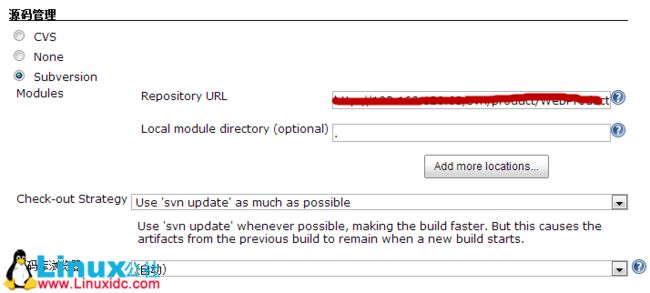
1) 在页面中点击“新job”,输入任务名称,选择“构建一个maven2/3项目”,如下图: 2) 点击ok按钮进入任务配置页面,首先配置项目的svn地址,如下图:
3) 配置maven的pom文件位置,可以使用相对路径(相对于svn地址库中的位置),如下图:
4) 配置maven编译参数,如下图所示不执行单元测试:
关于maven的编译参数可参考Maven基本命令
3、邮件通知
构建邮件通知配置如下图,Recipients栏目中添加需要发送邮件通知的邮件地址。
4、定时构建
构建触发器可以配置构建的时间,如果需要定时构建,可以选择 Build periodically,日程表参数解释如下:- 第一个参数代表的是分钟 minute,取值 0~59;
- 第二个参数代表的是小时 hour,取值 0~23;
- 第三个参数代表的是天 day,取值 1~31;
- 第四个参数代表的是月 month,取值 1~12;
- 最后一个参数代表的是星期 week,取值 0~7,0 和 7 都是表示星期天。
如0 * * * * 表示的就是每个小时的第 0 分钟执行一次构建。
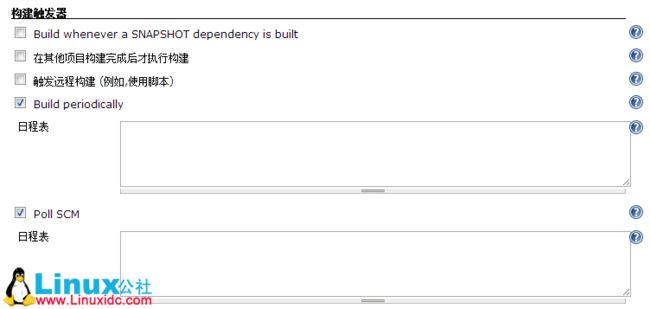
5、版本更新构建
很多情况需要jenkins定时轮询版本库,只要有版本更新就触发构建,jenkins提供了Poll SCM支持版本更新构建,如上图,配置参数与定时构建的参数一样,如*/5 * * * *表示每隔5分钟轮询一次,检查版本库是否更新。
