看到 Android Weekly 最新一期有一篇文章:Tinting drawables,使用 ColorFilter 手动打造了一个TintBitmapDrawable,之前也看到有些文章使用这种方式来实现 Drawable 着色或者实现类似的功能。但是,这种方案并不完善,本文将介绍一个完美的后向兼容方案。
解决方案
其实在 Android Support V4 的包中提供了 DrawableCompat 类,我们很容易写出如下的辅助方法来实现 Drawable 的着色,如下:
public static Drawable tintDrawable(Drawable drawable, ColorStateList colors) {
    final Drawable wrappedDrawable = DrawableCompat.wrap(drawable);
    DrawableCompat.setTintList(wrappedDrawable, colors);
    return wrappedDrawable;
}
使用例子:
EditText editText1 = (EditText) findViewById(R.id.edit_1);
final Drawable originalDrawable = editText1.getBackground();
final Drawable wrappedDrawable = tintDrawable(originalDrawable, ColorStateList.valueOf(Color.RED));
editText1.setBackgroundDrawable(wrappedDrawable);

EditText editText2 = (EditText) findViewById(R.id.edit_2);
editText2.setBackgroundDrawable(tintDrawable(editText2.getBackground(),
        ColorStateList.valueOf(Color.parseColor("#03A9F4"))));
这种方式支持几乎所有的 Drawable 类型,并且能够完美兼容几乎所有的 Android 版本。
优化
使用 ColorStateList 着色
这种方式支持使用 ColorStateList 着色,这样我们还可以根据 View 的状态着色成不同的颜色。
对于上面的 EditText 的例子,我们就可以优化一下,根据它是否获得焦点,设置成不同的颜色。我们新建一个res/color/edittext_tint_colors.xml 如下:
<?xml version="1.0" encoding="utf-8"?>
<selector xmlns:android="http://schemas.android.com/apk/res/android">
    <item android:color="@color/red" android:state_focused="true" />
    <item android:color="@color/gray" />
</selector>
代码改成这样:
editText2.setBackgroundDrawable(tintDrawable(editText2.getBackground(),
    getResources().getColorStateList(R.color.edittext_tint_colors)));
BitmapDrawable 的优化
首先来看一下问题。原始的 Icon 如下图所示:
我们使用两个 ImageView,一个不做任何处理,一个使用如下代码着色:
ImageView imageView = (ImageView) findViewById(R.id.image_1);
final Drawable originalBitmapDrawable = getResources().getDrawable(R.drawable.icon);
imageView.setImageDrawable(tintDrawable(originalBitmapDrawable, ColorStateList.valueOf(Color.MAGENTA)));
效果如下:
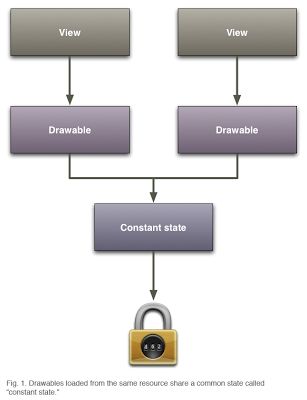
怎么回事?我明明只给后面的一个设置了着色的 Drawable,为什么两个都被着色了?这是因为 Android 为了优化系统性能,资源 Drawable 只有一份拷贝,你修改了它,等于所有的都修改了。如果你给两个 View 设置同一个资源,它的状态是这样的:
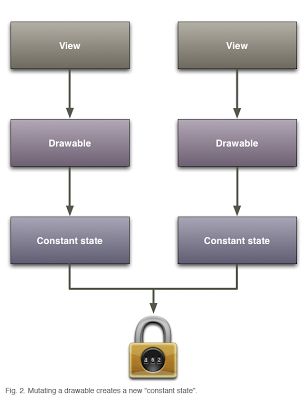
也是就是他们是共享状态的。幸运的是,Drawable 提供了一个方法 mutate(),来打破这种共享状态,等于就是要告诉系统,我要修改(mutate)这个 Drawable。给 Drawable 调用 mutate() 方法以后。他们的关系就变成如下的图所示:
我们修改一下代码:
ImageView imageView = (ImageView) findViewById(R.id.image_1);
final Drawable originalBitmapDrawable = getResources().getDrawable(R.drawable.icon).mutate();
imageView.setImageDrawable(tintDrawable(originalBitmapDrawable, ColorStateList.valueOf(Color.MAGENTA)));
非常完美,达到了我们之前想要的效果。
你可能会有这样的担心,调用 mutate() 是不是在内存中把 Bitmap 拷贝了一份?其实不是这样的,还是公用的 Bitmap,只是拷贝了一份状态值,这个数据量很小,所以不用担心。详细情况可以参考这篇文章:Drawable mutations。
EditText 光标着色
通过前面的方法,我们已经可以把 EditText 的背景着色(Tint)成了任意想要的颜色。但是仔细一看,还有点问题,输入的时候,光标的颜色还是原来的颜色,如下图所示:
在 Android 3.1 (API 12) 开始就支持了 textCursorDrawable,也就是可以自定义光标的 Drawable。遗憾的是,这个方法只能在 xml 中使用,这和本文没有啥关系,具体使用可以参考这个回答,并没有提供接口来动态修改。
我们有一个比较折中的方案,就是通过反射机制,来获得 CursorDrawable,然后通过本文的方法,来对这个 Drawable 着色。
public static void tintCursorDrawable(EditText editText, int color) {
    try {
        Field fCursorDrawableRes = TextView.class.getDeclaredField("mCursorDrawableRes");
        fCursorDrawableRes.setAccessible(true);
        int mCursorDrawableRes = fCursorDrawableRes.getInt(editText);
        Field fEditor = TextView.class.getDeclaredField("mEditor");
        fEditor.setAccessible(true);
        Object editor = fEditor.get(editText);
        Class<?> clazz = editor.getClass();
        Field fCursorDrawable = clazz.getDeclaredField("mCursorDrawable");
        fCursorDrawable.setAccessible(true);

        if (mCursorDrawableRes <= 0) {
            return;
        }

        Drawable cursorDrawable = editText.getContext().getResources().getDrawable(mCursorDrawableRes);
        if (cursorDrawable == null) {
            return;
        }

        Drawable tintDrawable  = tintDrawable(cursorDrawable, ColorStateList.valueOf(color));
        Drawable[] drawables = new Drawable[] {tintDrawable, tintDrawable};
        fCursorDrawable.set(editor, drawables);
    } catch (Throwable ignored) {
    }
}
原理比较简单,就是直接获得到 EditText 的 mCursorDrawableRes,然后通过这个 id 获取到对应的 Drawable,调用我们的着色函数 tintDrawable,然后设置进去。效果如下:
原理分析
上面就是我们的全部的解决方案,我们接下来分析一下 DrawableCompat 着色相关的源码,理解其中的原理。再来回顾一下我们写的 tintDrawable 函数,里面只调用了 DrawableCompat 的两个方法。下面我们详细分析这两个方法。
首先通过 DrawableCompat.wrap() 获得一个封装的 Drawable:
// android.support.v4.graphics.drawable.DrawableCompat.java
public static Drawable wrap(Drawable drawable) {
    return IMPL.wrap(drawable);
}
调用了 IMPL 的 wrap 函数,IMPL 的实现如下:
/**
 * Select the correct implementation to use for the current platform.
 */
static final DrawableImpl IMPL;
static {
    final int version = android.os.Build.VERSION.SDK_INT;
    if (version >= 23) {
        IMPL = new MDrawableImpl();
    } else if (version >= 22) {
        IMPL = new LollipopMr1DrawableImpl();
    } else if (version >= 21) {
        IMPL = new LollipopDrawableImpl();
    } else if (version >= 19) {
        IMPL = new KitKatDrawableImpl();
    } else if (version >= 17) {
        IMPL = new JellybeanMr1DrawableImpl();
    } else if (version >= 11) {
        IMPL = new HoneycombDrawableImpl();
    } else {
        IMPL = new BaseDrawableImpl();
    }
}
很明显,这是根据不同的 API Level 选择不同的实现类,再往下看一点,发现 API Level 大于等于 22 的继承于LollipopMr1DrawableImpl,我们来看一下它的 wrap() 的实现:
static class LollipopMr1DrawableImpl extends LollipopDrawableImpl {
    @Override
    public Drawable wrap(Drawable drawable) {
        return DrawableCompatApi22.wrapForTinting(drawable);
    }
}

class DrawableCompatApi22 {

    public static Drawable wrapForTinting(Drawable drawable) {
        // We don't need to wrap anything in Lollipop-MR1
        return drawable;
    }

}
因为 API 22 开始 Drwable 本来就支持了 Tint,不需要做任何封装了。
我们来看一下它的 wrap() 都是返回一个封装了一层的 Drawable,我们以 BaseDrawableImpl 为例分析:
static class BaseDrawableImpl implements DrawableImpl {
    ...
    @Override
    public Drawable wrap(Drawable drawable) {
        return DrawableCompatBase.wrapForTinting(drawable);
    }
    ...
}
这里调用了 DrawableCompatBase.wrapForTinting(),实现如下:
class DrawableCompatBase {
    ...
    public static Drawable wrapForTinting(Drawable drawable) {
        if (!(drawable instanceof DrawableWrapperDonut)) {
           return new DrawableWrapperDonut(drawable);
        }
        return drawable;
    }
}
实际上这里是返回了一个 DrawableWrapperDonut 的封装对象。同理分析其他 API Level 小于 22 的最后实现,发现最后都是返回一个继承于 DrawableWrapperDonut 的对象。
回到最开始的代码,我们分析 DrawableCompat.setTintList() 的实现,其实是调用了 IMPL.setTintList(),通过前面的分析我们知道,只有 API Level 小于 22 的才要做特殊的处理,我们还是以 BaseDrawableImpl 为例分析:
static class BaseDrawableImpl implements DrawableImpl {
    ...
    @Override
    public void setTintList(Drawable drawable, ColorStateList tint) {
        DrawableCompatBase.setTintList(drawable, tint);
    }
    ...
}
这里调用了 DrawableCompatBase.setTintList():
class DrawableCompatBase {
    ...
    public static void setTintList(Drawable drawable, ColorStateList tint) {
        if (drawable instanceof DrawableWrapper) {
            ((DrawableWrapper) drawable).setTintList(tint);
        }
    }
}
通过前面的分析,我们知道,这里传入的 Drawable 都是 DrawableWrapperDonut 的子类,所以实际上就是调用了DrawableWrapperDonut 的 setTintList():
@Override
public void setTintList(ColorStateList tint) {
    mTintList = tint;
    updateTint(getState());
}

private boolean updateTint(int[] state) {
    if (mTintList != null && mTintMode != null) {
        final int color = mTintList.getColorForState(state, mTintList.getDefaultColor());
        final PorterDuff.Mode mode = mTintMode;
        if (!mColorFilterSet || color != mCurrentColor || mode != mCurrentMode) {
            setColorFilter(color, mode);
            mCurrentColor = color;
            mCurrentMode = mode;
            mColorFilterSet = true;
            return true;
        }
    } else {
        mColorFilterSet = false;
        clearColorFilter();
    }
    return false;
}
看到这里最终是调用了 Drawable 的 setColorFilter() 方法。可以看到,这里和最开始提到的那篇文章的原理是一致的,但是这里处理更加细致,考虑更加全面。
通过源码分析,感觉到可能这才是做 Android 后向兼容库的正确姿势吧。转自http://www.race604.com/tint-drawable/


