Windows phone 7之页面布局
Windows phone的页面布局方式一般是依赖布局控件实现的,而布局控件有三种Grid,StackPanel和Canvas
Grid是网格布局方式,相当于一个表格,有行和列,新建一个Windows phone项目,打开MainPage.xaml,页面呈现内容的核心代码如下
<Grid x:Name="LayoutRoot" Background="Transparent">
        <Grid.RowDefinitions>
            <RowDefinition Height="Auto"/>
            <RowDefinition Height="*"/>
        </Grid.RowDefinitions>

        <!--TitlePanel contains the name of the application and page title-->
        <StackPanel x:Name="TitlePanel" Grid.Row="0" Margin="12,17,0,28">
            <TextBlock x:Name="ApplicationTitle" Text="MY APPLICATION" Style="{StaticResource PhoneTextNormalStyle}"/>
            <TextBlock x:Name="PageTitle" Text="page name" Margin="9,-7,0,0" Style="{StaticResource PhoneTextTitle1Style}"/>
        </StackPanel>

        <!--ContentPanel - place additional content here-->
        <Grid x:Name="ContentPanel" Grid.Row="1" Margin="12,0,12,0"></Grid>
    </Grid>
看到代码中用的了两种布局方式Grid和StackPanel,这也是windows phone最常用的两种布局方式,在布局中Canvas不常用,当然这不代表他没用,在一些xaml绘制logo,那Canvas在核实不过了,Grid和StackPanel无法将之取代。
1、Grid
看下面的代码
<Grid x:Name="LayoutRoot" Background="Transparent">
        <Grid.RowDefinitions>
            <RowDefinition Height="Auto"/>
            <RowDefinition Height="*"/>
        </Grid.RowDefinitions>

        <!--TitlePanel contains the name of the application and page title-->
        <StackPanel x:Name="TitlePanel" Grid.Row="0" Margin="12,17,0,28">
            <TextBlock x:Name="ApplicationTitle" Text="MY APPLICATION" Style="{StaticResource PhoneTextNormalStyle}"/>
            <TextBlock x:Name="PageTitle" Text="Grid" Margin="9,-7,0,0" Style="{StaticResource PhoneTextTitle1Style}"/>
        </StackPanel>

        <!--ContentPanel - place additional content here-->
        <Grid x:Name="ContentPanel" Grid.Row="1" Margin="12,0,12,0">
            <Grid.RowDefinitions>
                <RowDefinition/>
                <RowDefinition/>
                <RowDefinition/>
            </Grid.RowDefinitions>
            <Grid.ColumnDefinitions>
                <ColumnDefinition/>
                <ColumnDefinition/>
                <ColumnDefinition/>
            </Grid.ColumnDefinitions>
            <TextBlock Text="left top"/>
            <TextBlock Grid.Column="1" Text="center top"/>
            <TextBlock Grid.Column="2" Text="right top"/>
            <TextBlock Grid.Row="1" Text="left center"/>
            <TextBlock Grid.Row="1" Grid.Column="1" Text="center center"/>
            <TextBlock Grid.Row="1" Grid.Column="2"  Text="right center"/>
            <TextBlock Grid.Row="2" Text="left bottom"/>
            <TextBlock Grid.Row="2" Grid.Column="1"  Text="center bottom"/>
            <TextBlock Grid.Row="2" Grid.Column="2"  Text="right bottom"/>
        </Grid>
    </Grid>
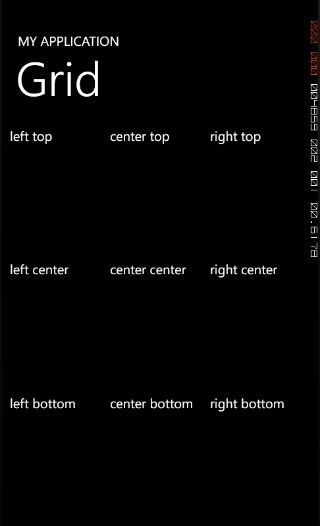
运行效果如下图
在name为ContentPanel的Grid中加入三行三列,<Grid.RowDefinitions>也是一个容器,在内部放几个RowDefinition,就表明Grid有几行,<Grid.ColumnDefinitions>中放几个ColumnDefinition就有几列看
还有就是,RowDefinition只是用来定义列的,列中的内容不是直接放在RowDefinition标签下,而是放在Grid标签下,通过Grid.Row和Grid.Column来定义内容属于哪一行哪一列,默认是第0行,第0列,所以如果是放在0行Grid.Row可以不用写,如果是放在0列Grid.Column不用写,就想上面的代码。
Grid中RowDefinition能够定义Height属性,表示高度,不能定义宽度,ColumnDefinition能够定义Width,表示宽度,不能定义高度,所以最终的宽度和高度是两者共同决定的
Height和Width属性是枚举类型,可以有三个选项,填入具体是,就是固定的高或宽,填入Auto关键字,就是根据行和咧中的子空间的高和宽决定,一最大的为准,填入星号*,就是占据剩余部分,比如我第一行,Height填入100,升入两行诗*,则表明第一行为100,二三行平分Grid剩余的部分,比如Grid的Height是500,那剩余的部分就是400,而三行每行200.
实际中很少出现特别正规的行列分布,往往有的子控件要跨行或跨列,Grid.RowSpan表示跨行,Grid.ColumnSpan表示跨列
看下面的代码
<Grid x:Name="ContentPanel" Grid.Row="1" Margin="12,0,12,0">
            <Grid.RowDefinitions>
                <RowDefinition/>
                <RowDefinition/>
                <RowDefinition/>
            </Grid.RowDefinitions>
            <Grid.ColumnDefinitions>
                <ColumnDefinition/>
                <ColumnDefinition/>
                <ColumnDefinition/>
            </Grid.ColumnDefinitions>
            <TextBlock Grid.RowSpan="2" VerticalAlignment="Center" Text="left top"/>
            <TextBlock Grid.Column="1" Text="center top"/>
            <TextBlock Grid.Column="2" Text="right top"/>
            <TextBlock Grid.Row="1" Grid.Column="1" Text="center center"/>
            <TextBlock Grid.Row="1" Grid.Column="2"  Text="right center"/>
            <TextBlock Grid.Row="2" Text="left bottom"/>
            <TextBlock Grid.Row="2" Grid.ColumnSpan="2" HorizontalAlignment="Center" Grid.Column="1"  Text="center bottom"/>
        </Grid>
运行效果如下图
2、StackPanel
StackPanel是一个比较简单的容器,可以将子控件进行横排或竖排(默认是竖排),不能同时横排和竖排,如果是想实现横排和竖排一起出现的效果,就要使用子控件嵌套活着布局控件嵌套
Orientation属性是一个枚举类型,Horizontal表示横排,Vertical表示竖排
看下面的代码和运行效果
<Grid x:Name="ContentPanel" Grid.Row="1" Margin="12,0,12,0">
            <Grid.RowDefinitions>
                <RowDefinition Height="100"/>
                <RowDefinition/>
            </Grid.RowDefinitions>
            <StackPanel Orientation="Horizontal">
                <TextBlock Text="left" Width="100"/>
                <TextBlock Text="center" Width="100"/>
                <TextBlock Text="right" Width="100"/>
            </StackPanel>
            <StackPanel Orientation="Vertical" Grid.Row="1">
                <TextBlock Text="top" Height="100"/>
                <TextBlock Text="center" Height="100"/>
                <TextBlock Text="bottom" Height="100"/>
            </StackPanel>
        </Grid>
3、Canvas
Canvas是画布布局方式,是一个绝对定位的布局控件,他是以左上角(0,0)为标准,将子控件摆放到其中,用Cancas.eft和Cancas.Right决定距离左上角的偏移量,可以是负值,如果出现控件重叠的状况可以通过Canvas.Zindex属性控制,Zindex大的会覆盖小的
看下面代码和运行效果
<Canvas>
                <TextBlock Canvas.Left="0" Canvas.Top="10" Text="textblock1"/>
                <StackPanel Canvas.ZIndex="2" Canvas.Left="0" Canvas.Top="10" Background="Red">
                    <TextBlock Text="hello"/>
                </StackPanel>
                <TextBlock Canvas.Left="100" Canvas.Top="100" Text="textblock2"/>
                <TextBlock Canvas.Left="300" Canvas.Top="300" Text="textblock3"/>
            </Canvas>
另外,每个控件都有布局的属性,Margin之类的接下来的文章中将介绍不同控件的用法和属性,会介绍布局属性,今天的内容中,有关布局属性,不是很明白的童鞋不用急


