iOS-UICollectionView的简单使用(原创)
前言
UICollectionView是一种新的数据展示方式,简单来说可以把他理解成多列的UITableView(请一定注意这是UICollectionView的最最简单的形式)。如果你用过iBooks的话,可能你还对书架布局有一定印象:一个虚拟书架上放着你下载和购买的各类图书,整齐排列。其实这就是一个UICollectionView的表现形式,或者iPad的iOS6中的原生时钟应用中的各个时钟,也是UICollectionView的最简单的一个布局。
基础知识
一.创建UICollectionView的常用方法
1.创建cell以及header,footer
使用代码创建
- registerClass:forCellWithReuseIdentifier: - registerClass:forSupplementaryViewOfKind:withReuseIdentifier:
使用xib创建 - registerNib:forCellWithReuseIdentifier: - registerNib:forSupplementaryViewOfKind:withReuseIdentifier:
复用cell - dequeueReusableCellWithReuseIdentifier:forIndexPath: - dequeueReusableSupplementaryViewOfKind: :withReuseIdentifier:forIndexPath:
2.获取Collection View中的Item及位置 - indexPathForItemAtPoint: - indexPathsForVisibleItems - indexPathForCell: - cellForItemAtIndexPath:
3.获取Collection View的状态 - numberOfSections - numberOfItemsInSection:
二:代理方法
1.UICollectionViewDelegate
1.处理选择的Cells
- collectionView:shouldSelectItemAtIndexPath:
- collectionView:didSelectItemAtIndexPath:
- collectionView:shouldDeselectItemAtIndexPath:
- collectionView:didDeselectItemAtIndexPath:
2.处理Cells的高亮
- collectionView:shouldHighlightItemAtIndexPath:
- collectionView:didHighlightItemAtIndexPath:
- collectionView:didUnhighlightItemAtIndexPath:
2.UICollectionViewDataSource
1.获取Section和Item的数量
- collectionView:numberOfItemsInSection:
- numberOfSectionsInCollectionView:
2.获取Items的视图
- collectionView:cellForItemAtIndexPath:
- collectionView:viewForSupplementaryElementOfKind: atIndexPath:
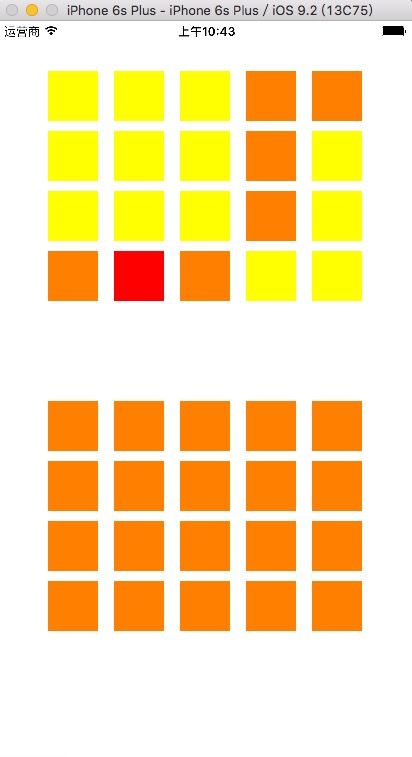
关于学习UICollectionView我们可以和UITableView进行对比着学习 下面我们来写一个简单的小例子 来具体使用一下这些方法 要实现的效果如下图
1.初始化视图布局对象 导入代理 这里要说的是UICollectionView 有三个代理方法 可以根据实际情况进行导入
<1>UICollectionViewDataSource
<2>UICollectionViewDelegate
<3>UICollectionViewDelegateFlowLayout
- (void)viewDidLoad {
    [super viewDidLoad];
    //初始化一个视图布局对象
    UICollectionViewFlowLayout *flowLayout = [[UICollectionViewFlowLayout alloc]init];
    UICollectionView *collectionView = [[UICollectionView alloc]initWithFrame:self.view.frame collectionViewLayout:flowLayout];
    collectionView.backgroundColor = [UIColor whiteColor];
    collectionView.dataSource = self;
    collectionView.delegate = self;
    [self.view addSubview:collectionView];
    //注册cell 必须要有
    [collectionView registerClass:[UICollectionViewCell class] forCellWithReuseIdentifier:@"UICollectionViewCell"];
}
2.实现具体的代理方法 以下代码中有详情注释
//定义展示UICollectionViewCell的个数
- (NSInteger)collectionView:(UICollectionView *)collectionView numberOfItemsInSection:(NSInteger)section{
    return 20;
}
//定义展示section的个数
- (NSInteger)numberOfSectionsInCollectionView:(UICollectionView *)collectionView{
    return 2;
}
//cell
- (UICollectionViewCell *)collectionView:(UICollectionView *)collectionView cellForItemAtIndexPath:(NSIndexPath *)indexPath{
    static NSString *cellID = @"UICollectionViewCell";
    UICollectionViewCell *cell = [collectionView dequeueReusableCellWithReuseIdentifier:cellID forIndexPath:indexPath];
    cell.backgroundColor = [UIColor orangeColor];

    return cell;
}
//定义每个item的大小
-(CGSize)collectionView:(UICollectionView *)collectionView layout:(UICollectionViewLayout *)collectionViewLayout sizeForItemAtIndexPath:(NSIndexPath *)indexPath{

    return CGSizeMake(50, 50);
}
//上左下右  每一组之间的间距
-(UIEdgeInsets)collectionView:(UICollectionView *)collectionView layout:(UICollectionViewLayout *)collectionViewLayout insetForSectionAtIndex:(NSInteger)section{
    //对组进行操作
    return UIEdgeInsetsMake(50, 50, 50, 50);
}
//UICollectionView被选中时调用的方法
-(void)collectionView:(UICollectionView *)collectionView didSelectItemAtIndexPath:(NSIndexPath *)indexPath
{
    UICollectionViewCell * cell = (UICollectionViewCell *)[collectionView cellForItemAtIndexPath:indexPath];
    //临时改变个颜色,看好,只是临时改变的。如果要永久改变,可以先改数据源,然后在cellForItemAtIndexPath中控制。(和UITableView差不多吧!O(∩_∩)O~)
    cell.backgroundColor = [UIColor redColor];
    NSLog(@"item======%ld",(long)indexPath.item);
    NSLog(@"row=======%ld",indexPath.row);
    NSLog(@"section===%ld",indexPath.section);
}
//点击cell 对上一个cell进行操作 // 取消选中操作
- (void)collectionView:(UICollectionView *)collectionView didDeselectItemAtIndexPath:(NSIndexPath *)indexPath{

     UICollectionViewCell * cell = (UICollectionViewCell *)[collectionView cellForItemAtIndexPath:indexPath];
    cell.backgroundColor = [UIColor yellowColor];

}
//返回这个UICollectionView是否可以被选择
-(BOOL)collectionView:(UICollectionView *)collectionView shouldSelectItemAtIndexPath:(NSIndexPath *)indexPath
{
    return YES;
}
// 设置最小行间距,也就是前一行与后一行的中间最小间隔
- (CGFloat)collectionView:(UICollectionView *)collectionView layout:(UICollectionViewLayout*)collectionViewLayout minimumLineSpacingForSectionAtIndex:(NSInteger)section {
    return 10;
}

// 设置最小列间距,也就是左行与右一行的中间最小间隔
- (CGFloat)collectionView:(UICollectionView *)collectionView layout:(UICollectionViewLayout*)collectionViewLayout minimumInteritemSpacingForSectionAtIndex:(NSInteger)section {
    return 10;
}
// 设置是否允许取消选中
- (BOOL)collectionView:(UICollectionView *)collectionView shouldDeselectItemAtIndexPath:(NSIndexPath *)indexPath {
    NSLog(@"%s", __FUNCTION__);
    return YES;
}
// 由高亮转成非高亮完成时的回调
- (void)collectionView:(UICollectionView *)collectionView didUnhighlightItemAtIndexPath:(NSIndexPath *)indexPath {
    NSLog(@"%s", __FUNCTION__);
}
// 高亮完成后回调
- (void)collectionView:(UICollectionView *)collectionView didHighlightItemAtIndexPath:(NSIndexPath *)indexPath {
    NSLog(@"%s", __FUNCTION__);
}
// 允许选中时,高亮
- (BOOL)collectionView:(UICollectionView *)collectionView shouldHighlightItemAtIndexPath:(NSIndexPath *)indexPath {
    NSLog(@"%s", __FUNCTION__);
    return YES;
}
总结一下 这些代理方法 可以根据开发中的实际情况进行选择 当然也有像UITableView那样的自定义Cell 只需要继承至UICollectionViewCell即可。
